Prerequisites
There are only two necessary steps before we embark on installing RDS. Those are:
- All servers are domain joined
- There are at least two available servers
The reason that we need two servers is that the RD Licensing role will go on the second server rather than all on one, as this is considered a Microsoft best practice. In this tutorial, we use the Domain Controller as the RD License server which would not be considered best practice. The reason for doing this in this tutorial is to keep the installation simple.
Installation of Remote Desktop Services base roles
In this first installation series, we are going to add the following roles to our primary RDS server:
- RD Connection Broker
- RD Web Access
- RD Session Host
Installation steps
- Within Server Manager on the primary RDS server that we are installing, open the Add Roles and Features Wizardand select Remote Desktop Services installation.
2. For this tutorial we are going to choose Quick Start, but if you need further control over the installation process, you can use the Standard Deployment to modify more options during installation.
3. Next, we will choose Session-based desktop deployment, as this is a common RemoteApp and desktop session model that is commonly used in more traditional RDS deployments.
4. In the Server Selection, choose the server where we are installing RDS.
5. Choose Restart the destination server automatically if required and click on Deploy to start the installation.
6. Verify that all roles have succeeded in installation before moving on to the next steps.
Add secondary server
For this tutorial, we are going to use the Domain Server as our RD Licensing server, but to easily install that role, we can add an additional server to the Server Manager.
- Add the secondary server by right-clicking on the All Servers, choosing Add Servers, and then picking the server from Active Directory.
2. Navigate to Remote Desktop Services and click on the green plus for RD Licensing.
3. The Add RD Licensing Servers screen will appear and that will let you add the secondary server as a target for the RD Licensing role.
4. Click on Add to install the role on the secondary server.
5. Verify that the installation is complete by seeing the green plus replaced by the proper icon in RD Licensing.
Add RD Gateway Role
Finally, we need to add the RD Gateway Role to our primary RDS server.
- Under the Remote Desktop Services screen, click on the green plus over RD Gateway.
- Select the primary RDS server to use for the installation of this role.
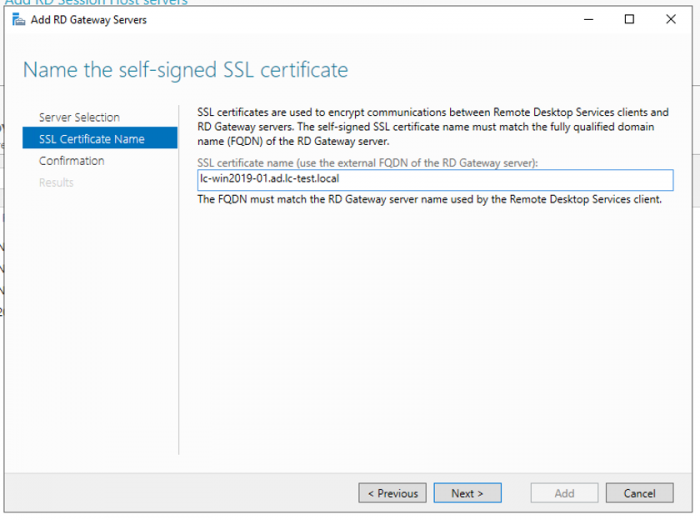
3. Name the self-signed SSL certificate with a Fully-Qualified Domain Name.
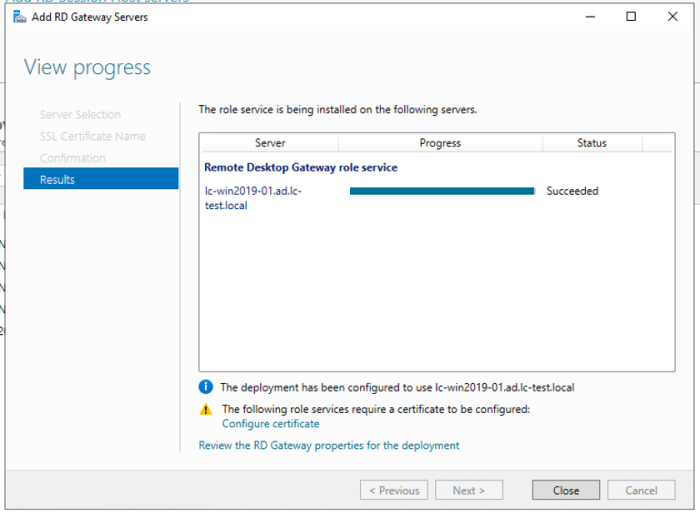
4. Click on Next and then Add to install the role to our primary RDS server.
Configure deployment properties
Now that all the roles have been installed, we can configure the actual deployment properties.
- Navigate to the Remote Desktop Services screen and under the Tasks dropdown, click on Edit Deployment Properties.
2. Leave the default settings on the RD Gateway screen and click on the RD Licensing menu item.
3. Choose Per User at the RD Licensing screen. You can choose either, but for the purposes of this tutorial, we want Per User.
4. Note the URL of the RD Web Access screen as this will be used later to access the applications deployed.
5. For the purposes of testing, you can leave the certificates Not Configured, and finally click on OK to save the deployment configuration.
If you do want to configure a certificate, you will have to do this for each and every role service individually
Verify Remote Desktop Services
By default, a QuickSessionCollection was created upon installation that contains Calculator, WordPad, and Paint as RemoteApps. This can be used to test the RDP deployment.
- Navigate to the IIS URL originally located in RD Web Access, or you can use https://localhost/rdweb/ if you are located on the RDP server itself, to test IIS.
2. Log into the IIS RDS session using domain credentials.
3. Finally, launch a remote connection, either one you have defined or a default RemoteApp.
Remote Desktop Services may have a lot of steps to deploy, but once setup, it is easy to configure and use. RemoteApps offer a lot of flexibility as does the ability to define collections of RDP connections that can be offered to users.


