In de Sphere Client: Install/update VMware Tools Op de VM console op de command line,mkdir /cdrom mount de virtuele cdrom van stap 1; mount /dev/cdrom /cdrom cd /tmp tar -xvf /cdrom/VMwareTools (tab om automatisch aan te vullen) cd vmware (tab om automatisch aan te vullen) ./vmware-install.pl accepteer de defaults, Indien nodig installeer perl umount /cdrom
Auteur: diode Laatst bijgewerkt:01-04-2019 17:41
Install VMware tools on Windows Server Core 2012R2
Install/upgrade VMWare tools Dan op de commandline D:\.\setup64.exe /S /v"/qn REBOOT=Y" indien nodig shutdown -r -t 1
Auteur: diode Laatst bijgewerkt:01-04-2019 18:02
VMware tools may not install on Windows after upgrade VMware
VMware Tools may not install on a Windows guest operating system after upgrading to a newer version of ESX/ESXi (1012693) | VMware KB This is an issue with Microsoft Windows Installer and does not affect all Windows 2008/2003 systems. The problem can occur when the original install path from the older version of VMware Tools is invalid, such as if the install path was E:\ and that path is no longer present. For more information, see the Microsoft Knowledge Base article To resolve this issue, you must perform a forced uninstall and reinstall of VMware Tools. To uninstall and reinstall VMware Tools: Right-click the virtual machine and click Guest > Install/Upgrade VMware Tools. Open a Console to the virtual machine and log into the guest operating system. Click Start > Run, type cmd, and click OK. A Command Prompt window opens. Change the drive to your CD-ROM drive (For example, D:\). Type setup /c and press Enter to force removal of all registry entries and delete the old version of VMware Tools. Note: For 64-bit guest operating systems, type setup64 /c Open My Computer and double-click the CD-ROM that contains VMware Tools. After Auto-Run starts, follow the prompts to install.
Note: This must be done from the GUI interface. Do not launch the install by running Setup from the Command Prompt. Also ensure that the CD-ROM is enabled. In the virtual machine properties select CD-ROM under Device Status, and ensure that Connected (if the virtual machine is powered on) and Connect at power on are selected.
When the installation completes, reboot the guest operating system.
Fusion 11.x Workstation Pro 15.x Workstation Player 15.x
15
ESXi 6.9.1 ESXi 6.8.7 ESXi 6.7 U2
14
ESXi 6.7 Fusion 10.x Workstation Pro 14.x Workstation Player 14.x
13
ESXi 6.5
12
Fusion 8.x Workstation Pro 12.x Workstation Player 12.x
11
ESXi 6.0 Fusion 7.x Workstation 11.x Player 7.x
10
ESXi 5.5 Fusion 6.x Workstation 10.x Player 6.x
9
ESXi 5.1 Fusion 5.x Workstation 9.x Player 5.x
8
ESXi 5.0 Fusion 4.x Workstation 8.x Player 4.x
7
ESXi/ESX 4.x Fusion 3.x Fusion 2.x Workstation 7.x Workstation 6.5.x Player 3.x Server 2.x
6
Workstation 6.0.x
4
ESX 3.x ACE 2.x Fusion 1.x Player 2.x
3 and 4
ACE 1.x Lab Manager 2.x Player 1.x Server 1.x Workstation 5.x Workstation 4.x
3
ESX 2.x GSX Server 3.x
Auteur: diode Laatst bijgewerkt:22-06-2020 21:37
ESXi 6.5 remove Host Client Web Interface session timeout
In VMware ESXi 6.5 the Host Client Web Interface session timeouts automatically every 15 minutes and then you have to log back in to the ESXi Host Client Web Interface again.
To avoid this tedious situation you can increase the session timeout changing an advanced configuration parameter in the ESXi Host Client Web Interface.
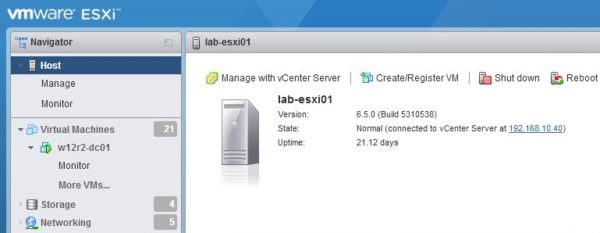
Using your favorite browser, log in to the web interface.
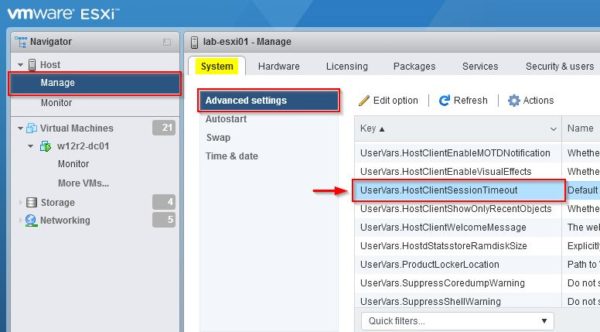
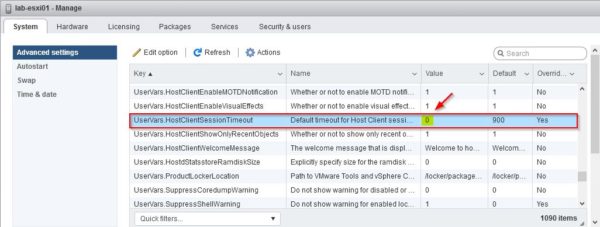
Navigate to Host > Manage > System > Advanced Settings and scroll down on the right side searching for the key UserVars.HostClientSessionTimeout.
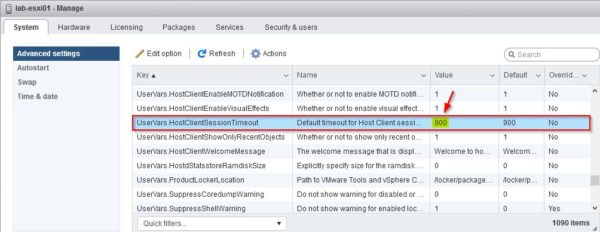
The default value for UserVars.HostClientSessionTimeout key is set to 900 (value in seconds). After 15 minutes you will be logged out.
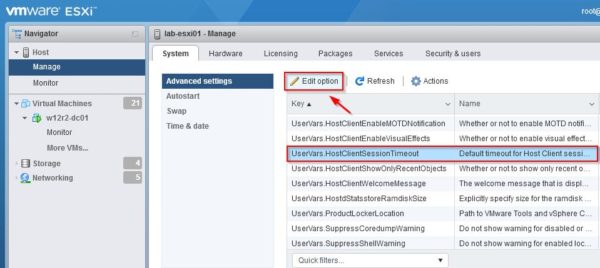
To change the timeout, click on Edit Settings button.
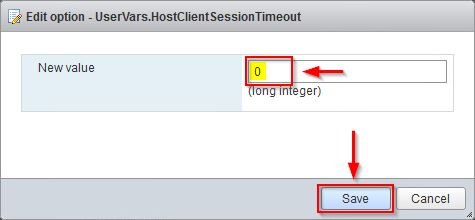
Set the New value field to 0 and click Save to keep the web page open indefinitely.
The value for UserVars.HostClientSessionTimeout key is now 0.
Reload the web page and your session will remain open until you logoff.
However, as best practice it's suggested to set a session timeout for security reasons.
Auteur: diode Laatst bijgewerkt:29-09-2020 16:39
Crontab
Crontab
List active cron jobs
crontab -l less /etc/crontab
Systemctl restart crond
View Cron Jobs by User sudo crontab –u username –l
How to List Hourly Cron Jobs ls –la /etc/cron.hourly
How to List Daily Cron Jobs ls –la /etc/cron.daily
How to Display Weekly Cron Jobs ls –la /etc/cron.weekly
How to List Monthly Cron Jobs ls –la /etc/cron.monthly
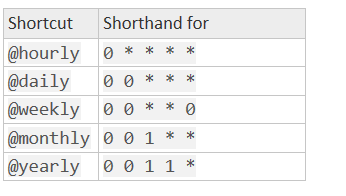
The first five fields of the line are the date and time field which specify how frequently and when to execute a command. When adding the cron job in the DreamHost panel, the Date/Time is added for you automatically based on your 'When to run' setting.
Auteur: diode Laatst bijgewerkt:22-05-2021 14:40
Add user with commandline
Add user net user test test123 /add
Add user to group administrators net localgroup administrators test /add
Delete user net user test /del
Enable user net user test /active:no
net user test /active:yes
Auteur: diode Laatst bijgewerkt:28-11-2021 13:27
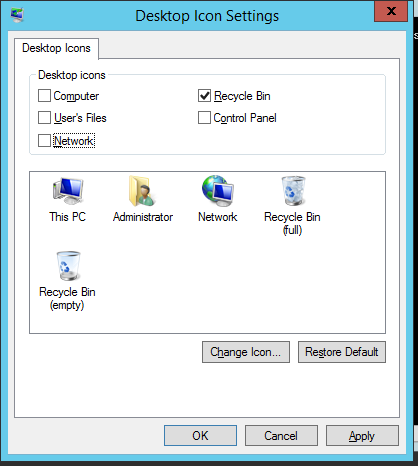
Plaats desktop iconen op server versies
Open een command prompt als administrator,
vul in het volgende commando
desk.cpl ,5
Auteur: diode Laatst bijgewerkt:09-03-2022 10:17
Enable content Copy/Paste between VMRC client and Windows/Linux Virtual Machine
From the vCenter Server HTML5 Web Client
Power off the VM.
Enable the Copy & Paste for the Windows/Linux virtual machine:
Right-click the virtual machine and click Edit Settings.
Click the VM Options tab, expand Advanced, and click Edit Configuration.
Click on Add Configuration Params three times to give three rows
Fill in the Name and Value fields as mentioned below:
Click OK to save and exit out of the Configuration Parameters wizard. Note: These options override any settings made in the guest operating system’s VMware Tools control panel.
Click OK to save and exit out of the Edit Settings wizard.
Power on the VM
Then use Copy/Paste directly on Windows/Linux/any other platform.
For paste operation's target platform is Linux, Older X applications do not use a clipboard. Instead, they let you paste the currently selected text (called the "primary selection") without copying it to a clipboard. Pressing the middle mouse button is usually the way to paste the primary selection. For more information see Copying and pasting from a Windows guest to Linux host.
From the vCenter Server Flash Web Client
Power off the VM.
Enable the Copy & Paste for the Windows/Linux virtual machine:
Right-click the virtual machine and click Edit Settings.
Click the VM Options tab, expand Advanced, and click Edit Configuration.
Fill in the Name and Value fields as mentioned below. After entering each one, click the Add button.
Click OK to save and exit out of the Configuration Parameters wizard. Note: These options override any settings made in the guest operating system’s VMware Tools control panel.
Click OK to save and exit out of the Edit Settings wizard.
Power on the VM
Then use Copy/Paste directly on Windows/Linux/any other platform.
For paste operation's target platform is Linux, Older X applications do not use a clipboard. Instead, they let you paste the currently selected text (called the "primary selection") without copying it to a clipboard. Pressing the middle mouse button is usually the way to paste the primary selection. For more information see Copying and pasting from a Windows guest to Linux host.
Auteur: diode Laatst bijgewerkt:22-06-2022 16:00
Reset System Configuration ESXI host with PowerCLI
Most Useful ESXCLI and ESXi Shell Commands for Your VMware Environment
VMware provides a powerful and convenient graphical interface for managing ESXi servers – you can use a VMware vSphere Client that is a standalone application on Windows machines for managing ESXi hosts and the entire vSphere environment. Another option is to use VMware vSphere Web/HTML5 Client on any machine. Thus, you can launch a web browser for managing vSphere with ESXi hosts and VMware Host Client for managing ESXi hosts in a web browser.
The majority of settings are available in the graphical user interface (GUI), though sometimes you may need to get some information or change a configuration that is not displayed in the GUI. In this case, using the command line interface (CLI) is what you need – it is possible to configure all settings, including the hidden ones in the command line, which is also referred to as the console. In addition to traditional commands that are the same in Linux and ESXi, ESXi has its own ESXCLI commands. The most useful ESXCLI commands are explained in today’s blog post. This blog post has been created in the format of a catalog which lists useful ESXCLI commands that are part of the ESXi shell commands.
How Do I Open the CLI in ESXi?
By default, ESXi shell is disabled for local and remote access; hence, you are not able to run ESXi shell commands until you enable the ESXi shell. VMware has made this restriction for security reasons. There are three main methods for enabling the command line interface in ESXi.
Using the ESXi default interface
In the ESXi Direct Console User Interface (DCUI), go to Troubleshooting Options, navigate to Enable ESXi Shell and Enable SSH strings and press Enter to enable each option. After enabling the ESXi shell, press Alt+F1 to open the console on the machine running ESXi. You should enter your login and password after that (credentials of the root user can be used). If you need to go back to the ESXi DCUI, press Alt+F2. The Enable SSH option allows you to open the ESXi console remotely by using an SSH client.
Using VMware Host Client
Open a web browser and enter the IP address of your ESXi host in the address bar, then log in. Go to Host > Actions > Services and click Enable Secure Shell (SSH). Now you can connect to the ESXi console by using your SSH client remotely. Similarly, you can enable the console shell on a local ESXi host in the Services menu.
Using vCenter and VMware vSphere Client
This method can be used if your ESXi host is managed by vCenter Server. In VMware HTML5 vSphere Client, go to Hosts and Clusters, select your ESXi host, select the Configure tab, open System > Services and click SSH in the list of services. After that, hit Start to launch the SSH server once, or hit Edit Startup Policy and select Start and Stop with host if you wish to enable the SSH server for an extended period of time. You can also enable the ESXi shell in the Services menu.
In order to connect to the ESXi console remotely via SSH, in the Linux console, type a command like ssh 192.168.101.221, where 192.168.101.221 is the IP address of the ESXi server used in this example. You need to enter the login and password of the ESXi user in this case (root can be used by default).
In Windows, you can use PuTTY as an SSH client for running ESXI shell commands remotely.
About ESXCLI Commands
ESXCLI is a part of the ESXi shell, this is a CLI framework intended to manage a virtual infrastructure (ESXi components such as hardware, network, storage, etc.) and control ESXi itself on the low level. All ESXCLI commands must be run in the ESXi shell (console). Generally, ESXCLI is the command that has a wide list of subcommands called namespaces and their options. The ESXCLI command is present right after ESXi installation along with other ESXi shell commands. You can locate ESXCLI and explore the nature of ESXCLI after executing the following commands:
which esxcli
ls -l /sbin/esxcli
As you see in the console output, ESXCLI is a script written in Python that is located in the /sbin/ directory. If you want to see the contents of the script, you can use the built-in text editor vi.
Thus, ESXCLI consists of branches that are the main categories (namespaces) of ESXCLI commands. Notice that ESXCLI commands are case-sensitive, similarly to other console commands used in ESXi. The entire list of all available ESXCLI namespaces and commands is displayed after running the command:
esxcli esxcli command list
The list of available ESXCLI commands depends on the ESXi version.
Hence, the list of top ESXCLI namespaces for ESXi 6.7 is as follows:
device – device manager commands
esxcli – commands related to ESXCLI itself
fcoe – Fibre Channel over Ethernet commands
graphics – VMware graphics commands
hardware – commands for checking hardware properties and configuring hardware
iscsi – VMware iSCSI commands
network – this namespace includes a wide range of commands for managing general host network settings (such as the IP address, DNS settings of an ESXi host, firewall) and virtual networking components such as vSwitch, portgroups etc.
nvme – managing extensions for VMware NVMe driver
rdma – commands for managing the remote direct memory access protocol stack
sched – commands used for configuring scheduling and VMkernel system properties
software – managing ESXi software images and packages for ESXi
storage – commands used to manage storage
system – commands for configuring VMkernel system properties, the kernel core system and system services
vm – some commands that can be used to control virtual machine operations
vsan – VMware vSAN commands
The main commands appear as verbs indicating the same action:
list – show the list of objects available for the defined namespace (for example, esxcli hardware bootdevice list – list available boot devices)
get – get the value of the defined setting or property (for instance, esxcli hardware clock get – check the time set)
set – set the necessary parameter manually (for example, esxcli hardware clock set -y 2019 -s 00 – set the year to 2019 and set the seconds to 00)
load/unload – load/unload system configuration (esxcli network firewall load – load the firewall module and firewall settings stored in the configuration file)
If you are unable to remember a particular ESXCLI command related to the appropriate namespace, you can enter the command and see a tip in the output of the console—for example, type:
esxcli network to see all available commands for the network namespace, then type:
esxcli network vm to check the commands for the vm namespace.
The ESXCLI log file is located in /var/log/esxcli.log
The data is written to this file if an ESXCLI command has not been executed successfully. If an ESXCLI command is run successfully, nothing is written to this log file.
Useful ESXCLI Commands
Now that you are familiar with the basic working principle of ESXCLI commands, let’s consider the particular examples of useful ESXCLI commands which can be used in VMware vSphere. The list of ESXCLI commands considered in this article is divided by categories equivalent to namespace names.
Checking hardware
By using the hardware namespace, you can view the full information about installed devices. In order to view installed PCI devices, run the following ESXCLI command:
esxcli hardware pci list | more
Check the amount of memory installed on the ESXi server:
esxcli hardware memory get
View the detailed information about installed processors:
esxcli hardware cpu list
System settings
In this section, you can see the commands of the system esxcli namespace.
Check the precise ESXi version and build number, including the number of installed updated and patches:
esxcli system version get
Check the hostname of an ESXi server:
esxcli system hostname get
Check the ESXi installation time:
esxcli system stats installtime get
Check the SNMP configuration:
esxcli system snmp get
Enter the ESXi host to the maintenance mode:
esxcli system maintenanceMode set --enable yes
Exit the maintenance mode:
esxcli system maintenanceMode set --enable no
After entering an ESXi host to the maintenance mode, you can shut down or reboot the host.
Power off an ESXi host:
esxcli system shutdown poweroff
The command for rebooting the host is similar:
esxcli system shutdown reboot
You can also set a delay and write a reason of rebooting the host to be saved in system logs:
esxcli system shutdown reboot -d 60 -r “Installing patches”
In this example, the delay is 60 seconds.
Another command is to set the custom welcome message instead of a standard background screen with a shaded inactive main menu where the “<F2> Customize System/View Logs <F12> Shut Down/Restart” tip and the IP address to manage the host are displayed. Notice that after setting a custom welcome message you will see only this set message on the black screen. You can type “Press F2” manually to avoid confusion. The custom message can be used for hiding information about your ESXi host on the display connected to the ESXi host when a user is not logged in.
esxcli system welcomemsg set -m="Welcome to NAKIVO! Press F2"
Verify whether the welcome message is already set:
esxcli system welcomemsg get
Network settings
The network namespace is one of the largest namespaces of ESXCLI. Let’s explore the commands that can be useful for diagnostics.
Check the status of active network connections:
esxcli network ip connection list
View the list of installed network adapters:
esxcli network nic list
Display the information about network interfaces:
esxcli network ip interface list
Display the information about IP addresses of the network interfaces that are present on the server:
Note: The default firewall policy is to drop traffic if the opposite rules are not set.
You can temporary disable the firewall on an ESXi host for troubleshooting:
esxcli network firewall set --enabled false
The firewall must be enabled with the command:
esxcli network firewall set --enabled true
It is recommended to have the ESXi firewall enabled for security reasons.
The network namespace includes many commands. Only basic and the most popular of them are considered in the Network section of today’s blog post. It is possible to configure a high number of network parameters with esxcli, but would require a long walkthrough that is out of scope for today’s article.
Storage
The storage namespace allows you to check and edit storage settings.
Check the information about mounted VMFS volumes:
esxcli storage vmfs extent list
View mappings of VMFS file systems to disk devices:
esxcli storage filesystem list
List all the iSCSI paths on the system:
esxcli storage core path list
Display the list of mounted NFS shares:
esxcli storage nfs list
How do you check SMART with esxcli? S.M.A.R.T. is useful for disk diagnostics and for preventing disk failure. You can read the S.M.A.R.T. data and, if you discover that something is wrong with your disk, you can make a timely decision to replace the disk.
First, list all storage devices and locate the unique device name (see the screenshot below):
esxcli storage core device list
Then, use the command to get the S.M.A.R.T. data of that disk device:
esxcli storage core device smart get -d naa.50026b7267020435
where naa.50026b7267020435 is the name of the device used in this example.
iSCSI
iSCSI is a widely used protocol for accessing shared storage on a block level, and there is a separate iscsi namespace in ESXCLI for managing the iSCSI storage.
Show the list of available iSCSI adapters:
esxcli iscsi adapter list
Re-discover and re-scan iSCSI adapters:
esxcli iscsi adapter discovery rediscover -A adapter_name
esxcli storage core adapter rescan -A adapter_name
Instead of -A adapter_name you can rescan all adapters by using the --all option.
Software
Software packages intended for ESXi are usually distributed as VIB files (vSphere installation bundle). A VIB file is similar to a container with zipped packages that can be installed in the system, with a descriptor and a signature file. In turn, VIBs are usually distributed as files packed into an archive file in the standard ZIP format. You may need to include VIBs into an ESXi image in order to use the appropriate hardware or install VIBs in an existing system for applying a security patch.
You can view the list of VIB packages installed on your ESXi host:
esxcli software vib list
You can install a VIB with ESXCLI (the ESXi host must be in maintenance mode):
The vm namespace can be used for operations on running virtual machines processes.
Check the list of running VMs and display their World IDs:
esxcli vm process list
You can kill the unresponsive virtual machine with ESXi shell commands. Using ESXCLI, in this case, can be helpful when a VM cannot be shut down via GUI, such as the GUI of VMware vSphere Client, VMware Host Client or VMware Workstation.
Shut down the VM by using the World ID displayed in the output of the esxcli vm process list command. In the current example, the World ID of the necessary VM is 75498.
esxcli vm process kill -w 75498 -t soft
If the soft command type was not helpful, consider performing an immediate shut down of the VM by using the hard method.
esxcli vm process kill -w 75498 -t hard
There are three available command options for the kill command:
soft - a correct signal is sent in the guest operating system to shut down a VM correctly;
hard - a VM is shut down immediately;
force - VM is powered off similarly to how a computer is powered off when unplugging the power cable. Only use this type of powering off the VM if the previous two types were unsuccessful.
Other Useful ESXi Shell Commands
Besides ESXCLI commands, you can use a lot of ESXi shell commands. The ESXi shell commands list that may be useful for you is provided below.
Open the ESXi DCUI from the console (the colors are different when you connect to the ESXi shell via SSH):
dcui
Press Ctrl+C to go back to the command prompt.
Convert a thick provisioned virtual disk to a thin provisioned virtual disk by using vmkfstools:
Among ESXi shell commands, vmkfstools is a powerful command for performing storage operations as well as managing storage devices, VMFS volumes, and virtual disks. Read more about thick and thin provisioning as well as virtual disk shrinking in the blog post.
Open the ESXi task manager:
esxtop
After opening the task manager with the esxtop command, you can switch between tabs by pressing the appropriate keys:
C - CPU
I – interrupt
M – memory
N – network
D – disk adapter
U – disk device
V – disk VM
P – power management
Find the file in the current directory:
find . -name filename.txt
Replace the . character with the name of the directory in which you would like to locate a file, and replace filename.txt with your file name. For example, if you wish to find a diskname.vmdk file in the /vmfs/volumes/ directory, run the command:
find /vmfs/volumes/ -name diskname.vmdk
Open the interactive VMware console:
vsish
Show loaded vmkernel drivers:
vmkload_mod --list
Check the settings of the swap partition:
esxcli sched swap system get
You can list users by using one of the following commands:
esxcli system account list
cat /etc/passwd or less/etc/passwd
Creating a new user
There are at least two methods of creating a new ESXi user by using ESXi shell commands.
Using the adduser command
If you type the adduser command in the ESXi console, you will get the message:
-sh: adduser: not found
You should define the full path to the appropriate busybox binary to run this command:
/usr/lib/vmware/busybox/bin/busybox adduser
Now you can see the usage options for this command.
Finally, run the exact command to add an ESXi system user:
-G root – the group name whose member is a new user (the root group);
-h / is a home directory (the root directory) of a new user;
user1 is the user name.
Enter a new password and confirm the password when prompted.
Using ESXCLI
As an alternative, you can add a new user just with the one command by using esxcli:
esxcli system account add -d="test user" -i="username" -p="Password-Test321" -c="Password-Test321"
Where:
-d means the displayed description
-p is the password set for the new user
-c is the password confirmation
Which method of creating a new user in the command line is better? The single command used in the second method may appear to be the optimal method for creating a new user, but it is not entirely true on account of security reasons. If you’ve been attentive, you should be able to remember the warning message displayed right after logging in to the ESXi shell:
All commands run on the ESXi shell are logged and may be included in support bundles. Do not provide passwords directly on the command line. Most tools can prompt for secrets or accept them from standard input.
If security is a concern for you, enter commands without including passwords as plain text into the commands. If a password is needed, it is usually prompted and can be entered in the standard console input. For example, if you would likr to create a new user with ESXCLI, use a command like:
esxcli system account add -d="user2" -i="user2" -p -c
A password will be prompted separately and will not be displayed in the console while entering the password.
Conclusion
Today’s blog post has covered a series of ESXi shell commands including ESXCLI commands. Using the command line interface in ESXi gives you more power in addition to nice graphical user interfaces of VMware vSphere Client and VMware Host Client for managing ESXi hosts. You can use ESXi shell commands for viewing and configuring settings that are hidden or not available in the GUI. Use the ESXi shell commands list provided in this blog post for fine ESXi tuning and experience the extra power of using the command line interface in VMware vSphere. You can learn more by reading about PowerCLI, another type of the command line interface for managing VMware vSphere from Windows PowerShell.
Auteur: diode Laatst bijgewerkt:14-09-2022 14:35
Microsoft
Keyboard shortcuts on a RDP session
CTRL+ALT+END : Open the Microsoft Windows NT Security dialog box (CTRL+ALT+DEL) ALT+PAGE UP : Switch between programs from left to right (CTRL+PAGE UP) ALT+PAGE DOWN : Switch between programs from right to left (CTRL+PAGE DOWN) ALT+INSERT : Cycle through the programs in most recently used order (ALT+TAB) ALT+HOME : Display the Start menu (CTRL+ESC) CTRL+ALT+BREAK : Switch the client computer between a window and a full screen ALT+DELETE : Display the Windows menu CTRL+ALT+Minus sign (-) : Place a snapshot of the entire client window area on the Terminal server clipboard and provide the same functionality as pressing ALT+PRINT SCREEN on a local computer (ALT+PRT SC) CTRL+ALT+Plus sign (+) : Place a snapshot of the active window in the client on the Terminal server clipboard and provide the same functionality as pressing PRINT SCREEN on a local computer (PRT SC)
Auteur: diode Laatst bijgewerkt:01-04-2019 18:52
Remove windows 7 productkey
In the elevated command prompt, copy and paste the command below and press enter slmgr.vbs /upk Remove productkey Windows 7 Registry In the elevated command prompt, copy and paste the command below and press enter slmgr.vbs -cpky
Auteur: diode Laatst bijgewerkt:02-04-2019 10:33
Partitie vergroten van Server 2003 met Extpart
Download Extpart van de Dell Site Als je deze uitpakt wordt hij geinstalleerd in C:\dell\ExtPart In de directory staan dan 2 bestanden extpart.exe extpart.txt Mocht je de C:\ partitie willen vergroten met 10 GB De groote moet je met 1024 vermenigvuldigen dus 10240 Open een command prompt en ga naar C:\dell\ExtPart, tik in extpart c: 10240 Krijg je een melding dat de disk in gebruik is, start dan op in veilige modus dan moet het wel lukken.
Windows Registry Editor Version 5.00 [HKEY_LOCAL_MACHINE\SOFTWARE\Microsoft\Windows\CurrentVersion\OEMInformation] "Manufacturer"="Asus" "SupportHours"="9 - 5" "SupportURL"="www.support.nl" "Model"="Cooler Master" "SupportPhone"="1234567890" "Logo"="C:\logo\logo.jpg"
Pas de gegevens naar wens aan.
Auteur: diode Laatst bijgewerkt:02-04-2019 10:41
Install MSE on a Windows Server
Download MSE >>>klik hier voor download<<< Set Compatiblity mode on Windows 7 Launch file with commandline C:\Temp\mseinstall.exe /disableoslimit
Auteur: diode Laatst bijgewerkt:02-04-2019 12:13
Server herstart opzoeken in de eventviewer.
Start eventviewer op de server,
Auteur: diode Laatst bijgewerkt:28-11-2019 09:03
How to create a PKCS#12 (PFX) file on a Windows server
Solution
Part 1: Create a "certificates" snap-in using the MMC:
Microsoft IIS Version 6.0
Click Start > Run
In the search box, type mmc
Click OK
From the Microsoft Management Console (MMC) menu bar, select File (in IIS 6.0) > Add/Remove Snap-in
Click Add
From the list of snap-ins, select Certificates
Click Add
Select Computer account
Click Next
Select Local computer
Click Finish
In the snap-in list window, click Close
In the Add/Remove Snap-in window, click OK
Microsoft IIS Version 7.0
Click Start
In the "Search programs and files" box, type mmc
At the permission prompt, click Yes
From the Microsoft Management Console (MMC), click File > Add/Remove Snap-in
From the list of snap-ins, select Certificates
Click Add
Select Computer account
Click Next
Select Local computer (the computer this console is running on)
Click Finish
In the Add/Remove Snap-in window, click OK
Microsoft IIS Version 8.0
Access the Search menu. In the search box, type mmc
From the Microsoft Management Console (MMC), click File > Add/Remove Snap-in
From the list of snap-ins, select Certificates
Click Add
Select Computer account
Click Next
Select Local Computer (the computer this console is running on)
Click Finish
In the Add/Remove Snap-in window, click OK
Part 2: Export SSL certificate, private key, and Intermediate CA's:
From the top, expand Certificates (Local Computer)
Expand the Personal folder
Click on the Certificates sub-folder
Locate the SSL certificate in the list on the right
Right-click on the certificate and select All Tasks > Export.
Select "Yes, Export the private key"
Click Next
In the Export File Format window, ensure the option for "Personal Information Exchange - PKCS#12 (.pfx)" is selected
Select "Include all certificates in the certification path if possible"
Click Next
Enter and confirm a password to protect the pfx file. Click Next
Click Next
Browse to the location where the pfx file should be saved. Enter a name for the file.
Click Next
Read the summary and verify that the information is correct.
Click Finish
Auteur: diode Laatst bijgewerkt:06-04-2019 19:04
IS Crypto is a free tool that gives administrators the ability to enable or disable protocols
IIS Crypto is a free tool that gives administrators the ability to enable or disable protocols, ciphers, hashes and key exchange algorithms on Windows Server 2008, 2012, 2016 and 2019. It also lets you reorder SSL/TLS cipher suites offered by IIS, change advanced settings, implement Best Practices with a single click, create custom templates and test your website.
Features
Single click to secure your website using Best Practices
Backup the registry before making any updates
Change advanced registry settings
Built in Best Practices, PCI 3.2, Strict and FIPS 140-2 templates
Create custom templates that can be saved and run on multiple servers
Revert back to the original server's default settings
Stop DROWN, logjam, FREAK, POODLE and BEAST attacks
Enable TLS 1.1 and 1.2
Enable forward secrecy
Reorder cipher suites
Disable weak protocols and ciphers such as SSL 2.0, 3.0, MD5 and 3DES
Site Scanner to test your configuration
Command line version
What Does IIS Crypto Do?
IIS Crypto updates the registry using the same settings from this article by Microsoft. It also updates the cipher suite order in the same way that the Group Policy Editor (gpedit.msc) does. Additionally IIS Crypto lets your create custom templates that can be saved for use on multiple servers. The command line version contains the same built-in templates as the GUI version and can also be used with your own custom templates. IIS Crypto has been tested on Windows Server 2008, 2008 R2 and 2012, 2012 R2, 2016 and 2019.
IIS Crypto requires administrator privileges. If you are running under a non-administrator account, the GUI version will prompt for elevated permissions. The command line version must be run from a command line that already has elevated permissions.
Downloads
IIS Crypto is offered in both a GUI and a command line version. Click here to choose your version and download.
Custom Templates
IIS Crypto allows you to create your own custom templates which can be saved and then executed on multiple servers. To create your own template, select all of the settings for your configuration. Click on the Templates button and give your template a name, author and description if desired. Then click on the Save button to save your template to disk. Copy your template to another server, run IIS Crypto and click on the Open button to load your template. You can also use it from the command line version of IIS Crypto.
The template format has been simplified in IIS Crypto 3.0. Old templates are automatically upgraded when loaded, however, if you save a new template it will only open in IIS Crypto 3.0 and later.
Load the Best Practices template before you start customizing your own template to ensure your template is setup securely. If your template is in the same folder as IIS Crypto it will show up automatically in the drop down box without having to click the Open button first.
Command Line Help
The following are the switches for the command line version of IIS Crypto. All parameters are optional.
Switch
Option
Description
/backup
<filename>
Specify a file to backup the current registry settings too.
/template
default
This template restores the server to the default settings.
best
This template sets your server to use the best practices for TLS. It aims to be compatible with as many browsers as possible while disabling weak protocols and cipher suites.
pci32
This template is used to make your server PCI 3.2 compliant. It will disable TLS 1.0 and 1.1 which may break client connections to your website. Please make sure that RDP will continue to function as Windows 2008 R2 requires an update. See our FAQ for more information.
strict
This template sets your server to use the strictest settings possible. It will disable TLS 1.0 and 1.1 and all non forward secrecy cipher suites which may break client connections to your website. Please make sure that RDP will continue to function as Windows 2008 R2 requires an update. See our FAQ for more information.
fips140
This template makes your server FIPS 140-2 compliant. It is similar to the Best Practices template, however, it is not as secure as Best Practices because some of the weaker cipher suites are enabled.
<filename>
Specify the filename of a template to use.
/reboot
Reboot the server after a template is applied.
/help|?
Show the help screen.
Here is an example that backs up the registry to a file named backup.reg, applies a custom template named MyServers.ictpl and reboots the server:
Please take a look at our FAQ. If you have any other questions, feel free to contact us.
Test Your Site
In order to test your site after you have applied your changes, click the Site Scanner but
Auteur: diode Laatst bijgewerkt:30-08-2023 11:19
How to enable TLS 1.1 and 1.2 in Outlook on Windows 7
Version 1.0 of the TLS protocol is not secure. As such it needs to be disabled on servers which want to have a PCI compliance. Our GoGeek servers are PCI compliant by default, which is why we have disabled TLS 1.0 on them.
On Windows 7 and Windows 8.0 computers, the applications built on WinHTTP (Windows HTTP Services) such as Outlook, Word, etc. only support TLS 1.0. As a result of this, if you try to establish a secure connection from your Outlook client to a GoGeek server, Outlook will throw an error message "your server does not support the connection encryption type you have specified".
In order to resolve this and allow your Outlook to communicate securely to the GoGeek server using TLS 1.1 and TLS 1.2, you have to do the following:
The file is available for download in the section labeled Easy fix on the above mentioned page. If the easy fix option is not suitable for you and you prefer to edit the registry of your computer manually, the article also provides that information in section "How the DefaultSecureProtocols registry entry works".
Auteur: diode Laatst bijgewerkt:17-04-2019 09:30
How to enable TLS 1.2 on Windows Server 2008 R2
Problem
How to enable TLS 1.2 on Windows Server 2008 R2?
Resolution
QuoVadis recommends enabling and using the TLS 1.2 protocol on your server. TLS 1.2 has improvements over previous versions of the TLS and SSL protocol which will improve your level of security. By default, Windows Server 2008 R2 does not have this feature enabled. This KB article will describe the process to enable this.
Start the registry editor by clicking on Start and Run. Type in "regedit" into the Run field (without quotations).
Highlight Computer at the top of the registry tree. Backup the registry first by clicking on File and then on Export. Select a file location to save the registry file.
Note:You will be editing the registry. This could have detrimental effects on your computer if done incorrectly, so it is strongly advised to make a backup.
Browse to the following registry key: HKEY_LOCAL_MACHINE\SYSTEM\CurrentControlSet\Control\SecurityProviders\SCHANNEL\Protocols
Right click on the Protocols folder and select New and then Key from the drop-down menu. This will create new folder. Rename this folder to TLS 1.2.
Right click on the TLS 1.2 key and add two new keys underneath it.
Rename the two new keys as:
Client
Server
Right click on the Client key and select New and then DWORD (32-bit) Value from the drop-down list.
Rename the DWORD to DisabledByDefault.
Right-click the name DisabledByDefault and select Modify... from the drop-down menu.
Ensure that the Value data field is set to 0 and the Base is Hexadecimal. Click on OK.
Create another DWORD for the Client key as you did in Step 7.
Rename this second DWORD to Enabled.
Right-click the name Enabled and select Modify... from the drop-down menu.
Ensure that the Value data field is set to 1 and the Base is Hexadecimal. Click on OK.
Repeat steps 7 to 14 for the Server key (by creating two DWORDs, DisabledByDefault and Enabled, and their values underneath the Server key).
How to Find Computer Locking Active Directory Account
Find Locking Computer Using Event Logs
Login to the Domain Controller where authentication took place.
Open “Event Viewer“.
Expand “Windows Logs” then choose “Security“.
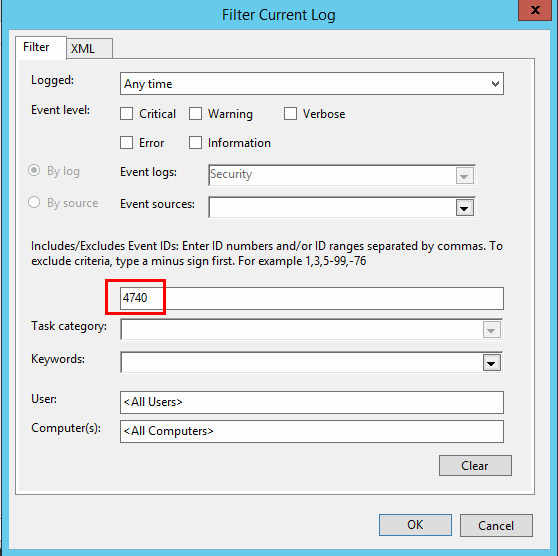
Select “Filter Current Log…” on the right pane.
Replace the field that says “<All Event IDs>” with “4740“, then select “OK“.
Select “Find” on the right pane, type the username of the locked account, then select “OK“.
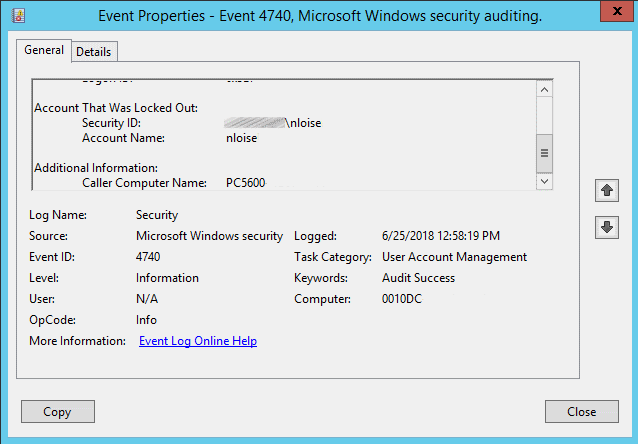
The Event Viewer should now only display events where the user failed to login and locked the account. You can double-click the event to see details, including the “Caller Computer Name“, which is where the lockout is coming from.
Auteur: diode Laatst bijgewerkt:28-11-2019 09:25
Drive mapping maken met gebruikersnaam en wachtwoord
@echo Create new E: drive mapping Video @net use E: \\synology\video /user:synology\gebruikersnaam wachtwoord @echo Create new F: drive mapping Programma @net use F: \\synology\Proggies /user:synology\gebruikersnaam wachtwoord :exit @pause
@echo Disconnect E: drive mapping Video @net use /del E: @echo Disconnect F: drive mapping Programma @net use /del F: :exit @pause
Auteur: diode Laatst bijgewerkt:21-02-2020 16:11
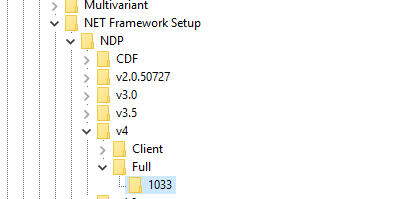
How to Check What Version of .NET Framework 4 is Installed on Your Computer
Instructions
We provide a PowerShell script here (also available as a text file) that you can use to return the installed .NET Framework version. Alternatively, we will observe where the code and build number are stored in the Windows registry so you can determine the .NET version manually without running any code on your computer.
In Microsoft Edge, go to edge://flags/#edge-click-once.
If the existing value is set to Default or Disabled in the dropdown list, change it to Enabled.
Scroll down to the bottom of the browser window and click Restart to restart Edge.
Note: Organizations can use Group Policy to disable ClickOnce support. To check if there is an organizational policy for ClickOnce support, go to edge://policy. The following screenshot shows that ClickOnce is enabled across the entire organization. If this policy value is set to false, you will need to contact an admin in your organization.
Install and run the eDiscovery Export Tool
Click Download results on the flyout page of an export in Content Search or an eDiscovery case.
You will be prompted with a confirmation to launch the tool, Click Open.
If the eDiscovery Export Tool isn't installed, you will be prompted with a Security Warning,
Click Install. After it's installed, the export tool will launch automatically.
Auteur: diode Laatst bijgewerkt:25-06-2020 11:52
KMS client setup keys
Generic Volume License Keys (GVLK)
In the tables that follow, you will find the GVLKs for each version and edition of Windows. LTSC is Long-Term Servicing Channel, while LTSB is Long-Term Servicing Branch.
Windows Server (LTSC versions)
Windows Server 2022
Operating system edition
KMS Client Product Key
Windows Server 2022 Datacenter
WX4NM-KYWYW-QJJR4-XV3QB-6VM33
Windows Server 2022 Standard
VDYBN-27WPP-V4HQT-9VMD4-VMK7H
Windows Server 2019
Operating system edition
KMS Client Product Key
Windows Server 2019 Datacenter
WMDGN-G9PQG-XVVXX-R3X43-63DFG
Windows Server 2019 Standard
N69G4-B89J2-4G8F4-WWYCC-J464C
Windows Server 2019 Essentials
WVDHN-86M7X-466P6-VHXV7-YY726
Windows Server 2016
Operating system edition
KMS Client Product Key
Windows Server 2016 Datacenter
CB7KF-BWN84-R7R2Y-793K2-8XDDG
Windows Server 2016 Standard
WC2BQ-8NRM3-FDDYY-2BFGV-KHKQY
Windows Server 2016 Essentials
JCKRF-N37P4-C2D82-9YXRT-4M63B
Windows Server (Semi-Annual Channel versions)
Windows Server, versions 20H2, 2004, 1909, 1903, and 1809
Operating system edition
KMS Client Product Key
Windows Server Datacenter
6NMRW-2C8FM-D24W7-TQWMY-CWH2D
Windows Server Standard
N2KJX-J94YW-TQVFB-DG9YT-724CC
Windows 11 and Windows 10 (Semi-Annual Channel versions)
Before you can delete the registry key, you need to change ownership. You can do that by following these steps:
Right-Click on the key.
Click on “Permissions”.
Click on “Advanced”.
Click on “Owner”.
Select “Administrators”.
Click on “Apply”
You can now delete the key. Reboot the server and you now have a new grace period.
Auteur: diode Laatst bijgewerkt:15-07-2020 17:14
Setup Server 2019 Enterprise CA 2/5: Offline Root CA
Setup Offline Root CA
First we will create the CApolicy.inf. This is a configuration file that defines multiple settings that are applied to the root CA certificate and all other certificates issued by the root CA. This file needs to be created before the ADCS is installed on the root CA. For more information about the Syntax go here.
1. Start powershell and type the following line and press “enter”:
notepad c:\windows\capolicy.inf
2. Select “yes” to create the new file
3. Because this is a lab setup I will only setup some basic settings for the Root CA. I will configure the following settings:
Renewalinformation for the CA certificate.
The validity period for the base CRL.
Disable the AlternateSignatureAlgorithm (more info on why can be found here).
Disable the DefaultTemplates, these are not used because this is an offline CA.
For this lab I will use a random generated OID which is based on the Microsoft OID. Because these generated OID may not be unique you should request a private enterprise number at IANA (link). This number can be added to the CAPolicy.inf.
4. Save the file as “capolicy.inf” using “All files” and “ANSI” Encoding.
5. Now we the role can be added and configured. Start the Server manager and select “Add roles and features”
6. The “Add Roles and Features Wizard” will start, press “Next” to continue.
7. Select “Role-based or feature-based installation” and press “Next”
8. Use the default settings and press “Next” to continue.
9. Select “Active Directory Certificate Services”
10. A pop-up will appear, press “Add Features” to continue.
11. Press “Next” to continue
12. Press “Next” to continue.
13. Check if the Servername is correct and press “Next” to continue.
14. Use the default settings, for the Root CA only the “Certification Authority” role is needed.
15. Press “install” to add the Active Directory Certificate Services to the server.
16. When the installation has completed, press the link “Configure Active Directory Certificate Services on the destination server”
17. Use the default settings and press “Next”
18. Select “Certification Authority” and press “Next”
19. Because this server is non-domain joined only Standalone CA can be selected. Press “Next” to continue.
20. As this server is the root of the PKI hierarchy select “Root CA” and press “Next”
21. Select “Create a new private key” and press “Next” to continue.
22. Because this is the Root CA Certificate I use a longer Key length of 4096. This will increase the security.
23. Use the default settings and press “Next” to continue.
24. Because this server will be used in a Test Environment I extend the validity period to 10 years. Press “Next” to continue.
25. Use the default settings and press “Next” to continue.
26. Press “Configure” to configure the server.
27. Press “Close” to continue.
28. Press “Tools” in the Server Manager and select “Certification Authority”
29. Right click the Servername and select “Properties”
30. Select the “Extensions” tab
31. In the “Extensions tab” select the extension “CRL Distribution Point (CDP) and remove all locations except the “C:\*” Location.
32. Because this server will be offline it cannot be contacted, therefore a location needs to be added to the subordinate server. Press “Add” to add the CDP on the Subordinate Server.
39. Check the box “Include in the AIA extension of issued certificates” and press “Apply”
40. Press “Yes” when asked to restart the service.
41. Select the “General” and select the Root Certificate and press “View Certificate”.
42. Select the tab “Details” and press “Copy to File…”.
43. In the Certificate Export Wizard press “Next”.
44. Select “DER encoded binary X.509 (.CER)” and press “Next”.
45. In File name enter “C:\Windows\System32\CertSrv\CertEnroll\<CA-NAME>-CA.cer” and press “Next”.
46. Press “Finish” to export the RootCA Certificate.
47. A popup will appear when the export was successful, press “OK” to continue.
The setup of the Offline RootCA is now completed.
Auteur: diode Laatst bijgewerkt:02-03-2021 11:24
Setup Server 2019 Enterprise CA 3/5: Subordinate CA
Setup Subordinate CA
1. Start the Server manager and select “Add roles and features”
2. The “Add Roles and Features Wizard” will start, press “Next” to continue.
3. Select “Role-based or feature-based installation” and press “Next”
4. Use the default settings and press “Next” to continue.
5. Select “Active Directory Certificate Services”
6. A pop-up will appear, press “Add Features” to continue.
7. Select “Web Server (IIS)
8. A pop-up will appear, press “Add Features” to continue.
9. Press “Next” to continue
10. Press “Next” to continue.
11. Check if the Servername before you start, this cannot be changed after the AD CS role has been installed and press “Next” to continue.
12. Keep the default role services (Certication Authority) and press “Next”
13. On the Web Server Role (IIS) page press “Next”
14. On the Role Services page select “Basic Authentication” and “Windows Authentication”. Press “Next” to continue.
15. In the confirmation screen press “Install” to start the installation.
16. When the installation has completed, press the link “Configure Active Directory Certificate Services on the destination server”
17. Make sure your Domain credentials have been entered and not your local admin credentials. Otherwise you will not be able to configure a Enterprise CA. Press “Next” to continue.
18. Select the box “Certification Authority” and press “Next” to continue.
19. Select “Enterprise CA” and press “Next” to continue. (if Enterprise CA is not available check if the server is domain joined and the credentials entered in step 17)
20. Select “Subordinate CA” and press “Next” to continue.
21. Select “Create a new private key” and press “Next”.
22. Use the default settings and press “Next” to continue.
23. Use the default settings and press “Next” to continue
24. Select the folder to save the Certificate Request and press “Next” to continue. (default is “c:\”)
25. Use the default settings and press “Next” to continue.
26. Press “Configure” to apply the configuration.
27. When the configuration has succeeded a warning is shown. This is just a notification that the untill a certificate of the RootCA has been obtained and applied to the subordinate ca the Configuration is not completed.
28. Switch over to the Offline Root CA (OFFENT-CA01) and browse to the folder “c:\windows\system32\certsrv\certenroll”. There should be three files, select and copy all files.
29. Switch back to the Subordinate CA (SUBENT-CA02) and browse to the folder “c:\windows\system32\certsrv\certenroll”. Paste all the files copied in the previous step.
30. Rightclick the Root CA certificate which you just copied and select “Install Certificate”
31. Select “Local Machine” and press “Next”
32. Press “Browse” and select the “Trusted Root Certification Authorities” store. Press “Next” to continue.
33. Press “Finish” to continue.
34. After some time a popup will appear when the import has finished. Press “OK” to continue
35. Create a new folder in “C:\inetpub\wwwroot” with the name “CertEnroll”
36. Copy the RootCA Certificate and Certifate Revocation List from “C:\Windows\System32\CertSrv\CertEnroll” to “C:\inetpub\wwwroot\CertEnroll”
37. Browse to the location entered in step 20 (default “c:\”) and copy the “*.Req” file to the C: Drive on RootCA server.
38. On the Root CA Server open ” Certification Authority” rightclick the servername and select “All Tasks” -> Submit new request…”
39. Browse to the request file on the C: driver and press “Open”
40. Select “Pending Requests”. Rightclick the pending request and select “All Tasks” -> “Issue”
41. Select “Issued Certificates”. Rightclick the issued certificate and select “Open”
42. Select “Details” and press “Copy to file…”
43. Press “Next” to continue
44. Select “Cryptographic Message Syntax Standard – PKCS #7 Certificates (.P7B)” and check the box “Include all certificates in the certification path if possible”. Press “Next” to continue.
45. Press “Browse…”
46. Enter a name for the certificate and press “Save” (the default location is the Documents folder)
47. Press “Next” to continue.
48. Press “Finish” to export the CA Certificate.
49. After some time a popup will appear when the export has finished. Press “OK” to continue.
50. Copy the CA Certificate from the RootCA ( step 46) and switch to the subordinate server to paste the file.
51. On the Subordinate CA open the Certification Authority. Rightclick the Servername and select “All Tasks” -> “Install CA Certificate”
52. Select the copied CA Certificate and press “Open”
53. Rightclick the Servername and select “All Tasks” -> “Start Service”
The setup of the Subordinate CA is now completed
Auteur: diode Laatst bijgewerkt:02-03-2021 11:26
Setup Server 2019 Enterprise CA 4/5: Setup Group Policy
Setup Group Policy
1. Open “Group Policy Management”
2. Expand “Group Policy Management” -> “Forest: <domain>” -> “Domains” and Rightclick your domain. Select “Create a GPO in this domain, and link it here…”
3. Enter a name for the policy for example “Root CA Distribution policy” and press “OK”
4. Select the created policy and press “Edit”
5. Go to: “Computer Configuration” -> “Policies” -> “Windows Settings” -> “Security Settings” -> “Public Key Policies” and Rightclick “Trusted Root Certification Authorities” and select “Import”
6. Press “Next” to continue
7. Press “Browse”
8. Browse to <subordinate-ca>\c$\inetpub\wwwroot\CertEnroll and select the RootCA certificate. Press “Open” to continue
9. Press “Next” to continue
10. Use the default settings and press “Next”
11. Press “Finish” to import the Root CA Certificate.
12. After some time when the import has finished a popup will appear. Press “OK” to continue
The Root CA Certificate is now distributed to all domain devices.
Auteur: diode Laatst bijgewerkt:02-03-2021 11:27
Setup Server 2019 Enterprise CA 5/5: Deploy Policy Templates
Deploy Policy Templates
1. On the Subordinate CA start the “Certification Authority” and select “Certificate Templates”. In the right pane all the out of the box templates are visible. These can be requested by Users, Computers, etc depending on the type.
2. To add a new template rightclick “Certificat Templates” and select “Manage”
3. An overview with all available templates will appear.
4. To avoid editing the original template Rightclick the template and select “Duplicate Template”
5. Give the new template a unique name and press “OK”
6. Rightclick “Certificat Templates” and select “New” -> “Certificate Template to Issue”
7. Select in the “Enable Certificate Templates” list the template which was created and press “OK”
8. The certificate is now visible in the “Certificate Templates” Pane
Test the certificate
9. Logon to a domain joined computer. Start “MMC” and select “file” -> “Add/Remove Snap-in”.
10. Select the “Certificates” snap-in and press “Add”.
11. Select “My user account” in the Certificates snap-in popup and press “Finish”. Press “OK” to close the snap-in manager. (Only select “my user account” for user templates, for computer related templates select “Computer account”)
12. Rightclick “Personal” and select “All Tasks” -> “Request New Certificate”
15. In the “Request Certificates” overview all available user related policy templates are displayed. The created template should appear. Check the box of the created template and press “Enroll”
16. The template will be requested. After a while the status should be “Succeeded”. Press “Finish” to continue.
17. The new certificate is now visible.
18. When you doubleclick the Certificate and select “Certification Path” you should see the RootCA, SubordinateCA and requested Certificate. All Certificates should be “OK”
This was the final post of the Setup Server 2019 Enterprise CA tutorial.
Auteur: diode Laatst bijgewerkt:02-03-2021 11:28
Enable Win32 long paths
Download and install administrative templates for Windows Server 2016 and 2019 in your Windows Server 2012 R2 Active Directory
Folow these steps:
Download Windows 10 and Windows Server 2016 specific administrative templates – or .admx files.
Install the downloaded .msi file Windows 10 and Windows Server 2016 ADMX.msi on a supported system: Windows 10 , Windows 7, Windows 8.1, Windows Server 2008, Windows Server 2008 R2, Windows Server 2012, Windows Server 2012 R2. You also need user rights to run the Group Policy Management Editor (gpme.msc), or the Group Policy Object Editor (gpedit.msc). But that’s for later use.
The administrative templates are installed in C:\Program Files (x86)\Microsoft Group Policy\Windows 10 and Windows Server 2016, or whatever directory you provided during the installation. Copy over the entire folder PolicyDefinitions to your Primary Domain Controller’s SYSVOL\domain\Policies directory.
Verify you’ve copied the folder, and not just the files. The full path is: SYSVOL\domain\Policies\PolicyDefinitions. This is explained in Microsoft’s Technet article Managing Group Policy ADMX Files Step-by-Step Guide.
That’s it, you now have Group Policy Objects available for Windows Server 2016. Let’s enable Win32 long paths support now.
Now that you have your Windows Server 2016 Group Policy Objects available, it’s time to setup a GPO to enable NTFS long path support. Create the GPO in your preferred location, but be sure to target it on Windows Server 2016 only.
Please note that the GPO is called Enable Win32 long paths, not NTFS.
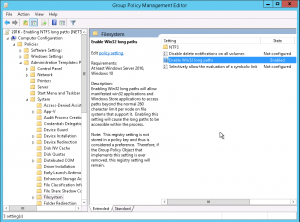
Enabling Win32 long paths will allow manifested win32 applications and Windows Store applications to access paths beyond the normal 260 character limit per node on file systems that support it. Enabling this setting will cause the long paths to be accessible within the process.
Start your Group Policy Management console and click through to the location where you want to add the GPO. Create a new GPO: Create a GPO in this domain, and Link it here..., and provide your GPO with a relevant name.
In the Settings tab, right click and choose Edit…. Now under Computer Configuration in the Group Policy Management Editor, click through to Policies > Administrative Templates > System > Filesystem. Configure and enable the Setting Enable Win32 long paths.
This is all you have to do to create the Group Policy for long Win32 paths. All that is left is to run gpupdate in an elevated cmd.exe command prompt.
Verify LongPathsEnabled registry value
If needed, you can use the following cmd.exe or PowerShell commands to verify the LongPathsEnabled registry value is set correctly:
Windows Setup Edition Configuration and Product ID Files (EI.cfg and PID.txt)
The edition configuration (EI.cfg) file and the product ID (PID.txt) file are optional configuration files that you can use to specify the Windows® product key and the Windows edition during Windows installation. You can use these files to automate the product-key entry page in Windows Setup instead of using an answer file. If you use an EI.cfg file to differentiate volume license media, but you do not include a PID.txt file, the user receives a prompt for a product key to continue Windows Setup.
You can reuse the product key in the product ID file for multiple installations. The product key in the product ID file is only used to install Windows. This key is not used to activate Windows. For more information, see Work with Product Keys and Activation.
Using EI.cfg and PID.txt
Create these configuration files in a text editor such as Notepad.
Save the files into the \Sources folder on the installation media. Windows Setup will use these files automatically during installation.
Run Windows Setup. Setup uses these files during the Windows PE configuration pass as soon as it is launched.
Note An answer file takes precedence over these files. If you use an answer file during installation, Windows Setup ignores the EI.cfg and PID.txt files.
EI.cfg Format
The EI.cfg file specifies the values for the edition ID, the channel, and the volume license.
{Volume License} must be either 1, if this is a volume license, or 0, if this is not a volume license. For example:
[EditionID]
Enterprise
[Channel]
OEM
[VL]
0
PID.txt Format
The PID.txt file contains the product key for the edition of Windows that you are installing.
The PID.txt file has the following format:
[PID]
Value=XXXXX-XXXXX-XXXXX-XXXXX-XXXXX
where XXXXX-XXXXX-XXXXX-XXXXX-XXXXX is the product key.
Troubleshooting
"The product key entered does not match any of the Windows images available for installation. Enter a different product key.": You may need to download a separate version of Windows. OEM versions are only available to OEMs, and volume licenses are only available to MSDN subscribers.
Om te voorkomen dat er iets wordt geinstalleerd met admin rechten kun je een registry key toepassen dat altijd om het wachtwoord wordt gevraagd en niet alleen een bevestiging hoeft te geven.
Windows 10 Productkey opzoeken via de (administrator) commandline
Open een command prompt met administrator rechten
Voer onderstaand commando in,
wmic path SoftwareLicensingService get OA3xOriginalProductKey
Auteur: diode Laatst bijgewerkt:24-09-2021 12:09
Omzeilen van TPM 2.0-check Windows 11
Microsoft recommends against installing Windows 11 on a device that does not meet the Windows 11 minimum system requirements. If you choose to install Windows 11 on a device that does not meet these requirements, and you acknowledge and understand the risks, you can create the following registry key values and bypass the check for TPM 2.0 (at least TPM 1.2 is required) and the CPU family and model.
Note: Serious problems might occur if you modify the registry incorrectly by using Registry Editor or by using another method. These problems might require that you reinstall the operating system. Microsoft cannot guarantee that these problems can be solved. Modify the registry at your own risk.
There are two installation paths available:
Upgrade by launching Setup on the media while running Windows 10. You will have the option to:
a. Perform a Full Upgrade, which keeps personal files (including drivers), apps, and Windows Settings. This is the default experience and is the one that Installation Assistant uses.
b. Keep Data Only will keep personal files (including drivers) only, not apps and not Windows Settings.
c. Clean Install will install Windows 11 and keep nothing from the Windows 10 installation. For more info, see Give your PC a Fresh Start.
How to permanently disable Windows Defender Antivirus on Windows 10
How to disable Windows Defender Antivirus using Group Policy
On Windows 10 Pro, it's possible to use the Group Policy Editor to disable the Windows Defender Antivirus permanently.
Use the Windows key + R keyboard shortcut to open the Run command.
Type gpedit.msc and click OK to open the Local Group Policy Editor.
Browse the following path:
Computer Configuration > Administrative Templates > Windows Components > Windows Defender Antivirus
On the right side, double-click the Turn off Windows Defender Antivirus policy.
Select the Enabled option.
Click Apply.
Click OK.
Browse the following path:
Computer Configuration > Administrative Templates > Windows Components > Windows Defender Antivirus > Real-time Protection
On the right side, double-click the Turn on behavior monitoring policy.
Select the Disabled option.
Click Apply.
Click OK.
On "Real-time Protection," double-click the Monitor file and program activity on your computer policy.
Select the Disabled option.
Click Apply.
Click OK.
On "Real-time Protection," double-click the Turn on process scanning whenever real-time protection is enabled policy.
Select the Disabled option.
Click Apply.
Click OK.
On "Real-time Protection," double-click the Turn on behavior monitoring policy.
Select the Disabled option.
Click Apply.
Click OK.
Restart your computer.
Once you've completed the steps, Windows Defender Antivirus will no longer scan and detect malware on your device, even after restarting your computer.
At any time, you can enable the Windows Defender Antivirus using the same steps, but on step No. 5, 10, and 14, make sure to select the Not Configured option. Then just restart your device to apply the changes.
How to disable Windows Defender Antivirus using Registry
The Local Group Policy Editor is not available on Windows 10 Home, but you can still achieve the same results changing the Registry settings.
Warning: This is a friendly reminder that editing the registry is risky, and it can cause irreversible damage to your installation if you don't do it correctly. It's recommended to make a full backup of your PC before proceeding.
Use the Windows key + R keyboard shortcut to open the Run command.
Right-click on the Windows Defender (folder) key, select New, and click on DWORD (32-bit) Value.
Name the key DisableAntiSpyware and press Enter.
Double-click the newly created key and set the value from 0 to 1.
Click OK.
Right-click on the Windows Defender (folder) key, select New, and click on Key.
Name the key Real-Time Protection and press Enter.
Right-click on the Real-Time Protection (folder) key, select New, and click on DWORD (32-bit) Value.
Name the key DisableBehaviorMonitoring and press Enter.
Double-click the newly created key and set the value from 0 to 1.
Click OK.
Right-click on the Real-Time Protection (folder) key, select New, and click on DWORD (32-bit) Value.
Name the key DisableOnAccessProtection and press Enter.
Double-click the newly created key and set the value from 0 to 1.
Click OK.
Right-click on the Real-Time Protection (folder) key, select New, and click on DWORD (32-bit) Value.
Name the key DisableScanOnRealtimeEnable and press Enter.
Double-click the newly created key and set the value from 0 to 1.
Click OK.
After completing the steps, simply restart your computer to disable the Windows Defender Antivirus permanently.
If you change your mind, you can always revert the changes using the same instructions, but on step No. 3, right-click the DisableAntiSpyware key, and select Delete. Then inside the Windows Defender (folder) key, right-click the Real-Time Protection (folder) key and select Delete to remove key and its content. Finally, restart your device to complete reverting the changes.
How to disable Windows Defender Antivirus using Security Center
Alternatively, if you're installing a piece of software that requires deactivating the antivirus to install correctly, or you simply want to disable the Windows 10 built-in antivirus temporarily, you can use the following steps:
Open Windows Defender Security Center.
Click on Virus & threat protection.
Click the Virus & threat protection settings option.
Turn off the Real-time protection toggle switch.
After completing the steps, Windows Defender Antivirus will be disabled making it unable to monitor and stop malware from taking over your device. However, this is a temporary solution, eventually, the antivirus will re-activate automatically after you restart your device.
Wrapping things up
While there could be scenarios where you may need to disable the antivirus, it's never recommended to have your device without malware protection.
If you're trying to get rid of Windows Defender Antivirus because you prefer another security software, you should know that the built-in antivirus will disable itself automatically during the installation of third-party security software.
It's should also be noted that the shield icon will continue to appear in the notification area of the Taskbar because it's the Windows Defender Security Center icon, not merely dedicated to the antivirus.
In the case you don't like the default anti-malware solution, here are a few alternatives that won't cost you a penny for basic protection
Auteur: diode Laatst bijgewerkt:17-10-2021 17:02
Windows Server 2019 desktop icons such as My Computer, Windows cannot access the specified device, path, or file.
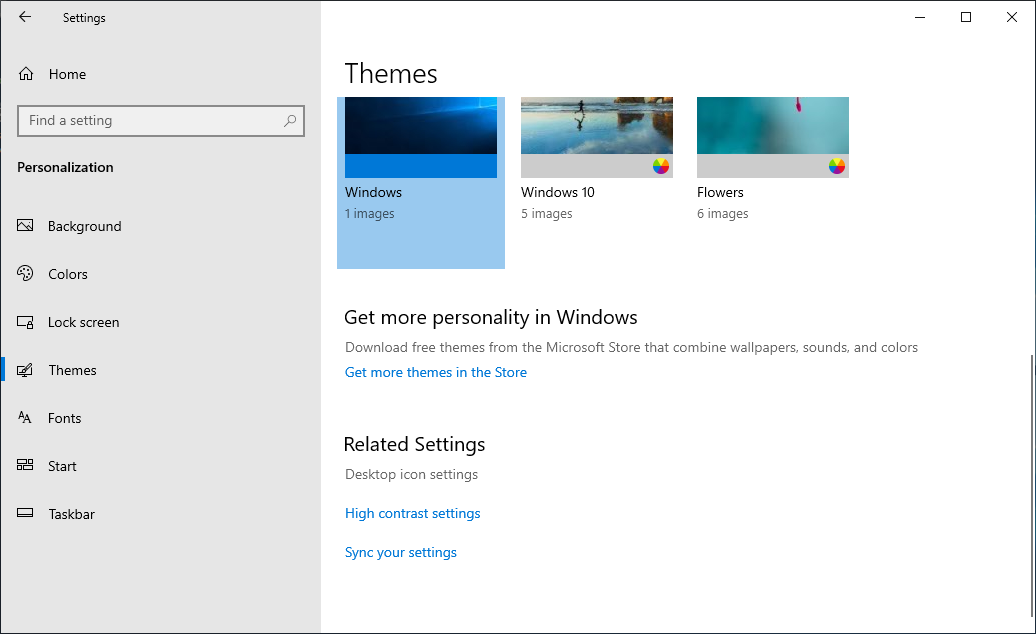
In Windows Server 2019 you may notice that the desktop icons such as My Computer are missing, however when you goto
Personalization > Themes > Desktop icon settings
You see the error Windows cannot access the specified device, path, or file. You may not have the appropriate permissions to access the item.
The quickest way to resolve this is to ignore the modern UI and
desk.cpl ,5
From here you can easily add the My Computer icon
Auteur: diode Laatst bijgewerkt:28-11-2021 13:24
Add user with commandline
Add user net user test test123 /add
Add user to group administrators net localgroup administrators test /add
Delete user net user test /del
Disable user net user test /active:no
Enable user net user test /active:yes
Auteur: diode Laatst bijgewerkt:28-11-2021 13:29
2 Simple Ways to Find All Locked User Accounts in Active Directory
Saved queries is a function in the Active Directory users and Computers MMC. It lets you create and save queries that can be used later.
1. Open Active Directory Users and Computers
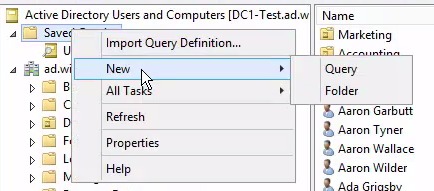
2. Rick click “Saved Queries” then select “New” then “Query”
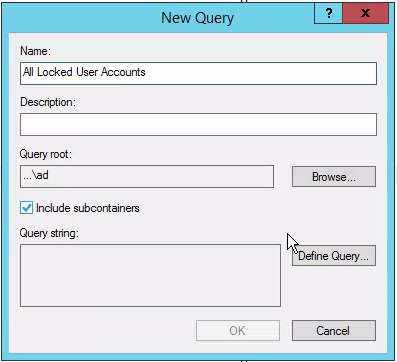
3. Name the Query
In this example I named it “All Locked out User Accounts”
4. Click “Define Query”
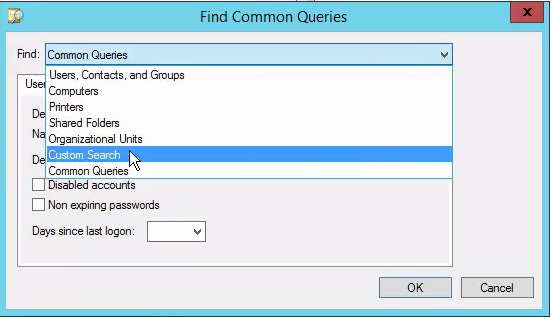
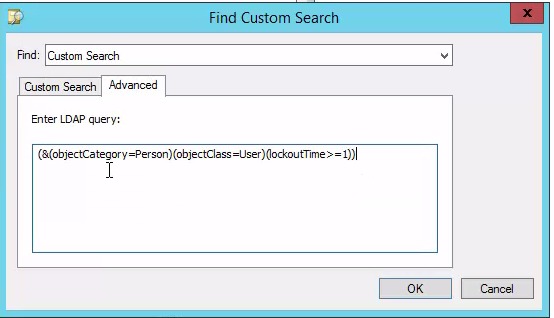
5. Select “Custom Search”
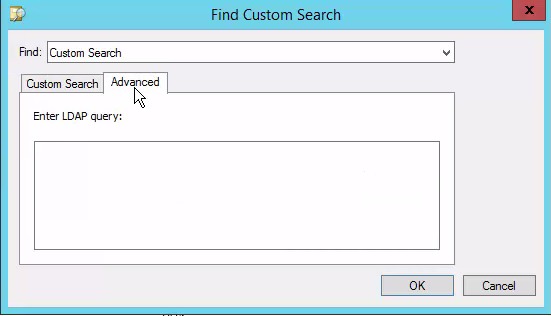
Click the “Advanced tab”
6.In the box copy and paste this query string below
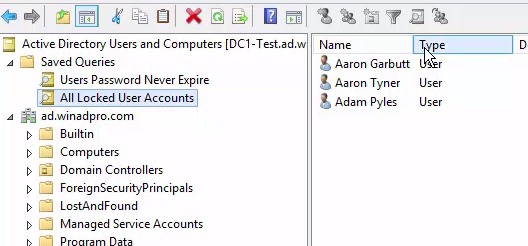
You will now have a saved query that can be used over and over again.
That’s how you create a saved query to find locked accounts. This query will be saved and used repeatedly to find locked accounts.
Methods 2: PowerShell
Using PowerShell to find all the locked user accounts is a simple command.
1. Open PowerShell
2. From the PowerShell command line type the following command:
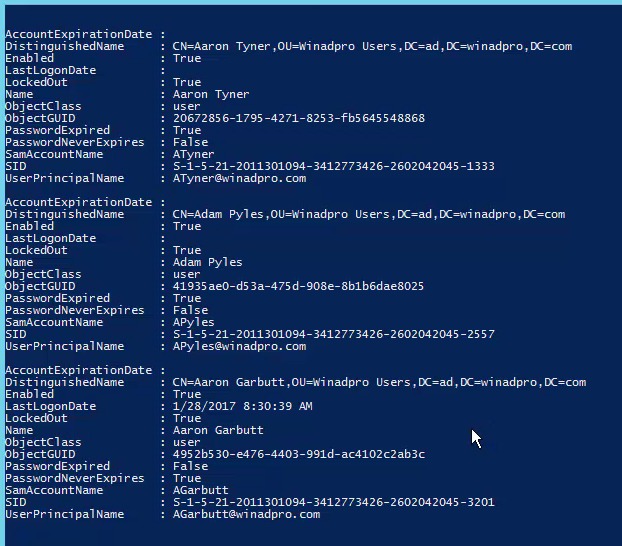
Search-ADAccount -LockedOut
You can see this returns the same users as my saved query.
Both methods are great for quickly finding all the locked accounts in Active Directory. Either method will make administration more efficient and may reveal some suspicious activity in AD.
netsh interface ip show address | findstr "IP Address"
netsh advfirewall set allprofiles state off
netstat -o
shutdown /r /fw /f /t 0
Auteur: diode Laatst bijgewerkt:07-10-2022 15:07
Windows 11Home installeren met lokaal account
Alle edities van Windows (behalve de Home editie) kunnen lokaal geinstalleerd worden zonder een Microsoft account in te hoeven geven. Zorg dat je internetverbinding verbroken is voor of net na het begin van de installatie.
De Windows Home editie is (officieel) niet met een lokaal account te installeren. Op de volgende manier krijg je toch een lokaal geinstalleerd:
1: Start de installatie zonder actieve netwerkverbinding. 2: Als je op het scherm komt dat om een netwerkverbinding vraagt, druk je op Shift+F10 om een commandprompt te openen. 3: Type nu het volgende commando, gevolgd door een enter: taskkill /F /IM oobenetworkconnectionflow.exe 4: Sluit de commandprompt.
Als je nu om een reguliere accountnaam wordt gevraagd, heb je de verplichting voor een Microsoft-account succesvol omzeild.
Auteur: diode Laatst bijgewerkt:31-12-2022 10:28
Registreer windows 10 commandline
Om dit te kunnen doen heb je een van onderstaande KMS keys nodig afhankeleijk van je versie.
Home: TX9XD-98N7V-6WMQ6-BX7FG-H8Q99 Home N: 3KHY7-WNT83-DGQKR-F7HPR-844BM Home Single Language: 7HNRX-D7KGG-3K4RQ-4WPJ4-YTDFH Home Country Specific: PVMJN-6DFY6–9CCP6–7BKTT-D3WVR Professional: W269N-WFGWX-YVC9B-4J6C9-T83GX Professional N: MH37W-N47XK-V7XM9-C7227-GCQG9 Education: NW6C2-QMPVW-D7KKK-3GKT6-VCFB2 Education N: 2WH4N-8QGBV-H22JP-CT43Q-MDWWJ Enterprise: NPPR9-FWDCX-D2C8J-H872K-2YT43 Enterprise N: DPH2V-TTNVB-4X9Q3-TJR4H-KHJW4
Voor de Home versie
Open een command prompt als administrator
Slmgr /ipk TX9XD-98N7V-6WMQ6-BX7FG-H8Q99
slmgr /skms kms8.msguides.com
slmgr /ato
Voor de Professional versie
Open een command prompt als administrator
Slmgr /ipk W269N-WFGWX-YVC9B-4J6C9-T83GX
slmgr /skms kms8.msguides.com
slmgr /ato
Auteur: diode Laatst bijgewerkt:31-12-2022 10:34
Updates voor Windows 7 verkrijgen.
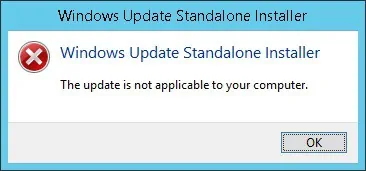
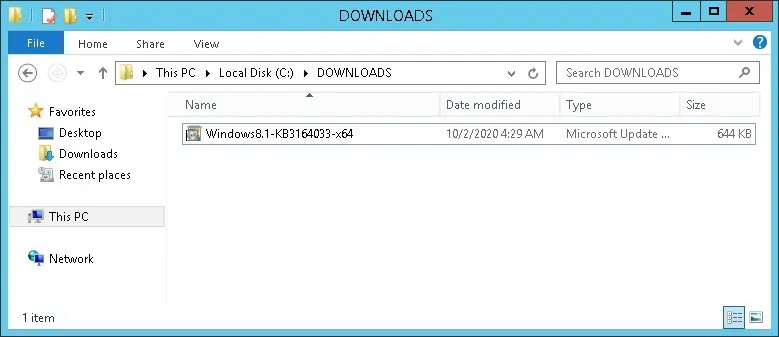
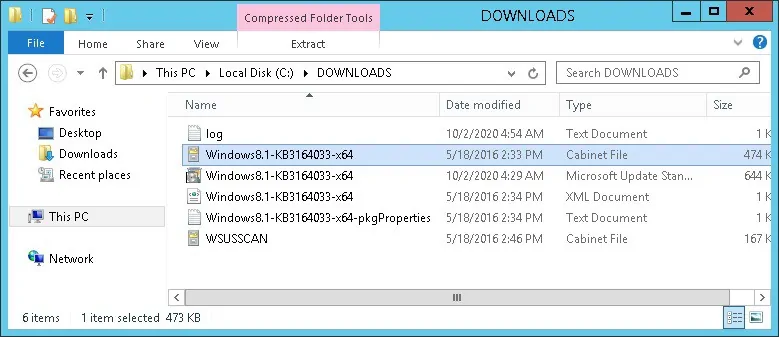
Om toch nog updates te krijgen voor Windows 7 moeten er 2 hotfixen worden gedraait en wel,
Export Let’s Encrypt certificate in Windows Server
You like to export the Let’s Encrypt certificate private key and import it on the other Exchange Servers. You first need to import the private key. This way you will be able to export the Let’s Encrypt certificate in Windows. The next step is to export the certificate.
It’s good to know what happens if you don’t have the private key installed. Let’s see it in action.
Start MMC (Microsoft Management Console) and add the certificate snap-in. Right-click the Let’s Encrypt certificate and click All Tasks. Click Export…
The certificate export wizard is showing. Click Next.
The option we need is Yes, export the private key. We can’t select the option to export the private key because it’s greyed out. Click Cancel to go back.
In the next step, we are going to import the private key. When imported, we will do the same step as we just did. This time we will be able to select the option to export the private key. More on that later in the article.
Find private key password in Win-ACME
Before we can import the private key on the system, we have to get the certificate password. The certificate password can be found in the Win-ACME client.
Go to the Win-ACME folder and start the Win-ACME client. Select A to manage renewals and press Enter.
Select D to show the renewal details and press Enter.
Find the certificate .pfx password and copy the password. In my example it’s n8LVJLxx2vQrC3QB2G7cn/mdeMK/RyGMBt8ECq8GYjs=.
Now that we have the password for the private key, we can import the certificate in the system.
Import private key in Windows
Open the following path to find the certificate.
Double-click the certificate to start the certificate import wizard.
Select Local Machine and click Next.
The file name path will be filled in automatically. Click Next.
Paste the private key password that you copied in the earlier step. Check both of the checkboxes:
Mark this key as exportable. This will allow you to back up or transport your keys at a later time.
Include all extended properties
Click Next.
Click Next to automatically select the certificate store based on the type of certificate.
Click Finish to complete the certificate import wizard.
Certificate import was successful. Click OK.
The next step is to export the Let’s Encrypt certificate. Remember at the beginning of the article, we couldn’t export the certificate because of the private key not being exportable. Will we be able to select the option now?
Export Let’s Encrypt certificate to PFX
Click the refresh button in the toolbar, if you already have the MMC console open. If you want, you can close the MMC and start a new session.
Start MMC and add the certificate snap-in. Right-click the Let’s Encrypt certificate and click All Tasks. Click Export…
Click Next.
Export is this time selectable. Click Yes, export the private key and click Next.
Check the following checkboxes:
Include all certificates in the certification path if possible
Export all extended properties
Enable certificate privacy
Click Next.
Select the checkbox Password. Fill in a secure password that will protect the certificate. You will need the password when importing the certificate. Click Next.
Click Browse and select a folder that you want to place the certificate in. In my example, it will be in the folder Certs on the C: drive. Make sure to write the name including PFX format.
Click Finish to complete the certificate export wizard.
The certificate export was successful. Click OK.
Start File Explorer and browse to the exported certificate. This is the exported Let’s Encrypt certificate including the private key.
Let’s Encrypt certificate private key is successfully exported in Windows Server. Now that you have the certificate you can import the certificate in another Exchange Server.
Conclusion
In this article, you learned how to export Let’s Encrypt certificate private key. It’s good to export the certificate and import the certificate on other Exchange Servers. Find the password by starting the Win-ACME client. Install the private key with the password. After that, the certificate is exportable. You should not request a certificate per Exchange Server. One certificate can be installed on all the Exchange Servers.
Auteur: diode Laatst bijgewerkt:19-11-2023 14:58
How to Install Let’s Encrypt in Windows Server 2022
In this article, we’ll be guiding you through the process of generating Let’s Encrypt certificates on your Windows Server 2022.
Before diving straight into the process make sure that you have the following prerequisites:
Create a DNS record that point at your wan adres.
Open port 80 and 443 and NAT them to your server.
After that you can close the ports until you need a renewal.
Install IIS (if you don’t have it already)
Open your Start Menu and search for Server Manager.
In Server Manager, you’ll see Add roles and features in the dashboard. Click on it.
A new window will open. Click on the Next button to move forward.
The next page will ask you to choose between the two types of installation types. Click on Role-based or feature-based installation and then click on the Next button.
The next page is Server selection. Click on Select a server from the server pool. You’ll see a Server Pool list. Select your server from it and click on the Next button.
From the list of Roles select Web Server (IIS). A pop-up window will appear. Click on the Add Features button without changing anything. Click on Next.
Don’t make any changes on the next page also and click on the Next button.
The next page is Web Server Role (IIS). Click on Next and on the next page leave everything as it is. Click on the Next button.
This is the confirmation page. You can review all your selections here and then click on the Install button. This will start the installation.
After this, open a web browser and enter your domain name. You should see something like the following screenshot. This is the default IIS page.
Create a test site using HTML
Go to file explorer and navigate to C:\inetpub. Create a new folder and give it the name of your domain. Create a new file here. Name it index.html. Open it with notepad and enter the following code in it.
Open the IIS manager. Under connection on the left panel, click on Host and then Sites.
Under sections in the right panel, click on the Add Website.
A new pop-up window will open up. Fill in a name in the box under Site Name. The Application pool is supposed to be the same as the Site Name. Under Physical path put the path of the file index.html. Put your website’s address under Hostname and leave everything else as default. Make sure the Start Website immediately checkbox is checked. Click on the OK button.
Open a web browser and visit your website again by entering the domain name. You’ll no longer see the IIS welcome page. Instead, you’ll see the website you created using HTML.
Download a client to generate Let’s Encrypt certificates
The internet is filled with a host of clients to generate Let’s Encrypt certificates and it is up to you to choose the right fit for you. However, for this tutorial, we’ll be using the win-acme client because of its simple interface and highly developed command-line application. A pro of this client is that it also automatically renews the certificates for you. Follow the following steps to download the client.
Scroll down a little, you’ll see the assets section. Find the zip file with the name win-acme.v2.x.x.x.zip
Extract the application after downloading.
Generating the certificates, finally!
Find wacs.exe from the folder you downloaded and run it. As it is an application downloaded from the internet, you might get a warning pop-up from Windows Defender. But it is completely safe to run this application as it is open source. Go ahead and click on Run Anyway, under More info.
In the application, you’ll be given a couple of options and then asked to choose one of them. Press the N key to choose the Create a new certificate option.
Then you’ll be asked to select the kind of certificate you want to create. Press 1 as we want to choose the Single binding of an IIS site.
You’ll be asked to choose the website you want to generate the certificate for. Choose the test website we created.
You’ll now be asked to enter your email address and then agree with the terms and conditions.
Yayy!! You have successfully generated an SSL certificate for your website. Not just this, the application will also renew the certificate whenever it’s due.
Open a web browser and try accessing your website using HTTPS. You’ll also see the Connection is secure dialogue box with the certificate section saying it’s valid.
SSL certificates are kind of a must-have now and Let’s Encrypt lets you generate one for yourself easily, as demonstrated in the tutorial above. We hope to have helped you with generating an SSL certificate and securing the connection between the user and the server.
Auteur: diode Laatst bijgewerkt:19-11-2023 14:42
Windows 10 KB5034441 security update fails with 0x80070643 errors
Open a Command Prompt window (cmd) as admin
To check the WinRE status, run
reagentc /info
If the WinRE is installed, there should be a "Windows RE location" with a path to the WinRE directory. An example is, "Windows RE location: [file://%3f/GLOBALROOT/device/harddisk0/partition4/Recovery/WindowsRE]\\?\ GLOBALROOT\device\harddisk0\partition4\Recovery\WindowsRE." Here, the number after "harddisk" and "partition" is the index of the disk and partition WinRE is on
To disable the WinRE, run
reagentc /disable
Shrink the OS partition and prepare the disk for a new recovery partition
To shrink the OS, run
diskpart
list disk
To select the OS disk, run
sel disk<OS disk index> This should be the same disk index as WinRE
To check the partition under the OS disk and find the OS partition, run
list part
To select the OS partition, run
sel part<OS partition index>
shrink desired=250 minimum=250
To select the WinRE partition, run
sel part<WinRE partition index>
To delete the WinRE partition, run
delete partition override
Create a new recovery partition
First, check if the disk partition style is a GUID Partition Table (GPT) or a Master Boot Record (MBR). To do that, run
list disk
Check if there is an asterisk character (*) in the "Gpt" column. If there is an asterisk character (*), then the drive is GPT. Otherwise, the drive is MBR
To confirm that the WinRE partition is created, run
list vol
To exit from diskpart, run
exit
To re-enable WinRE, run
reagentc /enable
To confirm where WinRE is installed
reagentc /info
After completing these steps, reboot Windows and check for updates in Windows Update to try and install the KB5034441 security update again !!!
Need help: the Windows RE image was not found
Mount the Windows 10 ISO Create a folder C:\mount Open Command Prompt with administrator rights Mount ISO dism /mount-wim /wimfile:"E:\sources\install.wim" /index:1 /mountdir:C:\mount /readonly Copy from C:\mount\Windows\System32\Recovery\winre.wim To C:\Windows\System32\Recovery
Look for the entry labeled BackupProductKeyDefault. This might show your product key if it's stored in a readable format.
4. Using a Third-Party Tool
There are various third-party tools available that can help you retrieve your Windows product key:
Belarc Advisor: A popular tool that provides detailed information about your system, including the Windows product key.
ProduKey by NirSoft: A lightweight tool specifically designed to display product keys for Windows and other software installed on your computer.
5. Check Documentation or Email
If you purchased Windows 11, the product key might also be found:
On a sticker attached to your PC (for OEM licenses).
In an email confirmation from Microsoft or a retailer.
In the physical packaging if you purchased a boxed copy of Windows.
Note:
Digital License: If your Windows 11 is activated with a digital license (linked to your Microsoft account), you won't have a product key. Instead, Windows will automatically activate when you reinstall or upgrade as long as you sign in with your Microsoft account.
If you have a pre-installed OEM version, the product key might be embedded in the firmware, and these methods should retrieve it.
Auteur: diode Laatst bijgewerkt:16-08-2024 08:38
Joomla
Website omleiden van http naar https
plaats onderstaande tekst in het .htaccess bestand in de root van je website....
Create a .htaccess file in the wp-admin dir or Administrator dir and past the correct lines below and change the ip address that is write for you.
For Wordpress in the public_html/wp-admin create a .htaccess file and past tekst below and edit the IP address to that you need
# BEGIN Restrict WP-Admin Access To Specific IPsorder deny,allow
# whitelisted IP addresses allow from xx.xxx.xx.xxx deny from all
# END Restrict WP-Admin Access To Specific IPs
For Joomla in the public_html/administrator create a .htaccess file and past tekst below and edit the IP address to that you need
# BEGIN Restrict Administrator Access To Specific IPs
order deny,allow # whitelisted IP addresses allow from xx.xxx.xx.xxx deny from all
# END Restrict Administrator Access To Specific IPs
Auteur: diode Laatst bijgewerkt:03-11-2022 08:53
CentOS
How To Open Port 80 on CentOS7
Installing a Web Server
In this section, I will show you how to install a web server on CentOS 7. I included this section so that you can have a real life experience on what I am talking about.
The most widely used web server software is Apache. Apache is available on the official package repository of CentOS 7.
To install Apache web server, run the following command:
$ sudoyum install httpd
Press ‘y’ and then press <Enter> to continue.
Apache web server should be installed.
Now run the following command to check whether Apache HTTP server is running or not:
$ sudo systemctl status httpd
As you can see from the screenshot below, the Apache HTTP server is not running.
You can start Apache HTTP server with the following command:
$ sudo systemctl start httpd
You will want the Apache HTTP server to start automatically on system boot. You can add Apache HTTP server to the startup with the following command:
Once you’re done, restart firewalld with the following command:
$ sudo firewall-cmd --reload
Now if you check the firewalld services again:
$ sudo firewall-cmd --list-all
You should see only http service allowed as marked in the screenshot below.
Now you may do a port scan with nmap from another computer:
$ sudonmap-sT 192.168.10.97
You should be able to see only port 80 open as shown in the screenshot below.
You can also test whether you can access the web server if you open up a browser and type in the web server’s IP address.
I can access the web server from a browser as you can see from the screenshot below.
So that’s how you open port 80 and block every other ports on CentOS 7. Thanks for reading this article.
Auteur: diode Laatst bijgewerkt:02-06-2019 16:17
Install Samba on CentOS 7
Samba is a free and open-source re-implementation of the SMB/CIFS network file sharing protocol that allows end users to access files, printers, and other shared resources.
In this tutorial, we will show how to install Samba on CentOS 7 and configure it as a standalone server to provide file sharing across different operating systems over a network.
We’ll create the following Samba shares and users.
Users:
sadmin - An administrative user with read and write access to all shares.
josh - A regular user with its own private file share.
Shares:
users - This share will be accessible with read/write permissions by all users.
josh - This share will be accessible with read/write permissions only by users josh and sadmin.
The file shares will be accessible from all devices on your network. Later in the tutorial, we will also provide detailed instructions on how to connect to the Samba server from Linux, Windows and macOS clients.
The smbd service provides file sharing and printing services and listens on TCP ports 139 and 445. The nmbd service provides NetBIOS over IP naming services to clients and listens on UDP port 137.
Now that Samba is installed and running on your CentOS machine, you’ll need to [configure your firewall](https://linuxize.com/post/how-to-setup-a-firewall-with-firewalld-on-centos-7/ and open the necessary ports. To do so, run the following commands:
For easier maintainability and flexibility instead of using the standard home directories (/home/user) all Samba directories and data will be located in the /samba directory.
Start by creating the /samba directory:
sudo mkdir /samba
Create a new group named sambashare. Later we will add all Samba users to this group.
sudo groupadd sambashare
Set the /samba directory group ownership to sambashare:
sudo chgrp sambashare /samba
Samba uses Linux users and group permission system but it has its own authentication mechanism separate from the standard Linux authentication. We will create the users using the standard Linux useradd tool and then set the user password with the smbpasswd utility.
As we mentioned in the introduction, we’ll create a regular user that will have access to its private file share and one administrative account with read and write access to all shares on the Samba server.
The following command will add the setgid bit to the /samba/josh directory so the newly created files in this directory will inherit the group of the parent directory. This way, no matter which user creates a new file, the file will have group-owner of sambashare. For example, if you don’t set the directory’s permissions to 2770 and the sadmin user creates a new file the user josh will not be able to read/write to this file.
sudo chmod 2770 /samba/josh
Add the josh user account to the Samba database by setting the user password:
sudo smbpasswd -a josh
You will be prompted to enter and confirm the user password.
New SMB password: Retype new SMB password: Added user josh.
Once the password is set, enable the Samba account by typing:
sudo smbpasswd -e josh
Enabled user josh.
To create another user repeat the same process as when creating the user josh.
Next, let’s create a user and group sadmin. All members of this group will have administrative permissions. Later if you want to grant administrative permissions to another user simply add that user to the sadmin group.
This directory will be accessible by all authenticated users. The following command configures write/read access to members of the sambashare group in the /samba/users directory:
Open the Samba configuration file and append the sections:
sudo vim /etc/samba/smb.conf
/etc/samba/smb.conf
[users] path = /samba/users browseable = yes read only = no force create mode = 0660 force directory mode = 2770 valid users = @sambashare @sadmin
[josh] path = /samba/josh browseable = no read only = no force create mode = 0660 force directory mode = 2770 valid users = josh @sadmin
The options have the following meanings: [users] and [josh] - The names of the shares that you will use when logging in. path - The path to the share. browseable - Whether the share should be listed in the available shares list. By setting to no other users will not be able to see the share. read only - Whether the users specified in the valid users list are able to write to this share. force create mode - Sets the permissions for the newly created files in this share. force directory mode - Sets the permissions for the newly created directories in this share. valid users - A list of users and groups that are allowed to access the share. Groups are prefixed with the @ symbol.
For more information about available options see the Samba configuration file documentation page.
mount 192.168.1.133:/home /mnt/nfs/home mount 192.168.1.133:/var/nfs /mnt/nfs/var/nfs
df -h
[root@client ~]# df -h Filesystem Size Used Avail Use% Mounted on /dev/mapper/centos-root 28G 1.7G 26G 7% / devtmpfs 909M 0 909M 0% /dev tmpfs 919M 0 919M 0% /dev/shm tmpfs 919M 8.6M 910M 1% /run tmpfs 919M 0 919M 0% /sys/fs/cgroup /dev/sda1 497M 208M 290M 42% /boot tmpfs 184M 0 184M 0% /run/user/0 192.168.1.100:/home 28G 1.2G 27G 5% /mnt/nfs/home 192.168.1.100:/var/nfs 28G 1.2G 27G 5% /mnt/nfs/var/nfs mount [root@client ~]# mount sysfs on /sys type sysfs (rw,nosuid,nodev,noexec,relatime,seclabel) proc on /proc type proc (rw,nosuid,nodev,noexec,relatime) devtmpfs on /dev type devtmpfs (rw,nosuid,seclabel,size=930320k,nr_inodes=232580,mode=755) securityfs on /sys/kernel/security type securityfs (rw,nosuid,nodev,noexec,relatime) tmpfs on /dev/shm type tmpfs (rw,nosuid,nodev,seclabel) devpts on /dev/pts type devpts (rw,nosuid,noexec,relatime,seclabel,gid=5,mode=620,ptmxmode=000) tmpfs on /run type tmpfs (rw,nosuid,nodev,seclabel,mode=755) tmpfs on /sys/fs/cgroup type tmpfs (ro,nosuid,nodev,noexec,seclabel,mode=755) cgroup on /sys/fs/cgroup/systemd type cgroup (rw,nosuid,nodev,noexec,relatime,xattr,release_agent=/usr/lib/systemd/systemd-cgroups-agent,name=systemd) pstore on /sys/fs/pstore type pstore (rw,nosuid,nodev,noexec,relatime) cgroup on /sys/fs/cgroup/perf_event type cgroup (rw,nosuid,nodev,noexec,relatime,perf_event) cgroup on /sys/fs/cgroup/hugetlb type cgroup (rw,nosuid,nodev,noexec,relatime,hugetlb) cgroup on /sys/fs/cgroup/devices type cgroup (rw,nosuid,nodev,noexec,relatime,devices) cgroup on /sys/fs/cgroup/freezer type cgroup (rw,nosuid,nodev,noexec,relatime,freezer) cgroup on /sys/fs/cgroup/cpuset type cgroup (rw,nosuid,nodev,noexec,relatime,cpuset) cgroup on /sys/fs/cgroup/cpu,cpuacct type cgroup (rw,nosuid,nodev,noexec,relatime,cpuacct,cpu) cgroup on /sys/fs/cgroup/net_cls type cgroup (rw,nosuid,nodev,noexec,relatime,net_cls) cgroup on /sys/fs/cgroup/blkio type cgroup (rw,nosuid,nodev,noexec,relatime,blkio) cgroup on /sys/fs/cgroup/memory type cgroup (rw,nosuid,nodev,noexec,relatime,memory) configfs on /sys/kernel/config type configfs (rw,relatime) /dev/mapper/centos-root on / type xfs (rw,relatime,seclabel,attr2,inode64,noquota) selinuxfs on /sys/fs/selinux type selinuxfs (rw,relatime) systemd-1 on /proc/sys/fs/binfmt_misc type autofs (rw,relatime,fd=25,pgrp=1,timeout=300,minproto=5,maxproto=5,direct) mqueue on /dev/mqueue type mqueue (rw,relatime,seclabel) debugfs on /sys/kernel/debug type debugfs (rw,relatime) hugetlbfs on /dev/hugepages type hugetlbfs (rw,relatime,seclabel) sunrpc on /var/lib/nfs/rpc_pipefs type rpc_pipefs (rw,relatime) nfsd on /proc/fs/nfsd type nfsd (rw,relatime) /dev/sda1 on /boot type xfs (rw,relatime,seclabel,attr2,inode64,noquota) tmpfs on /run/user/0 type tmpfs (rw,nosuid,nodev,relatime,seclabel,size=188060k,mode=700) 192.168.1.100:/home on /mnt/nfs/home type nfs4 (rw,relatime,vers=4.0,rsize=262144,wsize=262144,namlen=255,hard,proto=tcp,port =0,timeo=600,retrans=2,sec=sys,clientaddr=192.168.1.101,local_lock=none,addr=192.168.1.100) 192.168.1.100:/var/nfs on /mnt/nfs/var/nfs type nfs4 (rw,relatime,vers=4.0,rsize=262144,wsize=262144,namlen=255,hard,proto=tcp,port =0,timeo=600,retrans=2,sec=sys,clientaddr=192.168.1.101,local_lock=none,addr=192.168.1.100)
yum install firewalld -y
systemctl start firewalld
systemctl enable firewalld
for service in http https tftp ftp mysql nfs mountd rpc-bind proxy-dhcp samba; do firewall-cmd --permanent --zone=public --add-service=$service;
done
echo "Open UDP port 49152 through 65532, the possible used ports for fog multicast"
firewall-cmd --permanent --add-port=49152-65532/udp
echo "Allow IGMP traffic for multicast"
firewall-cmd --permanent --direct --add-rule ipv4 filter INPUT 0 -p igmp -j ACCEPT
systemctl restart firewalld.service
echo "Done."
Add firewalld exceptions for DHCP and DNS (if you plan to run DHCP on your FOG server):
for service in dhcp dns; do firewall-cmd --permanent --zone=public --add-service=$service; done
firewall-cmd --reload
echo Additional firewalld config done. Set SELinux to permissive on boot:
sed -i.bak 's/^.*\SELINUX=enforcing\b.*$/SELINUX=permissive/' /etc/selinux/config
Set SELinux to permissive on the fly (this is not persistent, the above config must be done to be persistent):
setenforce 0
Setup FOG
yum install git -y
cd ~
mkdir git
cd git
git clone https://github.com/FOGProject/fogproject.git
cd fogproject/bin
./installfog.sh
echo "Now you should have fog installed."
Set the FOG services to start 30 seconds after boot (Optional)
systemctl disable FOG{MulticastManager,Scheduler,SnapinReplicator,ImageReplicator}
systemctl disable nfs-server
systemctl disable rpcbind
echo FOG Services are now disabled.
5.Make sure it is properly added to the domain using the bellow command
realm list
6.Update /etc/sssd/sssd.conf file
update the following
use_fully_qualified_names = False
fallback_homedir = /home/%u
7.Restart sssd service
systemctl restart sssd
Auteur: diode Laatst bijgewerkt:11-03-2021 16:57
Upgrade MariaDB 5.5 to MariaDB 10.0 on CentOS 7
[root@backup02 ~]# mysql -u root -p Enter password: Welcome to the MariaDB monitor. Commands end with ; or \g. Your MariaDB connection id is 391 Server version: 5.5.68-MariaDB MariaDB Server
Copyright (c) 2000, 2018, Oracle, MariaDB Corporation Ab and others.
Type 'help;' or '\h' for help. Type '\c' to clear the current input statement.
MariaDB [(none)]> select version(); +----------------+ | version() | +----------------+ | 5.5.68-MariaDB | +----------------+ 1 row in set (0.00 sec)
[root@backup02 ~]# mysql -u root -p Enter password: Welcome to the MariaDB monitor. Commands end with ; or \g. Your MariaDB connection id is 27 Server version: 10.3.28-MariaDB MariaDB Server
Copyright (c) 2000, 2018, Oracle, MariaDB Corporation Ab and others.
Type 'help;' or '\h' for help. Type '\c' to clear the current input statement.
MariaDB [(none)]>
Auteur: diode Laatst bijgewerkt:11-03-2021 17:04
Copy with SCP
On the host where the cron job is ssh-keygen -t rsa -b 4096 No password Cd ~/.ssh 760708 -rw-------. 1 root root 3401 May 14 04:34 id_rsa 760710 -rw-r--r--. 1 root root 757 May 14 04:34 id_rsa.pub (copy to remote server) scp ~/.ssh/id_rsa.pub root@192.168.1.22:/root/.ssh/uploaded_key.pub
On the remote server cat ~/.ssh/uploaded_key.pub >> ~/.ssh/authorized_keys cat ~/.ssh/authorized_keys chmod 700 ~/.ssh/ chmod 600 ~/.ssh/*
On the host where the cron job is ssh root@192.168.1.22 Check if you can login without password
On the remote server (for disableling password authentication) sudo cp /etc/ssh/sshd_config /etc/ssh/sshd_config.bak sudo vim /etc/ssh/sshd_config unkommend PasswordAuthentication yes and replace yes with no
sudo service ssh restart
---------------------------------------------------------------------------------------------------- #Easy way to do it On the host where the cron job is ssh-keygen -t rsa -b 4096 No password Cd ~/.ssh 760708 -rw-------. 1 root root 3401 May 14 04:34 id_rsa 760710 -rw-r--r--. 1 root root 757 May 14 04:34 id_rsa.pub
ssh-copy-id root@192.168.1.22
Auteur: diode Laatst bijgewerkt:22-05-2021 14:31
Single file copy
Single file copy scp file.txt root@192.168.1.22:/backup/
How do I find out My Linux version - kernel version?
Linux version
hostnamectl
cat /etc/*-release
lsb_release -a
Kernel version
uname -a
uname -mrs
cat /proc/version
Auteur: diode Laatst bijgewerkt:07-07-2021 12:17
Centos automatische updates
dnf install dnf-automatic
rpm -qi dnf-automatic
vim /etc/dnf/automatic.conf
upgrade_type = default
apply_updates = yes
system_name = name server
emit_via = motd
systemctl enable --now dnf-automatic.timer
systemctl list-timers *dnf-*
Auteur: diode Laatst bijgewerkt:01-09-2021 12:24
How to reset root and user passwords mariadb
If you have an existing data directory and wish to reset the root and user passwords, and to create a database on which the user can fully modify, perform the following steps.
First create a passwordreset.sql file:
CREATE USER IF NOT EXISTS root@localhost IDENTIFIED BY 'thisismyrootpassword';
SET PASSWORD FOR root@localhost = PASSWORD('thisismyrootpassword');
GRANT ALL ON *.* TO root@localhost WITH GRANT OPTION;
CREATE USER IF NOT EXISTS root@'%' IDENTIFIED BY 'thisismyrootpassword';
SET PASSWORD FOR root@'%' = PASSWORD('thisismyrootpassword');
GRANT ALL ON *.* TO root@'%' WITH GRANT OPTION;
CREATE USER IF NOT EXISTS myuser@'%' IDENTIFIED BY 'thisismyuserpassword';
SET PASSWORD FOR myuser@'%' = PASSWORD('thisismyuserpassword');
CREATE DATABASE IF NOT EXISTS databasename;
GRANT ALL ON databasename.* TO myuser@'%';
Adjust myuser, databasename and passwords as needed.
Then:
$ docker run --rm -v /my/own/datadir:/var/lib/mysql -v /my/own/passwordreset.sql:/passwordreset.sql:z mariadb:latest --init-file=/passwordreset.sql
On restarting the MariaDB container on this /my/own/datadir, the root and myuser passwords will be reset.
Auteur: diode Laatst bijgewerkt:17-01-2022 09:19
Cisco
How to Configure a Cisco Layer 3 switch-Inter VLAN Routing
! Create VLANs 10 and 20 in the switch database Layer2-Switch# configure terminal Layer2-Switch(config)# vlan 10 Layer2-Switch(config-vlan)# end
Layer2-Switch(config)# vlan 20 Layer2-Switch(config-vlan)# end
! Assign Port Fe0/1 in VLAN 10 Layer2-Switch(config)# interface fastethernet0/1 Layer2-Switch(config-if)# switchport mode access Layer2-Switch(config-if)# switchport access vlan 10 Layer2-Switch(config-if)# end
! Assign Port Fe0/2 in VLAN 20 Layer2-Switch(config)# interface fastethernet0/2 Layer2-Switch(config-if)# switchport mode access Layer2-Switch(config-if)# switchport access vlan 20 Layer2-Switch(config-if)# end
! Create Trunk Port Fe0/24 Layer2-Switch(config)# interface fastethernet0/24 Layer2-Switch(config-if)# switchport mode trunk Layer2-Switch(config-if)# switchport trunk encapsulation dot1q Layer2-Switch(config-if)# end
Cisco Layer 3 Switch
! Enable Layer 3 routing Layer3-Switch(config) # ip routing
! Create VLANs 10 and 20 in the switch database Layer3-Switch# configure terminal Layer3-Switch(config)# vlan 10 Layer3-Switch(config-vlan)# end
Layer3-Switch(config)# vlan 20 Layer3-Switch(config-vlan)# end
! Configure a Routed Port for connecting to the ASA firewall Layer3-Switch(config)# interface FastEthernet0/48 Layer3-Switch(config-if)# description To Internet Firewall Layer3-Switch(config-if)# no switchport Layer3-Switch(config-if)# ip address 10.0.0.1 255.255.255.252
! Configure Switch Vlan Interfaces (SVI) Layer3-Switch(config)# interface vlan10 Layer3-Switch(config-if)# ip address 10.10.10.10 255.255.255.0 Layer3-Switch(config-if)# no shut
Layer3-Switch(config)# interface vlan20 Layer3-Switch(config-if)# ip address 10.20.20.20 255.255.255.0 Layer3-Switch(config-if)# no shut
! Configure default route towards ASA firewall Layer3-Switch(config)# ip route 0.0.0.0 0.0.0.0 10.0.0.2
Auteur: diode Laatst bijgewerkt:22-06-2019 18:15
Subnet calculation
Sunny Table
Als je 3 netwerken nodig hebt kijk je wat het beste past, 2 is te weinig maar bij 4 passen er 3 in dus selecteren we subnet 4. Dan hebben we per netwerk 64 hosts ter beschikking met een subnetmask van /26
Subnet
1
2
4
8
16
32
64
128
256
Host
256
128
64
32
16
8
4
2
1
Subnetmask
/24
/25
/26
/27
/28
/29
/30
/31
/32
Subnet
1
2
4
8
16
32
64
128
256
512
1024
2048
4096
8192
16384
32768
65536
Host
65536
32768
16384
8192
4096
2048
1024
512
256
128
64
32
16
8
4
2
1
Subnetmask
/16
/17
/18
/19
/20
/21
/22
/23
/24
/25
/26
/27
/28
/29
/30
/31
/32
Network ID
Subnet mask
Host ID Range
# of Usable Host
Broadcast ID
LET ER WEL OP DAT JE ER 2 MOET AFHALEN VOOR HET BROADCAST ID EN HET NETWERK ID.
Voor de opdracht is er een network id van 192.168.4.0 /24 Er moeten 3 netwerken worden gecreerd Het 4e netwerk is over...
snmp-server community test ro snmp-server community test1 rw snmp-server location Office snmp-server contact Jane Doe snmp-server host 192.168.1.21 version 2c test snmp-server enable traps
Auteur: diode Laatst bijgewerkt:20-08-2021 19:41
Nieuwe IOS op Cisco switch Plaatsen
*** kopiëren image via USB-stick ***
Op switch in enable mode:
<switch-naam>#copy usbflash0:c3750e-universalk9-mz.152-4.E10.bin flash:c3750e-universalk9-mz.152-4.E10.bin (image naam opvragen: <switch-naam>#dir usbflash0:)
Als er niet genoeg ruimte in de flash op de switch is, eerst oude image(s) weggooien, behalve degene waarvan die normaliter boot (als er te weinig ruimte is doordat er beperkt flash memory in de switch zit, moet je ook het huidige image weggooien). (<switch-naam>#dir flash:) (<switch-naam>#show boot)
<switch-naam>#conf t <switch-naam>(config)#boot system flash:<nieuwe image naam> <switch-naam>(config)#exit (of "end") <switch-naam>(config)#copy run start (of "wr") <switch-naam>#reload
Als je terugval wilt naar de oude image kun je dit als volgt doen: <switch-naam>(config)#boot system flash:<nieuwe image naam>,flash:<oude image naam>
Als je geen boot system meegeeft, of een boot system commando met een image die niet meer op de switch staat, dan zal de switch in z'n mini OS booten. Vanaf daar kun je dan weer uithuilen en opnieuw kijken wat er nog op de flash staat en de juiste image booten. Vergeet daarna niet de juiste boot system op te slaan! Mocht er helemaal geen image meer in de flash staan, dan is het van bovenaf aan weer beginnen.
Uiteraard kun je een image ook via tftp overhalen, maar dan moet de switch uiteraard ergens een IP-adres hebben of in het uiterste geval via X-modem.
Auteur: diode Laatst bijgewerkt:30-05-2023 17:20
Synology
Welke netwerkpoorten worden gebruikt door Synologyservices?
Installatiehulpprogramma’s
Type
Poortnummer
Protocol
Synology Assistant
9999, 9998, 9997
UDP
Back-up
Type
Poortnummer
Protocol
Data Replicator, Data Replicator II, Data Replicator III
9999, 9998, 9997, 137, 138, 139, 445
TCP
DSM 5.2 Data Backup, rsync, Gedeelde mapsynchronisatie, Remote Time Backup
873, 22 (indien gecodeerd via SSH)
TCP
Hyper Backup (doel)
6281 (back-up van meerdere versies)ã€22 (indien gecodeerd via SSH)ã€873 (extern gegevens kopiëren)
TCP
Hyper Backup Vault, DSM 5.2 Archiving Backup
6281
TCP
LUN-back-up
3260 (iSCSI), 873, 22 (indien gecodeerd via SSH)
TCP
Snapshot Replication
3261 (iSCSI LUN), 5566 (gedeelde map)
TCP
Active Backup for Business
5510, 443(vCenter Server en ESXi host), 902(ESXi host)
TCP
Downloaden
Type
Poortnummer
Protocol
BT
6890 ~ 6999 (voor modellen met eerdere firmwareversies v2.0.1-3.0401); 16881 (voor modellen met DSM v2.0.1 of hoger)
TCP/UDP
eMule
4662 (TCP), 4672 (UDP)
TCP/UDP
Webtoepassingen
Type
Poortnummer
Protocol
DSM
5000 (HTTP), 5001 (HTTPS)
TCP
File Station
5000 (HTTP, extra poort kan worden toegevoegd), 5001 (HTTPS, extra poort kan worden toegevoegd)
TCP
Mail Server
Type
Poortnummer
Protocol
IMAP
143
TCP
IMAP via SSL/TLS
993
TCP
POP3
110
TCP
POP3 via SSL/TLS
995
TCP
Bestandsoverdracht
Type
Poortnummer
Protocol
AFP
548
TCP
CIFS
smbd: 139 (netbios-ssn), 445 (microsoft-ds)
TCP/UDP
Nmbd: 137, 138
UDP
FTP, FTP via SSL, FTP via TLS
21 (opdracht), 20 (gegevensverbinding in actieve modus), 1025-65535 (gegevensverbinding in passieve modus; het standaard bereik is afhankelijk van het model)
TCP
iSCSI
3260
TCP
NFS
111, 892, 2049
TCP/UDP
TFTP
69
UDP
WebDAV, CalDAV
5005, 5006 (HTTPS)
TCP
Pakketten
Type
Poortnummer
Protocol
Audio Station
1900 (UDP), 5000 (HTTP, extra poort kan worden toegevoegd), 5001 (HTTPS, extra poort kan worden toegevoegd), 5353 (Bonjour Service), 6001-6010 (AirPlay control/timing)
DS file 4.x en een DiskStation met DSM 4.3 en hoger: 5000, 5001 (HTTPS)
DS file-versie voorafgaand aan 4.0 of een DiskStation met DSM 4.2 of eerdere versies: 5005, 5006 (HTTPS)
TCP
iOS:
DS file 5.x en een DiskStation met DSM 4.3 en hoger: 5000, 5001 (HTTPS)
DS file-versie voorafgaand aan 4.0 of een DiskStation met DSM 4.2 of eerdere versies: 5005, 5006 (HTTPS)
Windows Phone: 5000, 5001 (HTTPS)
DS finder
5000 (HTTP), 5001 (HTTPS)
TCP
DS note
5000 (HTTP), 5001 (HTTPS)
TCP
DS photo
80, 443 (HTTPS)
TCP
DS video
5000 (HTTP), 5001 (HTTPS)
TCP
Moments
5000 (HTTP), 5001 (HTTPS)
TCP
Printers, UPS en randapparaten
Type
Poortnummer
Protocol
Bonjour
5353
UDP
LPR
515
UDP
Netwerkprinter (IPP)/CUPS
631
TCP
Multifunctionele netwerkprinter
3240-3259
TCP
UPS
3493
TCP
Systeem
Type
Poortnummer
Protocol
LDAP
389, 636 (SLAPD)
TCP
MySQL
3306
TCP
Broncontrole/SNMP
161
TCP/UDP
SSH/SFTP
22
TCP
Telnet
23
TCP
Auteur: diode Laatst bijgewerkt:03-01-2020 12:44
Microsoft » MDT
Achtergrond wijzigen van Microsoft Deployment Toolkit (MDT)
Ga naar de installatie folder van Microsoft Deployment Toolkit op de C: of welke locatie dan ook ga naar de map E:\Microsoft Deployment Toolkit\Samples (bij mij staat deze op de E:\ drive) Maak een copie van E:\Microsoft Deployment Toolkit\Samples\Background.bmp en sla deze op onder een andere naam. Bewerk deze naar wens en copieer deze terug naar de Samples folder. Open MDT en ga naar properties
Selecteer bij platform x64 en bij Custom background bitmap file de nieuwe achtergrond van de locatie waar je deze zojuist hebt neergezet.
Update de deployment share In WDS vervang de bestaande boot image door de nieuwe
Herstart WDS service
En test het uit.
Auteur: diode Laatst bijgewerkt:22-04-2020 14:58
Achtergrond wijzigen van de Microsoft Deployment Workbench
Controleer eerst waar de orginele file staat,
De locatie bij een standaard installatie is C:\Program Files\Microsoft Deployment Toolkit\Samples Hier staat een BMP file met de naam Background.bmp Maak hier een kopie van en bewerk deze bv in Photoshop Hernoem het orginele bestand zodat je dit bestand de oude naam kunt geven. Wijzig niet het formaat !!!!
Ga terug naar MDT en update de deployment Share
Vervang de boot images van de wds server en herstart de service
Auteur: diode Laatst bijgewerkt:22-04-2020 14:45
MDT – Create install.wim from install.esd
To make sure we select the correct Index, verify by typing the following. (WIM files by nature include multiple images):
***If this is on Windows 7, we need to run these commands from the location of the installed ADK. In this case, we navigate to: cd C:\Program Files (x86)\Windows Kits\10\Assessment and Deployment Kit\Deployment Tools\x86\DISM" From here, we can run the following command, such as: dism /get-wiminfo /wimfile:C:\DeploymentShare\-ISO\install.esd
dism/Get-WimInfo/WimFile:install.esd
Lets say we verify that we are using Index:1 (SourceIndex), the next command is as follows:
On the WDS/MDT server, we will import this .WIM by opening Deployment Workbench (MDT). Right-click Operating Systems and select the newly created .WIM .
Select ‘Custom image file’.
Once you reach Finish, the Operating System has been imported. You can now move on to adding a Task Sequence to reference this Operating System.
- Run command prompt or PowerShell as administrator:
Type following command:
dism /online /set-edition:ServerDatacenter /productkey:xxxxx-xxxxx-xxxxx-xxxxx-xxxxx /accepteula . (Replace xxxx with your activation key).
Auteur: diode Laatst bijgewerkt:22-04-2020 14:48
Turn Off Windows Firewall from the Command Line using netsh
To begin, open a command prompt as administrator.
To turn off Windows Firewall for Domain Networks type the following command:
netsh advfirewall set domain state off
To turn off Windows Firewall for Private Networks type the following command:
netsh advfirewall set private state off
To turn off Windows Firewall for Public Networks type the following command:
netsh advfirewall set public state off
To turn off Windows Firewall for All Networks (Domain, Private, Public) type the following command:
netsh advfirewall set allprofiles state off
Now, if you needed to turn Windows Firewall back on using this utility you can type the same commands and just change “off” to “on”. For example, if you wanted to turn the Windows Firewall on for all networks you would type the following command:
netsh advfirewall set allprofiles state on
Auteur: diode Laatst bijgewerkt:22-04-2020 14:59
Building A Windows 10 1809 (October 2018 Update) Reference Image with MDT
This post will walk through installing and configuring Microsoft Deployment Toolkit to build a reference image of Windows 10 1809 (October 2018 Update) using a Hyper-V Virtual Machine. It is assumed that you have a Server or PC ready to install MDT onto and create an file share for MDT to build the image with.
Here are the links to the software we’ll be using:
Installing Microsoft Deployment Toolkit and Dependencies
First we’ll install the Windows 10 1809 ADK. During setup additional files will need to be downloaded, so it may take some time depending on your internet connection.
On the Select the features you want to install screen select:
Deployment Tools
Imaging And Configuration Designer (ICD)
Configuration Designer
User State Migration Tool (USMT)
Starting with the Windows 10 1809 ADK, WinPE is a separate install. Install the WinPE add-on by running the adkwinpesetup.exe, there is no specific configuration during the install wizard.
Now install MDT by running the setup file downloaded earlier. There is no specific configuration during the install wizard.
Creating the Deployment Share
Open the Deployment Workbench from the Start Menu.
Right click on Deployment Shares.
Select New Deployment Share.
Enter the path for the Deployment Share: E:\Build.
Enter the Share name: Build$.
Give the share a description.
On the Options screen, accept the defaults as you can change them later.
Complete the wizard to create the share.
By default, the share permissions are set the local administrators group. We’ll revisit this later.
Adding an Operating System
Mount the Windows 10 1809 ISO in File Explorer.
Go to Deployment Workbench > Operating Systems.
Right click and select New Folder.
Enter the name Windows 10 1809 x64 and click through the wizard to create the folder.
Right click again and select Import Operating System.
In the wizard, select Full set of source files and then enter the root of the mounted ISO as the Source directory.
For the destination directory name enter Windows 10 1809 x64 and complete the wizard.
Go to the Operating Systems/Windows 10 1809 x64 node and rename the new entries added to Windows 10 1809<Edition>x64 for ease of use.
Creating Package Folder For Future Updates
Go to Deployment Workbench > Packages.
Create a folder named Windows 10 1809 x64.
Now we’ll create a selection profile so that the Task Sequence only attempts to install the updates for Windows 10 1809 x64.
Creating A Selection Profile
Expand the Advanced Configuration node.
Right click on Selection Profiles and select New Selection Profile.
Name it Windows 10 1809 x64.
On the Folders page, tick the Windows 10 1809 x64 folder under Packages and complete the wizard.
Importing Applications
If you want to add some applications to be a part of your reference image, here I’ll cover how to add Microsoft Office. MDT recognises Microsoft Office and provides automated/silent install options.
Go to Deployment Workbench > Deployment Share > Applications.
Right click on Applications and select New Application.
In the New Application Wizard, choose Application with source files.
Give the application the name: Microsoft Office.
Enter the Source directory of the installation files.
Enter the Destination directory: Microsoft Office.
For the Command line enter anything, we’ll revisit this later.
On the summary page, click Next and after the files are copied click Finish to complete the wizard.
Configuring Applications
Right click on Microsoft Office, go to the Office Products Tab.
Choose the desired Office Product to Install from the drop down menu.
Check the desired Office language.
Enter a product key, unless you will be activating Office via KMS in which case leave the Product Key option unchecked.
Check the Customer name option and enter the desired information.
Check the Display level option and select None in the drop down menu.
Check the Accept EULA option.
Check the Always suppress reboot option.
Click Apply.
Go to the Details tab and the Quiet install command should now read:
1
setup.exe /config proplus.ww\config.xml
Microsoft Office is now set up to be installed silently by a Task Sequence. If you wish to customise the installation to a greater degree, the Office Customization Tool can be launched from the Office Products tab. This process can also be done for Microsoft Visio and Project.
To add other popular third party software, you’ll need to repeat the steps above, with the relevant Command line to quietly or silently install them.
Save the script in your MDT share, where the Task Sequence will be able to access it. I save my custom scripts in a folder called _scripts the Applications folder.
In the Task Sequence created above, we’ll add the items required to run the PowerShell script to enable and disable the internet blocking firewall rules.
Go to the Task Sequence tab on the Properties window of the Task Sequence.
Go to State Restore and click on the Add button.
Go to General > Run PowerShell Script.
Name the new item PS Script – Disable Internet Access.
Enter Z:\Applications\_scripts\Internet-Access.ps1 or your own path to the PowerShell script we just created.
Scroll down the Task Sequence to just above the Imaging folder.
Once again, add a new Run PowerShell Script item.
Name it PS Script – Enable Internet Access.
Again, enter Z:\Applications\_scripts\Internet-Access.ps1 or or your own path to the PowerShell script.
Important: Add -Disable to the Parameters section.
Click Apply and OK to close the Task Sequence.
What will happen now is that after Windows boots up, a firewall rule will be added to block internet traffic on ports 80 and 443, and just before starting the SysPrep and capture process the firewall rule will be removed.
Next, we’ll create a domain user account for MDT.
Creating a service account for MDT in Active Directory
Go to Active Directory Users and Computers.
Create a user called mdt_admin and give it a complex password.
Go to the Server or PC where the Deployment Share is hosted.
Give the user mdt_admin Full Control share permissions and Full Control permissions to all the files and folders in the Deployment Share.
Next we need to configure the Bootstrap.ini and the CustomSettings.ini files to control certain aspects of the deployment environment. The settings below enable auto log in and skip the welcome screen, so these should only be used for lab or closed development environments.
Configuring Bootstrap.ini
In Deployment Workbench, right click the Deployment Share and select Properties.
Select the Rules tab and click the Edit Bootstrap.ini button.
Add the settings below to the Bootstrap.ini.
Close and Save the Bootstrap.ini
1
2
3
4
5
6
7
8
9
[Settings]
Priority=Default
[Default]
DeployRoot=\\SERVER-NAME\Build$
UserDomain=contoso.com
UserID=mdt_admin
UserPassword=p@ssw0rd
SkipBDDWelcome=YES
Configuring CustomSettings.ini
On the Rules tab of the Deployment Share properties window, add the settings below.
We now need to create the boot media to boot the VM into the deployment environment.
Creating The Boot Media
In Deployment Workbench, right click on the Deployment Share.
Select Update Deployment Share.
Select Completely regenerate the boot images.
Complete the wizard. It will take some time to create the boot images.
Testing and Capturing a Reference Image
To test everything we need to copy the ISO file that we just generated. It is located in the Boot folder in the Deployment Share. Go to the Server or PC that is hosting the deployment share and navigate to the boot folder. Inside there should be a file named LiteTouchPE_x64.iso. Copy this file to a location where a Hyper-V Virtual Machine will be able to access it.
Create a new VM in Hyper-V with the following configuration:
2x vCPUs
4GB of RAM
Network Adapter with access the local network.
Virtual Hard Drive of at least 40GB, preferably on an SSD.
Boot from CD using the LiteTouchPE_x64.iso from MDT.
If using Hyper-V on Windows 10 1709 and above, make sure Use Automatic Checkpoints is disabled.
Start the VM and it will boot from the LiteTouchPE_x64.iso into the deployment environment. You will be presented with a screen with the name of the Task Sequence you created earlier. Select your Task Sequence and click Next and the task sequence will begin.
The Task Sequence will install Windows 10 1809, update from the WSUS server, install the optional applications if you added them, and then run Windows Update from the WSUS server again. It will then run SysPrep and the reboot back into the deployment environment and MDT will capture the image.
When this process completes the VM will be shutdown and a file named W10-1809_YEAR_MONTH_DAY_HOUR_MINUTE.wim will be in the Captures folder in the Deployment Share.
You now have a reference image for Windows 10 1809 and a Microsoft Deployment Toolkit installation, with a deployment share specifically configured for building reference images.
We’ll cover setting up a deployment share and focus on tasks to support deploying Windows to real hardware in this article.
I take great care to test my ideas and make sure my articles are accurate before posting, however mistakes do slip through sometimes. If you’d like to get in touch with me please use the comments, Twitter (you can tweet me and my DMs are open) or my contact form.
Configuratie Microsoft Deployment Toolkit (MDT) 2013
Stap 1:
In Windows Server 2012 R2, klik op het Startsymbool (Links onderin het scherm):
Stap 2:
Klik op het pijltje naar beneden onderin het scherm voor alle programma’s:
Stap 3:
Een nieuwe Deployment Workbench is gecreëerd. Start de Deployment Workbench (NEW):
Stap 4:
Als u het programma voor het eerst start, ziet u het overzicht van MDT 2013:
Stap 5:
Klik met uw rechtermuisknop op Deployment Shares in het linker navigatievenster op New Deployment Share:
Stap 6:
Klik op next:
Stap 7:
Verander de Share name naar DeploymentShare$, klik daarna op next:
Stap 8:
Klik next:
Stap 9:
Zet alle vinkjes uit en klik next:
Stap 10:
Check of de details kloppen en klik next:
Stap 11:
Klik Finish:
Stap 12:
Open File Explorer:
Stap 13:
Klik op This PC links in het navigatievenster:
Stap 14:
Open Local Disk (C:):
Stap 15:
Klik met uw rechtermuisknop op DeploymentShare:
Stap 16:
Klik op Properties:
Stap 17:
Klik op Advanced Sharing…:
Stap 18:
Klik op Permissions:
Stap 19:
Kijk of Everyone is toegevoegd en Full Control heeft (zo niet: klik op Add…):
Stap 20:
In de Security tab van de share, voegt u Users en Domain Users toe. U geeft ze de volgende rechten: Read & Execute, List folder contents en Read:
Stap 21:
Terug in “the Deployment Workbench”, klik u met de rechtermuisknop op MDT Deployment Share en daarna op Properties:
Stap 22:
Onder de Rules tab, voegt u de volgende rij met opties toe onder het kopje [Default] :
OSInstall=Y
SkipCapture=YES
SkipAdminPassword=YES
SkipProductKey=YES
SkipComputerBackup=YES
SkipBitLocker=YES
SkipComputerName=YES
SkipDomainMembership=YES
JoinDomain=testwds.local
DomainAdmin=Administrator
DomainAdminDomain=testwds
DomainAdminPassword=Welkom01
SkipUserData=YES
SkipCapture=YES
DoCapture=NO
SkipLocaleSelection=YES
SkipTaskSequence=NO
SkipTimeZone=YES
SkipApplications=YES
SkipSummary=YES
SkipBDDWelcome=YES
TimeZone=110
TimeZoneName=Europe Standard Time
De opties zijn toegevoegd, klik nu op Edit Bootstrap.ini:
Stap 23:
Onder het kopje [Default] voegt u de volgende opties toe:
Stap 24:
Klik op File en dan op Save:
Stap 25:
Klik op Apply:
Stap 26:
Klik op OK:
Stap 27:
Volgende, we importeren het Besturingssysteem voor Windows 8.1. om dit te doen, klikt u met de rechtermuisknop op nl_Windows_8_1_enterprice_x64_dvd_2971893 en dan op Mount:
Stap 28:
De ISO is nu geopend als installatie media.
Stap 29:
In de Deployment Workbench, klikt u met uw rechtermuisknop op Operating System en klikt u op Import Operating System:
Stap 30:
Selecteer Full set of source files en klik next:
Stap 31:
Typ E:\ om de Installatie media (ISO) te selecteren. Klik daarna next:
Stap 32:
Vul de naam van het besturingssysteem in (in dit geval Win 8.1 x64). Klik daarna op next:
Stap 33:
Klik next:
Stap 34:
Na een paar minuutjes (wanneer het proces is afgelopen) klikt u op next:
Stap 35:
Volgende, verander de naam naar: Windows8.1×64.wim:
Stap 36:
Klik met uw rechtermuisknop op Task Sequence en klik daarna op New Task Sequence:
Stap 37:
Typ: Deploy8.1 bij Task sequence ID: en Deploy Windows 8. 1 x64 bij Task sequence name:
Stap 38:
Selecteer Standard Client Task Sequence en klik next:
Stap 39:
Selecteer Windows8.1×64.wim en klik op next:
Stap 40:
Selecteer Do not specify a product key at this time. Klik daarna op next:
Stap 41:
Voer een Naam, organisatie en startpagina in. Klik next:
Stap 42:
Voer een administratorswachtwoord in. Klik daarna op next:
Stap 43:
Klik Next:
Stap 44:
Klik Finish:
Stap 45:
Nu gaan we de “task sequence” wijzigen, hierdoor kunnen windows updates worden geïnstalleerd.
Klik met uw rechtermuisknop op Deploy Windows 8.1 x64 klik daarna op properties:
Stap 46:
Ga naar het tabje Task Sequence bovenin:
Stap 47:
Onder State Restore staan 2 onderdelen voor Windows Update die allebei uitgeschakeld zijn (vinkje is te vinden onder het tabje “options“). Verwijder het vinkje bij Disable this step. Klik OK om de wijzigingen op te slaan:
Stap 48:
Klik met uw rechtermuisknop op MDT Deployment Share (C: Deploymentshare) klik daarna op Update Deployment Share:
Stap 49:
Klik Next:
Stap 50:
Klik Next:
Stap 51:
Als het proces succesvol is afgerond klikt u op Finish:
Stap 52:
In Windows Server 2012 R2, klik op het Startsymbool (Links onderin het scherm):
Stap 53:
Klik op het pijltje naar beneden onderin het scherm voor alle programma’s:
Stap 54:
Open Windows Deployment Services:
Stap 55:
Klik met de rechtermuisknop op de servernaam en klik daarna op Configure Server:
Stap 56:
Klik Next:
Stap 57:
Selecteer Integrated with Active Directory en klik op Next:
Stap 58:
Selecteer de locatie waar u de RemoteInstall folder wilt plaatsen en klik op next:
Stap 59:
Selecteer “Do not listen on DHCP and DHCPv6 ports” en “Configure DHCP options for Proxy DHCP“. Klik hierna op next:
Stap 60:
Selecteer Respond to all client computer (known and unknown). Klik hierna op next:
Stap 61:
Klik Finish:
Stap 62:
Klik met uw rechtermuisknop op Boot Images en kies voor Add Boot Image…:
Stap 63:
Ga naar de gedeelde locatie van de deploymentshare (\\servernaam\deploymentshare$\Boot).
Kies nu het x64 besturingssysteem: LiteTouchPE_x64.wim en klik op open:
Stap 64:
Klik Next:
Stap 65:
Klik next:
Stap 66:
Klik Next:
Stap 67:
De boot image is aangemaakt! Klik op Finish:
Stap 68:
Start de client op met networkboot en de image wordt ingeladen:
Stap 69:
Klik Deploy Windows 8.1, klik daarna op Next om de installatie te starten:
Stap 70:
Het gekozen besturingssysteem wordt geïnstalleerd:
Om te testen of de update goed is geinstalleerd kun jet het volgende commando gebruiken wmic qfe list | findstr 4056887 (het nummer is van het KB nummer)
Hoe extract je een cab file van een MSU pakket expand _f:* “C:\Temp\windows10.0-kb4056887-x64.msu” C:\Temp\kb4056887
Installeer een CAB update file in Windows 10 DISM.exe /Online /Add-Package /PackagePath:c:\Temp\kb4056887\Windows10.0-KB4056887-x64.cab
Installeer een CAB file in silent mode en met een uitgestelde restart start /wait DISM.exe /Online /Add-Package /PackagePath: c:\Temp\kb4056887\Windows10.0-KB4056887-x64.cab /Quiet /NoRestart
Download and deploy Windows Defender Definitions for Windows 10 during OSD
When you are using Windows 10 and Windows Defender in Windows 10 then the definitions are as old as the .WIM file is. It is a good idea to update the definitions during OSD to make sure that the latest definitions are there.
I have used Chris Nackers post and script a lot for downloading and deploying the definitions for System Center Endpoint Protection during OS deployment in Windows 7, Windows 8. http://www.chrisnackers.com/2012/10/18/configuration-manager-2012-installing-endpoint-protection-during-a-task-sequence/
This post will cover how we can do the same for Windows Defender when deploying Windows 10, it is actually much easier as we don’t have to install the Windows Defender client as it is already included in Windows 10. My colleague Johan Schrewelius and I put together this little script that can be run as a Schedule Task that download the definitions from Microsoft to the UNC path and update the package source files in a specific DP group.
1. To start with we create the following structure, “Defender Definition“, with two underlying leaflets for each architecture, on our Package-share to which we can download the definition files:
2. Download the script from the link above and place the script in any folder, for example. “C:\Scripts” 3. Then we create the Package that will be used in Configuration Manager as wee need the PackageID in the powershell script to be able to update it when a new version is downloaded. Use the folder we created above as the package source, in this example:”\\CM2012R2\pkgshare$\Defender definitions”
4. Then we select a Standard Program as well, we need three more if both Windows 10 i386 and X64 is used as wee need two for each architecture
5. Use the following command for the first x86 program “mpam-fe.exe” with the command line x86\mpam-fe.exe as shown below, we cannot browse as we haven’t downloaded the files just yet. There are two files per architecture that needs to be installed.
6. Limit so that the application can only be run on 32-bit Windows 10.
7. Create three more programs one more for x86, the command line for the second x86 Program should be x86\nis_full.exe. Then it should look like this.
8. Then we create two more programs for X64 with the same commands but run from the x64 folder instead. So it looks like this in the console.
9. Then we distribute the content to a Distribution Point Group
10. Now we can have a PackageID as well for the package which can be found in the Configuration Manager Admin Console, in this example 06000159
11. Now we edit the script that we placed in the C:\Scripts folder and change the following lines to reflect our environment.
12. Now we create a Schedule Task that will download the definition updates and update the package on the DP’s in the Distribution Point Group.
15. Then we can test the Schedule Task to make sure everything works by right-click the new event “Download Defender Definition” and select Run:
16. Examine the contents of both x 86 and x 64 leaflet under ‘Defender Definition“, they should now contain two files each with name as shown.
17. In the Configuration Manager Admin Console check the content status for the Package so that it was updated successful.
18. Then we add the steps to the Task Sequence to install the updated definitions Add a new group “Defender Definition Updates” in the TS and restrict this to Windows 10 (32-and 64-bit).
19. Then we add the four programs that should be run, restrict them to run only on the correct architecture.
Then we are ready to deploy Windows 10 including the latest Windows Defender updates.
Auteur: diode Laatst bijgewerkt:09-07-2020 11:08
How to Import Windows Updates in the Windows reference Image from the MDT
Setup your Reference Image
The first step is to deploy Windows Image from your MDT as a Virtual Machine. You can follow the guides base on your infrastructure.
The time depends of the windows updates size and the Server\Workstation performance
When the import of the Windows updates finished successful we must Dismount the Image
Type the following command Dismount-WindowsImage -Path c:\offline -Save
The time to dismount the image depends from the Windows Updates which import and the Performance
When finish successful it's time to Import all the changes in the MDT
How to Import the Windows Image back to your MDT
Until now we have done the following:
Setup if you don't have already the Reference Image to identify which updates must download.
We have downloaded the required Windows Updates from the Microsoft Update Catalog,
We use DISM commands to import Windows Updates in the Windows Image that already have imported in MDT.
Now we need to proceed with the following tasks:
Replace the install.wim and boot.wim in the Windows Image
Re-Import the Windows Image in MDT
Change the Task Sequence
So let's proceed with the above tasks
Right click in the Operating System that you want to replace with the new up to date and select Properties
Check the Path.
Copy and paste the folder in your Download folder
Copy the install.wim and boot.wim that we use to import the Windows updates in the source folder of the Windows Image that copy in your Download folder
Delete the Operating System that you have import in MDT
Import the Windows Image in your Download folder with the new files install.wim and boot.wim in MDT.
Preparing Windows 10 Reference Computer for MDT Capture
Before you begin to capture Windows 10 image, you should prepare already deployed Windows 10 PC by installing required drivers, apps, latest Windows security updates, and performing necessary system configuration. This computer will be used to capture the Windows image.
Let’s take a look at the basic steps to follow when configuring a Windows 10 reference computer.
Install Windows 10 Pro or Enterprise edition on a reference computer;
Install device drivers;
Enable .NET 3.5 Framework support (use the DISM command: Dism /online /Enable-Feature /FeatureName:”NetFx3″);
Use Windows Update to download and install the latest security fixes;
Remove unnecessary built-in Universal Windows Platform (UWP) apps (otherwise the sysprep mail fail). You can use the following PowerShell script to remove some of the unnecessarily Windows 10 built-in Window Store Apps, like Xbox, Games, etc: Use the script Remove_Unnecessary_uwp.ps1
Install Visual C++ Redist, office applications and other tools that your users use;
Customize Windows Start Menu and Taskbar pinned apps and copy setting to new user profiles:
Disable MSFT Consumer Experience, First Logon Animation and Windows Defender(if third party security solution is used). Use the following PowerShell commands:
# Disable the Microsoft Consumer Experience
New-Item -Path HKLM:\SOFTWARE\Policies\Microsoft\Windows\ -Name CloudContent
New-ItemProperty -Path 'HKLM:\SOFTWARE\Policies\Microsoft\Windows\CloudContent' -name 'DisableWindowsConsumerFeatures' -PropertyType DWORD -Value '1'
Run Disk Cleanup for system drive C:, remove temporary files, delete the Windows Update cache (C:\Windows\SoftwareDistribution\download folder).
Creating Capture Task Sequence on MDT
The first step is to create a new Task Sequence, which will control the image capturing process.
Run Deployment Workbench console and expand the branch Deployment Shares > MDT Deployment Share;
Right click on Task Sequence and select New Task Sequence in the appeared menu;
This starts the Task Sequence Wizard. Enter Task Sequence ID (w10Capt) and Task Sequence Name (Capture Windows 10 Image);
Select Sysprep and Capture from list of predefined task sequence templates and click Next;
Choose an operating system that matches the version of OS installed on a reference computer. In this case, it is Windows 10 Pro x64 install.wim (the operating system must be pre-imported into MDT);
Choose Don’t specify a product key at this time and press Next;
Fill the fields Full Name and Organization and click Next;
Select Don’t specify an Administrator password at this time;
On Summary page click Next > Next > Finish;
Important! Before continuing, check that MDT server configuration allows to capture OS image. To do this, open MDT Deployment Share properties and switch to the Rules tab. SkipCapture option must be set to NO.
Update deployment share to regenerate boot media with WinPE environment.
How to Capture Windows 10 Reference Image with Microsoft Deployment Toolkit (MDT)?
Now you are ready to capture already installed Windows 10 image on a client computer. Power on PC and boot Windows 10 as usual. Verify that necessary applications, updates, and language packs are installed on Windows, Time Zone is configured and check other Windows settings.
Open File Explorer and specify the network path to the DeploymentShare on MDT server. In our case, the path looks like this: \\192.168.1.17\deploymentshare$. You may need to enter credentials to access shared network folder on the MDT server
Open the folder Script, find and run (by double click) the script file LiteTouch.vbs
Wait until Windows deployment Wizard starts;
Select Capture Windows 10 Image (we created it earlier) from the task sequence list;
Enter current local Administrator password, which will be used to logon Windows after reboot;
Select Capture an image of this reference computer and verify the UNC path to the folder on MDT server, which will be used to save Windows 10 WIM image file (in our case \\192.168.1.17\deploymentshare$\Captures. You should have read/write NTFS permissions on this folder. After that specify the new .wim file name;
On the next screen you need to enter the domain credentials to access shared folder on the MDT server over the network;
Wait for some time to start Task Sequence;
After completing the preparations, Sysprep task starts. Then the computer will reboot into WiNPE environment and begin to capture system image (during the process of image creating, the system will switch in the OOBE (Out-Of-Box Experience) sysprep mode, and the Windows 10 image is captured using the DISM tool); Note. Your Windows reference computer will boot from the LiteTouchPE_x64.iso boot image (with WindowsPE environment) located in the Boot folder in the Deployment Shar on the WDS server.
The process of capturing Windows 10 image takes quite a long time and after finished a wim file with Windows 10 image appeared in the Captures folder on the deployment share
Tip. If you want to make changes to the local administrator’s profile before capturing the reference image, you need to use the MDT parameter – CopyProfile=TRUE. These changes will be transferred to the WIM system image and applied to the user’s profile when you deploy a Windows 10 image on the target computer. The CopyProfile option allows you to make changes to the local administrator profile when configuring your reference Windows 10 device. They are then transferred to a .wim file during image capture and can be applied to the default user profile on deployed machines. Otherwise, any changes made to the user’s profile won’t be saved (such as wallpaper, desktop icons, Windows theme setting, etc.).
Later you can directly import this WIM file to the System Center Configuration Manager, Windows Deployment Services or MDT and use it to deploy Windows 10 to the workstations. Thus, you save a lot of time when installing drivers and applications on multiple computers.
Capture Image Window Task Sequence not Showing in the Deployment Wizard
In some cases, step 3 (Capture image) with the option to select the start of image capture doesn’t appear on client computers. The Windows Deployment Wizard simply skips the step in which you must select the “Capture an image of this reference computer” option. Instead, the user is prompted to specify computer details.
If this problem appeared after upgrading the MDT version, then most likely it is related to a bug that has been confirmed by Microsoft Premier support. The version of the script ZTIUtility.vbs contains an error. To fix it, you need to manually edit the ZTIUtility.vbs file, find the lines:
If (oTS.SelectSingleNode("//step[@type='BDD_InstallOS']") is nothing) and (oTS.SelectSingleNode("//step[@type='BDD_UpgradeOS']") is nothing)then
And replace with:
If (oTS.SelectSingleNode("//step[@type='BDD_InstallOS' and @disable='false']") is nothing) and (oTS.SelectSingleNode("//step[@type='BDD_UpgradeOS' and @disable='false']") is nothing) then
Open the customsettings.ini file and make sure that the option is selected:
[Default]
...
SkipCapture=NO
In addition, there is information that the capture window doesn’t appear if the parameter is specified:
SkipProductKey=NO
Change it to SkipProductKey=YES, or edit the DeployWiz_ProductKeyVista.vbs file. Replace the line of code:
if oProperties("DeploymentType") = "UPGRADE" then
Change to:
if Property("DeploymentType") = "UPGRADE" then
After that, run the Capture task sequence again on the client computer, and make sure that the Capture Screen now appears in the Deployment Wizard.
Auteur: diode Laatst bijgewerkt:16-10-2020 14:12
Windows update toevoegen in de WIM file met Powershell
Integrating Windows Updates into Windows 10 Install Image (ESD)
In this guide I’ll show how to integrate new Windows update packages into the offline installation image of Windows 10 or Windows 8.1 using built-in tools. The same way you can slipstream the latest security patches into the Windows Server 2012 R2 / 2016 install ISO images.
In this example, I will show the process of adding the latest cumulative security updates (December 2018) to the installation image of Windows 10 1803. So, we will need:
Windows 10 ISO installation image in format or its install.wim file;
It’s important to make sure that your Windows OS image and the updates have the same bitness and version, otherwise, an error “Update is not applicable to your computer” will appear when installing the update.
Create the following directory structure on your computer:
C:\updates\mnt is the folder in which the file install.wim with the Windows installation image will be mounted;
C:\updates\msu is a folder in which you need to place the MSU updates for your Windows version (in this example, I downloaded 2 security updates for Windows 10 1803, released in December 2018 – KB4471331 and KB4471324);
C:\updates\Win10Image\ in this folder you need to copy the install.wim file from your Windows 10 install image. In our example, we mounted and unpacked the contents of the original Windows 10 ISO image Windows10x64-1803.iso. However, it can be a wim file from a virtual machine, VM template, WDS image or image stored in another OS automatic deployment software (for example, SCCM), etc.
If your Windows 10 ISO image contains only the file c:\sources\install.esd, you can convert the ESD file to WIM file using the DISM utility: dism /export-image /SourceImageFile:"C:\updates\Win10Image\install.esd" /SourceIndex:4 /DestinationImageFile:C:\updates\Win10Image\win10pro.wim /Compress:max /CheckIntegrity
Mount the Windows 10 installation image (install.wim) to the C:\updates\mnt folder by running the following command in the command prompt as an administrator:
Tip. If your WIM image contains several versions of Windows at once, in this command you need to specify the index of the required OS version, or integrate updates for every image in turn. You can get the list of Windows editions contained in the WIM file using the command:
In our example, the image contains only one OS edition – the Windows 10 Pro with the index 1, therefore in the command we need to specify install.wim /index:1.
Now you can run the integration of suitable MSU updates located in the specified directory into the Windows 10 image:
If the system detects a wrong update (a one that is not suitable for this OS version and bitness, or if the update is already installed), it will be ignored and the corresponding information will be written to C:\Windows\Logs\DISM\dism.log.
To reduce the size of an image by deleting old update files (see the article about the WinSxS folder cleanup), run the command:
If you already have a computer with a similar version of Windows 10 that already has the latest security updates installed, you can get all the necessary update files directly from it. In this case, you don’t need to manually download MSU update files from the Microsoft Update Catalog. The trick is that Windows saves CAB files of the updates that have been downloaded from Windows Update servers or a WSUS server to the C:\Windows\SoftwareDistribution\Download folder.
Using the following command, you will start the integration of update files into the install.wim image that have already been downloaded and installed on another computer via the local network:
Start /w for /R \\Win10x64AlreadyPatchedPC\C$\Windows\SoftwareDistribution\Download\ %f in (*.cab) do dism /image:C:\updates\mnt /add-package /packagepath:”%f”
In this example, Win10x64AlreadPatchedPC is the name of the remote computer on which the necessary updates are already installed (the OS version and bitness must match). Of course, this computer should be accessible over the network, and your account should be added to the local administrators group on it. In the window that opens, you can watch the process of installing updates to the offline Windows image. DISM will try to add to your WIM image each CAB file file that was found on a remote computer.
If you encounter an error while integrating updates into a Windows image: “Error 0xc0000135 An error occurred while attempting to start the servicing process for the image located at C:\Update\mount. For more information, review the log file”, make sure you are using the latest version of DISM. For example, you are trying to modify a Windows Server 2016 image from Windows 8.1. Install the latest available version Windows Assessment and Deployment Kit (Windows ADK) for your OS and run DISM directly from the catalog C:\Program Files (x86)\Windows Kits\10\Assessment and Deployment Kit\Deployment Tools\amd64\DISM.
And the last step is to save the changes and unmount the Windows 10 image:
You only have to copy install.wim to the source directory/virtual machine or rebuild the installation ISO image, e. g., using oscdimg,UltraISO or Dism++.
If the size of your install.wim file is more than 4 GB you may encounter the error “Windows cannot open the required file D:\sources\install.wim. Error code: 0x8007000D” during Windows installation on the UEFI system. In this case, you need to split the source install.wim into smaller files with the command:
Now you can deploy your Windows install image with the latest security updates integrated on computers in your network. By regularly integrating the latest security updates into your Windows image deployed on new computers, you increase the security of your infrastructure against the latest vulnerabilities and reduce the risk of infecting new computers until they start updating from WSUS.
From the Exchange Powershell run the following This command will display the current size Get-ReceiveConnector | select identity, maxmessagesize This will set the size to 50mb and the timout to 9 min. Get-ReceiveConnector | Set-ReceiveConnector -MaxMessageSize 50mb -ConnectionInactivityTimeout 00:09:00 Then restart transport… This will set all receive to 50 mb, use with caution!
Attention: This solution requires Windows Server 2008 R2 or Windows 7, or newer, and administrative access.
Attention: This solution has not been tested on all configurations and your results may vary. For additional options, see the Other resources section.
In the Windows Start menu, either in the RunBox or the SearchBox, type regedit and press Enter.
Browse to HKEY_LOCAL_MACHINE\SYSTEM\CurrentControlSet\Control\SecurityProviders\Schannel\Protocols .
Under Protocols, add two new keys if not already present: TLS 1.1 and TLS 1.2 . To create a key, select Edit > New > Key from the main menu. Inside each key, add another key, Client .
For the client key under TLS 1.1, right-click on the right pane. Select New > DWORD (32-bit) Value.
Create a DWORD value called DisabledByDefault using the default value of 00000000 .
Repeat Steps 4 - 5 for the client key under TLS 1.2.
Restart the machine and launch Outlook, which should now connect to a server running only TLS 1.1 or 1.2.
Auteur: diode Laatst bijgewerkt:22-04-2020 14:58
Export pst vanuit Exchange 2010
New-MailboxExportRequest –Mailbox info –FilePath \\servername\Export\info.pst
Today’s article will show how to remove Exchange from Active Directory. We are going to force remove Exchange Server with ADSIEdit. Why with ADSIEdit and not from the default Exchange uninstallation wizard? Sometimes the Exchange uninstallation is not finishing or the Exchange Server can’t start anymore. This is one of the reasons when we remove Exchange Server from Active Directory with ADSIEdit. Let’s get started and look at how to remove Exchange from Active Directory.
Information
Some of these problems that can occur why we would use ADSI Edit:
Exchange Server is offline and does not start anymore
Removing previous Exchange Servers that did not uninstall properly
The uninstallation of the Exchange Server is not finishing and is in a corrupt state
Exchange Server is not uninstalled but turned off and removed from Active Directory
It’s not recommended to use ADSI Edit for Exchange tasks. There are situations that ADSI Edit is your last option.
Remove Exchange Server with ADSI Edit
Log in to the domain controller and navigate to the Start menu. Open Administrative Tools and start ADSIEdit.
Remove Exchange Server attributes
Once opened, right-click ADSI Edit and click Connect to…
Select Configuration and click OK.
Expand CN=Configuration, DC=exoip, DC=local and expand CN=Services. Right-click on CN=Microsoft Exchange and click delete. A warning will show if you are sure to delete this object, confirm with Yes. Do the same with CN=Microsoft Exchange Autodiscover, right-click and click delete.
After removing both the objects in ADSI Edit. The screen will look like the following.
Fold the connection Configuration in ADSI Edit. We don’t need it anymore.
Remove Exchange Server security groups and system objects attributes
Start Active Directory Users and Computers (ADUC). Expand the domain and verify that the Organizational Unit (OU) Microsoft Exchange Security Groups and Microsoft Exchange System Objects are present. We can remove it from here or from ADSI Edit. We are going to use ADSI Edit.
Right-click ADSI Edit and click Connect to…
Select Default naming context and click OK.
Expand DC=exoip, DC=local. Right-click on OU=Microsoft Exchange Security Groups and click delete. A warning will show if you are sure to delete this object, confirm with Yes. Do the same with CN=Microsoft Exchange System Object, right-click and click delete.
We can confirm in ADUC that both the OUs are deleted.
We are going to remove Exchange Server from Active Directory in the next step.
Remove Exchange from Active Directory
Remove the Exchange Server if it’s showing in Active Directory Users and Computers (ADUC). Right-click the Exchange Server and click Delete.
A warning is showing if you are sure to delete the Exchange Server, click Yes.
Remove automatically generated Exchange user accounts
There are a few Active Directory users that are generated automatically by Exchange. Some serve as Discovery services, others are used to monitor the health of the Exchange system. These will no longer be needed if you have permanently removed Exchange from your organization.
Go to Active Directory Users and Computers and open the Users container. Right-click the following users and click delete.
DiscoverySearch Mailbox{GUID}
Exchange Online-ApplicationAccount
FederatedEmail.GUID
Migration.GUID
SystemMailbox{GUID}
After removing it will show like the following.
Remove Exchange Server from DNS
Remove the Exchange Server from the DNS Forward Lookup Zones. Click the default zone and search in the list for the Exchange Server. Right-click the Exchange Server and click Delete.
Remove the forward lookup zones if you have any configured for Exchange Server. Right-click and click Delete.
After removing the zones, it will look like the following screen.
Remove the static IP from DHCP and any other places that you have the IP or DNS name configured. For example, the firewall and Public DNS.
Conclusion
In this article, you learned how to remove Exchange from Active Directory. Always uninstall Exchange Server with the uninstall wizard or in unattended mode. This will remove Exchange from the server and removes the server’s Exchange configuration from Active Directory. It’s important to know that removing Exchange Server with ADSI Edit is your last option to use.
Auteur: diode Laatst bijgewerkt:27-07-2020 08:19
if you want to log into Outlook Web App, you need to use the Domain\Username format
Out of the box, if you want to log into Outlook Web App, you need to use the Domain\Username format, like so;
Seeing as how Microsoft are making a big song and dance about using UPN’s to log into Office 365, I thought they might have changed from the NT4 way of doing things, but hey what do I know?
As we all know users are stupid, Domain\Username is up there with string theory and quantum mechanics. So how do you change the format to simply Username?
Solution
Log into the Exchange eAdmin Center > Servers > Virtual Directories > Locate OWA > Edit.
Authentication Tab > Use Forms Based Authentication > User name only >Browse > Select your domain > OK > OK.
Now on the server that’s hosting the OWA Website you need to Restart IIS.
iisreset /noforce
Now your users can authenticate with just their username.
Exchange Admin Center Logon Note
This will also change the login method for the Exchange Admin Center website (ECP). because by default it has this set in it’s properties;
Auteur: diode Laatst bijgewerkt:13-08-2020 20:54
Remove on-premise mailbox properties from AD account
so make a list of users who are still not migrated keep their samaccount (loggin name)name in text file such has
jon Jim sara
and run against the list of users and clear their attributes
Log in to the domain controller and navigate to the Start menu. Open Administrative Tools and start ADSIEdit.
Remove Exchange Server attributes
Once opened, right-click ADSI Edit and click Connect to…
Select Configuration and click OK.
Expand CN=Configuration, DC=exoip, DC=local and expand CN=Services. Right-click on CN=Microsoft Exchange and click delete. A warning will show if you are sure to delete this object, confirm with Yes. Do the same with CN=Microsoft Exchange Autodiscover, right-click and click delete.
After removing both the objects in ADSI Edit. The screen will look like the following.
Fold the connection Configuration in ADSI Edit. We don’t need it anymore.
Remove Exchange Server security groups and system objects attributes
Start Active Directory Users and Computers (ADUC). Expand the domain and verify that the Organizational Unit (OU) Microsoft Exchange Security Groups and Microsoft Exchange System Objects are present. We can remove it from here or from ADSI Edit. We are going to use ADSI Edit.
Right-click ADSI Edit and click Connect to…
Select Default naming context and click OK.
Expand DC=exoip, DC=local. Right-click on OU=Microsoft Exchange Security Groups and click delete. A warning will show if you are sure to delete this object, confirm with Yes. Do the same with CN=Microsoft Exchange System Object, right-click and click delete.
We can confirm in ADUC that both the OUs are deleted.
We are going to remove Exchange Server from Active Directory in the next step.
Remove Exchange from Active Directory
Remove the Exchange Server if it’s showing in Active Directory Users and Computers (ADUC). Right-click the Exchange Server and click Delete.
A warning is showing if you are sure to delete the Exchange Server, click Yes.
Remove automatically generated Exchange user accounts
There are a few Active Directory users that are generated automatically by Exchange. Some serve as Discovery services, others are used to monitor the health of the Exchange system. These will no longer be needed if you have permanently removed Exchange from your organization.
Go to Active Directory Users and Computers and open the Users container. Right-click the following users and click delete.
DiscoverySearch Mailbox{GUID}
Exchange Online-ApplicationAccount
FederatedEmail.GUID
Migration.GUID
SystemMailbox{GUID}
After removing it will show like the following.
Remove Exchange Server from DNS
Remove the Exchange Server from the DNS Forward Lookup Zones. Click the default zone and search in the list for the Exchange Server. Right-click the Exchange Server and click Delete.
Remove the forward lookup zones if you have any configured for Exchange Server. Right-click and click Delete.
After removing the zones, it will look like the following screen.
Remove the static IP from DHCP and any other places that you have the IP or DNS name configured. For example, the firewall and Public DNS.
Conclusion
In this article, you learned how to remove Exchange from Active Directory. Always uninstall Exchange Server with the uninstall wizard or in unattended mode. This will remove Exchange from the server and removes the server’s Exchange configuration from Active Directory. It’s important to know that removing Exchange Server with ADSI Edit is your last option to use
Auteur: diode Laatst bijgewerkt:01-02-2021 16:22
Get Exchange 2013 / 2016 URL'S with Powershell
<# .SYNOPSIS GetExchangeURLs.ps1
.DESCRIPTION PowerShell script to display the Client Access server URLs for Microsoft Exchange Server 2013/2016.
.PARAMETER Server The name(s) of the server(s) you want to view the URLs for.
.EXAMPLE .\Get-ExchangeURLs.ps1 -Server EX-01
Change Log: V1.00, 27/08/2015 - Initial version V1.10, 18/04/2020 - Add PowerShell virtual directory and re-order the output as in the EAC virtual directories list. #>
#Add Exchange snapin if not already loaded in the PowerShell session if (Test-Path $env:ExchangeInstallPath\bin\RemoteExchange.ps1) { . $env:ExchangeInstallPath\bin\RemoteExchange.ps1 Connect-ExchangeServer -auto -AllowClobber } else { Write-Warning "Exchange Server management tools are not installed on this computer." EXIT } }
Als je de build van een SQL server wilt controleren voor bv welk servicepack erop staat kun je dit nakijken op via de onderstaande link sqlserverbuilds
Auteur: diode Laatst bijgewerkt:22-04-2020 14:55
Lijst opvragen SQL van alle databases met uitzondering van de systeem databases.
select*from sys.databases WHERE name NOTIN('master','tempdb','model','msdb');
Auteur: diode Laatst bijgewerkt:12-06-2020 08:27
Microsoft » WSUS
WINSXS folder cleanup
Voor Windows 7 en Windows 2008 R2 wordt het volgende commando gebruikt: The following command will remove files needed for uninstallation of service packs. You won’t be able to uninstall any currently installed service packs after running this command: DISM.exe /online /Cleanup-Image /SPSuperseded The following command will remove all old versions of every component. You won’t be able to uninstall any currently installed service packs or updates after this completes: DISM.exe /online /Cleanup-Image /StartComponentCleanup /ResetBase
Auteur: diode Laatst bijgewerkt:22-04-2020 14:56
Move WSUS Content
You can move the content to another drive/location using the wsusutil.exe, find this utility in C:\Program Files\Update Services\Tools Command: wsusutil.exe movecontent %content path% %logfile% %content path% : The new root for content files. The path must exist.%logfile% : Path and filename of the log file to create. You need to create the directory on the new partition first and then use the utility with the following example:"wsusutil.exe movecontent U:\WSUS\ U:\wsusmove.log" You can also use "skipcopy" command.. -skipcopy : Indicates that only the server configuration should be changed and that the content files should not be copied "wsusutil.exe movecontent U:\WSUS\ U:\wsusmove.log -skipcopy"
When you configure the Group Policy settings for WSUS, use a Group Policy object (GPO) linked to an Active Directory container. The container contains the computers for which the updates are to be deployed.
In Client side targeting you use Group Policy objects (GPOs) to add computers to computer groups. Most of all client side targeting in WSUS is required when you might have multiple GPOs linked to several organizational units (OUs). This enables you to have different WSUS policy settings applied to different types of computers.
You can enable client-side targeting through Group Policy or by editing registry entries for the client computers. When the client computers connect to the WSUS server, they will add themselves into the correct computer group.
If you have already have an OU to which you want to apply the policy, you can use that OU. First of all on the Domain Controller, we will create a OU called Workstations. We will then move a client computer called CLIENT into the OU.
Login to the WSUS server. Launch the WSUS Console.
Click on Computers. A new windows pops up, under General Tab choose “Use Group Policy or registry settings on computers“. Click Apply and OK.
How to Configure Client Side Targeting in WSUS
Now we will configure client side targeting in WSUS through the group policy. Right-click the domain and create a policy called WSUS Update Policy. Right-click the WSUS Update Policy, click Edit.
Note – You can create multiple GPO’s if required. In case you have several OU’s and you want to apply different WSUS settings, you will need to create separate GPO’s for each, define the windows update settings and apply the policies on desired OU’s.
On the Group policy management editor, click on Computer Configuration > Policies > Administrative templates > Windows Component > Windows Update.
Double Click Configure Automatic Updates. Click Enabled to enable the policy. Under Options, for Configure automatic updating – select option 4 – Auto download and schedule the install. Set Schedule install day as Everyday and Schedule install time as 10:00. Click Apply and OK.
Double the policy Specify intranet Microsoft Update service location and specify the name of WSUS server (http://wsus.prajwal.local) for both intranet update service for detecting updates and intranet statistics server. click Apply and OK.
Right click Enable Client-side targeting and click Edit.
On the Enable Client-side targeting page, Click on Enabled to enable the policy. For the Target group name for this computer, type the name of the OU that you have created in Active Directory. click Apply and OK.
By default, Group Policy refreshes in the background every 90 minutes, with a random offset of 0 to 30 minutes. However, if you want to refresh Group Policy sooner, you can go to a command prompt on the client computer and type: gpupdate /force.
A Remote Desktop Gateway Server enables users to connect to remote computers on a corporate network from any external computer. The RD Gateway uses the Remote Desktop Protocol & the HTTPS Protocol to create a secure encrypted connection.
A 2012 RD Gateway server uses port 443 (HTTPS), which provides a secure connection using a Secure Sockets Layer (SSL) tunnel.
A Remote Desktop Gateway Provides The following Benefits:
Enables Remote Desktop Connections to a corporate network without having to set up a virtual private network (VPN).
Enables connections to remote computers across firewalls.
Allows you to share a network connection with other programs running on your computer. This enables you to use your ISP connection instead of your corporate network to send and receive data over a remote connection.
To start the install, Click on the RD Gateway Icon Highlighted in green on the Deployment Overview.
Select the server you want to install the role on.
Enter the External FQDN in the SSL Certificate Name (for this example I am using a internal address)
RDS Gateway is installing…………
Once the install is complete, you can use the links at the bottom of the install window to configure certificates and review the RD Gateway properties for the deployment.
As highlighted in red, you can seen the Gateway certificate located in the deployment properties under certificates.
Under the Tab RD Gateway, you can configure the login method and basic gateway settings.
Once the gateway is installed you will see the RD Gateway symbol appear.
Configuring the Gateway Manager
by right clicking on the local gateway server, you can open the properties.
You can configure the advanced gateway settings by navigating to the Properties.
The General tab allows you to configure maximum connection.
The SSL Certificate tab allows you to import a external certificate, create a self-signed and import from a personal store. I would recommend that you assign all certificates and apply the RD Gateway Certificate last. This is the certificates are not modified by the certificate tab in the RDS deployment properties.
The Transport Tab allows you to configure RCP-HTTP and the HTTP settings. You can change the defaults to meet corporate security requirements.
The Remote Desktop Connection Authorisation Policies (RD CAP) store enables you to configure local or central NPS Services for centralised management.
The Messaging tab is great for notifying users of outages and maintenance times or other administrator messages.
Please see the hyperlink below for information on SSL Bridging and tunnelling.
The Auditing tab allows you to select what to audit in the log files.
The Server Farm tab allows you to configure multiple Gateway servers for use in a farm (High Availability).
Connection Policies allow you to configure user access.
You can disable the redirection features for enhanced security.
The Timeouts Tab allows you to limit client sessions.
Resource authorisation Policies allow you to specify the network computers that users can connect to.
You can define user access in user groups tab.
The Network Resource tab is used to specify the network resources.
The Allowed ports Tab enables you can change the ports to enhance security.
Creating Computer Groups
when creating a High available Connection broker configuration or a Remote desktop session server Farm you need to create server groups using the manage locally stored computer groups.
Click Create Group
enter the name and the description of the computer group
For connection brokers and RDSH servers, you need to add the servers and the farm name as mentioned in this tab.
Share this:
Auteur: diode Laatst bijgewerkt:22-04-2020 14:57
RDS 2012: How to login to RDWeb page without typing Domain Name?
Logon to RDWeb site with just username and password, saves time and confusion for the users. We can make user to bypass typing Domain Name with few easy steps.
There is two steps I did. One add “DomainName\” by script and second steps to change the text from “Domain Name\User name:” to just “User name:” in logon page.
To do the first step, follow the instructions below.
For Windows 2012 R2:
1. Remote Desktop to your RD Web Access Server.
2. Open Windows Explorer and go to C:\Windows\Web\RDWeb\Pages. Backup webscripts-domain.js file.
3. Open Notepad as (run as) Administrator. Open C:\Windows\Web\RDWeb\Pages\webscripts-domain.js
4. Find strDomainName variable text. It looks like this:
var strDomainName = “”;
5. Modify the above text with your NetBIOS domain name like below: (CONTOSO is my example domain, replace it with yours).
var strDomainName = “CONTOSO”;
6. Save the file and close the Notepad.
For Windows 2012:
1. Remote Desktop to your RD Web Access Server.
2. Open Windows Explorer and go to C:\Windows\Web\RDWeb\Pages. Backup renderscripts.js file.
3. Open Notepad as (run as) Administrator. Open C:\Windows\Web\RDWeb\Pages\renderscripts.js
4. Find “strDomainUserName = objForm.elements(“DomainUserName”).value;” and add the following script blob
Now user can just provide username and password. Domain name will be added if it is not present.
Now it the RD Web access log on page will still display Domain Name\User name:. That can be changed very easily also. Follow the steps below for the second step.
For Windows Server 2012 and Windows Server 2012 R2:
1. Remote Desktop to your RD Web Access Server.
2. Open Windows Explorer and go to C:\Windows\Web\RDWeb\Pages\en-US. Backup login.aspx file.
3. Open Notepad as (run as) Administrator. Open C:\Windows\Web\RDWeb\Pages\login.aspx
That’s all. If you ever update with RDS patches, you will have to redo these steps again.
Auteur: diode Laatst bijgewerkt:07-06-2021 12:41
How to deploy Remote Desktop Services (RDS) 2019
Installing Remote Desktop Services (RDS) on Windows Server 2019 appears to take many steps, but in reality is quite easy. In this article, we dive into how to install these services in a domain environment that requires two servers.
Prerequisites
There are only two necessary steps before we embark on installing RDS. Those are:
All servers are domain joined
There are at least two available servers
The reason that we need two servers is that the RD Licensing role will go on the second server rather than all on one, as this is considered a Microsoft best practice. In this tutorial, we use the Domain Controller as the RD License server which would not be considered best practice. The reason for doing this in this tutorial is to keep the installation simple.
Installation of Remote Desktop Services base roles
In this first installation series, we are going to add the following roles to our primary RDS server:
RD Connection Broker
RD Web Access
RD Session Host
Installation steps
Within Server Manager on the primary RDS server that we are installing, open the Add Roles and Features Wizardand select Remote Desktop Services installation.
2. For this tutorial we are going to choose Quick Start, but if you need further control over the installation process, you can use the Standard Deployment to modify more options during installation.
3. Next, we will choose Session-based desktop deployment, as this is a common RemoteApp and desktop session model that is commonly used in more traditional RDS deployments.
4. In the Server Selection, choose the server where we are installing RDS.
5. Choose Restart the destination server automatically if required and click on Deploy to start the installation.
6. Verify that all roles have succeeded in installation before moving on to the next steps.
Add secondary server
For this tutorial, we are going to use the Domain Server as our RD Licensing server, but to easily install that role, we can add an additional server to the Server Manager.
Add the secondary server by right-clicking on the All Servers, choosing Add Servers, and then picking the server from Active Directory.
2. Navigate to Remote Desktop Services and click on the green plus for RD Licensing.
3. The Add RD Licensing Servers screen will appear and that will let you add the secondary server as a target for the RD Licensing role.
4. Click on Add to install the role on the secondary server.
5. Verify that the installation is complete by seeing the green plus replaced by the proper icon in RD Licensing.
Add RD Gateway Role
Finally, we need to add the RD Gateway Role to our primary RDS server.
Under the Remote Desktop Services screen, click on the green plus over RD Gateway.
Select the primary RDS server to use for the installation of this role.
3. Name the self-signed SSL certificate with a Fully-Qualified Domain Name.
4. Click on Next and then Add to install the role to our primary RDS server.
Configure deployment properties
Now that all the roles have been installed, we can configure the actual deployment properties.
Navigate to the Remote Desktop Services screen and under the Tasks dropdown, click on Edit Deployment Properties.
2. Leave the default settings on the RD Gateway screen and click on the RD Licensing menu item.
3. Choose Per User at the RD Licensing screen. You can choose either, but for the purposes of this tutorial, we want Per User.
4. Note the URL of the RD Web Access screen as this will be used later to access the applications deployed.
5. For the purposes of testing, you can leave the certificates Not Configured, and finally click on OK to save the deployment configuration.
If you do want to configure a certificate, you will have to do this for each and every role service individually
Verify Remote Desktop Services
By default, a QuickSessionCollection was created upon installation that contains Calculator, WordPad, and Paint as RemoteApps. This can be used to test the RDP deployment.
Navigate to the IIS URL originally located in RD Web Access, or you can use https://localhost/rdweb/ if you are located on the RDP server itself, to test IIS.
2. Log into the IIS RDS session using domain credentials.
3. Finally, launch a remote connection, either one you have defined or a default RemoteApp.
Remote Desktop Services may have a lot of steps to deploy, but once setup, it is easy to configure and use. RemoteApps offer a lot of flexibility as does the ability to define collections of RDP connections that can be offered to users.
Auteur: diode Laatst bijgewerkt:27-12-2022 15:41
Veeam
After restore with Veeam domain controller not able to login
According to this Veeam document, and implied by this Microsoft document, a restored (or cloned) DC will boot into DSRM, and there's no way to tell from the login screen. It does flash up briefly stating this is what's happening (even if you select "Start Windows Normally"), but you have to be quick to see it.
Logging in (successfully) with the DSRM password confirmed this was the case.
The Veeam article suggests opening a command prompt and running the following:
bcdedit /deletevalue safeboot
shutdown -t 01 -r
The MS article advises the same but doesn't give the commands.
Rebooting after this allowed a successful login with domain credentials.
Auteur: diode Laatst bijgewerkt:22-04-2021 08:21
Windows Server 2019: Deactivating UAC
Deactivating UAC in Windows 2008 R2 was possible via running msconfig (for example winkey+r -> msconfig), going to the Tools tab and launching "Change UAC settings".
There, you select "Never notify" to disable UAC.
The same approach is still available in Windows Server 2019, though UAC is still active after you selected "Never notify".
You have the option to turn off UAC via registry by changing the DWORD "EnableLUA" from 1 to 0 in "HKEY_LOCAL_MACHINE\SOFTWARE\Microsoft\Windows\CurrentVersion\policies\system".
You will get a notification that a reboot is required. After the reboot, UAC is disabled.
Auteur: diode Laatst bijgewerkt:17-12-2023 16:04
Astaro UTM 9
USB Install Astaro Firewall (UTM)
Creating Your Own Sophos UTM Bootable USB Installation Drive
Installing Sophos UTM from a boot CD is straightforward and works well. The only problem with this old school method is that Sophos UTM appliances do not ship with optic drives, and this is true for most modern hardware.
Most current operating systems can be installed from USB (Windows, OSX, Linux, etc) and it is often the preferred method because these OS installers are aware that they are installing from USB.
Sophos provide a USB installation option called the Smart Installer for UTM hardware appliances, but this is a special USB drive that emulates a CD, essentially working around the issue.
This article steps you through the process of preparing and creating your own Sophos UTM bootable USB installation drive. Please note that since this is a workaround it is not a supported method by Sophos. It is handy for building and rebuilding your home and test equipment but for your serious production hardware please follow the official Sophos recommended method of attaching an external optical drive.
There are two options when downloading the ISOs. One for hardware appliances and another for software appliances. If you have a physical Sophos appliance use the first option, if you are building your own on a virtual machine or PC, use the second option.
Step 2. Download and run Rufus
Rufus is a USB utility that allows you to create bootable USB drives from ISO images, and it is available from http://rufus.akeo.ie. There are a number of similar utilities available which you should be able to use if you prefer.
The executable does not need to be installed. Simply run the exe as an administrator on your system.
In the Format Option section set the Create a bootable disk using to ISO and select the Sophos UTM ISO downloaded in step 1.
Click Start and accept the warning that the USB drive will be erased
The process take a few minutes and will notify you when it has completed.
Step 3. Boot and Build from USB
Here is the theory of what happens next. When the system boots from the USB drive it will be running an installation subset version of Linux. This version runs completely in RAM. For it to make use of files on the USB drive, the drive needs to be mounted. To do this we are going to switch between the installer and a console session. We will use the console the mount the USB drive, making the files available, and then switch back to the installer and continue from there.
Insert your USB drive into your device, in my case a Dell PC, power it on and invoke the boot selector by pressing F12 and then selecting the USB drive option. Depending on the hardware, you may find it automatically boots from USB or you might have to access the BIOS and set it as the preferred boot device. This can normally be accessed by pressing the Del or F2 key during POST.
The Sophos UTM installer should start and display the black Welcome screen. Press Enter to start the installation.
At the blue Introduction Screen press Alt + F2. This will switch you to a console screen.
Mount your USB drive with the following command:
mount /dev/sdb1 /install
Press Alt + F1 to switch back to the installer and carry on with the installation. If you run into an installation error, see the troubleshooting section below.
That’s all there is to it! Once the installation finishes you can remove the USB drive and reboot.
Conclusion
You don’t have to run around trying to find writable CD’s or USB optical drives to build a physical Sophos UTM device. You also don’t have use the Sophos UTM Smart Installer USB drive. Although, if you are routinely building Sophos UTMs from scratch, it might be worth the convenience. For more details on the Smart Installer check out http://www.sophos.com/en-us/support/utm-downloads/utm-smart-installer.aspx
Troubleshooting
If you are reading this it means you probably ran into an installation error. If you do not explicitly mount the USB drive as described, you may receive this error during the ‘formatting’ stage:
install.tar wasn’t found on the installation media
The installation expects the install.tar file to be located in:
/install/install/install.tar
You can check this by switching back to the console with Alt + F2 and using
cd /install/install
ls
It should list the following items:
build; install.md5; install.tar; rpm
If this error occurs, it is most likely that your USB device was not detected as /dev/sdb1. To verify this you can use the following command
dmesg | grep sd
Look for your usb device in the list, it should show the device name and size. Change the mount command to reference the correct sdx1 device id. For example, instead of
mount /dev/sdb1 /install
mount /dev/sdc1 /install
use something like:
mount /dev/deviceid install
Auteur: diode Laatst bijgewerkt:28-09-2020 15:55
Install certificate in UTM 9
Maak een cert aan op een linux machine voor de astaro utm
openssl pkcs12 -export -in <cert van de provider>.crt -inkey <naamkey>.key -out utmcert.p12
Note: In case you received multiple certs from the signing company please first of all combine all certs to one file with notepad or in Linux use the command below:
cat cert1.crt cert2.crt > combined.crt
Convert .CRT trusted Certificate Authority to .PEM
Als je een melding krijgt dat je het aantal gelicenseerde ip's bent overschreden kun je dit wissen d.m.v. een van de 2 onderstaande opties.
###Resetting the IP count-
1) Login to unit via SSH (you must have the "loginuser" and "root" user passwords set via the web interface).
2) Type "cc" and hit enter
3) Type "licensing" and hit enter
4) Type "active_ips@" and hit enter
5) Type "=[]" and hit enter
6) Type ".." and hit enter
7) Type "user_limit_exceeded$" and hit enter
8) Type "=0" and hit enter
9) Tyipe "exit", to quit, and hit enter.
At this point the IP table should be flushed and the unit should no longer be in violation of the license.
Please keep in mind that this is a quick fix to a licensing issue.
If you really have too many devices on your network, please consider purchasing a license for the devices you have.
###Delete from database
psql -U postgres -d reporting -c "delete from accounting where srcip in (`/usr/local/bin/count_active_ip.plx --debug 2>&1 | grep "Executing SQL:" | cut -b20-`);"
Auteur: diode Laatst bijgewerkt:28-09-2021 15:54
Microsoft » ADFS
Powershell view Certificates
Firstly open PowerShell and run cd Cert: , this will allow you to run the below commands.
Get-ChildItem -path cert:\LocalMachine\My – This will show you all certificates in the Local Machines Personal Store
Get-ChildItem -path “Thumbprint” -recurse – This will search all certificate stores for the thumbprint you specified
Get-ChildItem -ExpiringInDays 30 -recurse – This will show you all certificates expiring in the next 30 Days , obviously you can change the value for your requirements
Auteur: diode Laatst bijgewerkt:01-03-2021 19:59
Networking
Subnet calculation
Sunny Table
Als je 3 netwerken nodig hebt kijk je wat het beste past, 2 is te weinig maar bij 4 passen er 3 in dus selecteren we subnet 4. Dan hebben we per netwerk 64 hosts ter beschikking met een subnetmask van /26
Subnet
1
2
4
8
16
32
64
128
256
Host
256
128
64
32
16
8
4
2
1
Subnetmask
/24
/25
/26
/27
/28
/29
/30
/31
/32
Subnet
1
2
4
8
16
32
64
128
256
512
1024
2048
4096
8192
16384
32768
65536
Host
65536
32768
16384
8192
4096
2048
1024
512
256
128
64
32
16
8
4
2
1
Subnetmask
/16
/17
/18
/19
/20
/21
/22
/23
/24
/25
/26
/27
/28
/29
/30
/31
/32
Network ID
Subnet mask
Host ID Range
# of Usable Host
Broadcast ID
LET ER WEL OP DAT JE ER 2 MOET AFHALEN VOOR HET BROADCAST ID EN HET NETWERK ID. Netwerk id is het eerste adres van je subnet en de broadcast het laatste adres.
Voor de opdracht is er een network id van 192.168.4.0 /24 Er moeten 3 netwerken worden gecreerd Het 4e netwerk is over...
GLPI: reset the password of the glpi account
In this tutorial, I will explain how to reset GLPI account password.
After installing GLPI, you are invited to change the password of the glpi account (super-admin) which has the glpi password.
What if you “forgot” the account password and the rest of the user accounts are using an Active Directory that is no longer online? It’s simple, you can no longer connect?
I will explain here, how to reset the default password to the glpi account.
To reset the password, there are two “prerequisites”:
Not having deleted the glpi account
Have access to the database
In the tutorial, I am using PHPMYADMIN.
1. Access the GLPI installation database and find the glpi_users 1 table.
2. In the glpi_users table, find the user account glpi 1.
3. Change the password, modify the password field of the account by :$2y$10$p..X4No3kbL9zq3s9yyXuuNdbHN78Bd/j8aiInj5L7Fo1Hg3hJMFa which matches the hash of the word glpi.
For the update, there are several solutions:
Double click from the list and update the field
Use the edit page
Use the following SQL query :
update glpi_users set password='$2y$10$p..X4No3kbL9zq3s9yyXuuNdbHN78Bd/j8aiInj5L7Fo1Hg3hJMFa' where name = 'glpi';
4. Go to the GLPI authentication page and use the glpi account with the glpi password.
5. Once logged in, the security message for the account is displayed.
------------------------------------------------------------------------------------------------------------------------------------------------------------- A linux installation
systemctl enable glpi-agent systemctl start glpi-agent systemctl status glpi-agent
Auteur: diode Laatst bijgewerkt:30-08-2024 11:42
Microsoft » Powershell
Archive a file
# Create-NewFileAfterArchive.ps1
# Full path of the file $file = 'c:\temp\important_file.txt'
#Full path to the archiving folder $archiveFolder = "c:\temp\archive_$(get-date -Format 'dd-MMM-yyyy_hh-mm-ss-tt')\"
# If the file exists, move it to the archive folder, then create a new file. if (Get-Item -Path $file -ErrorAction Ignore) { try { ## If the Archive folder does not exist, create it now. if (-not(Test-Path -Path $archiveFolder -PathType Container)) { $null = New-Item -ItemType Directory -Path $archiveFolder -ErrorAction STOP } ## Move the existing file to the archive. Move-Item -Path $file -Destination $archiveFolder -Force -ErrorAction STOP Write-Host "The old file [$file] has been archived to [$archiveFolder]" -ForegroundColor Red } catch { throw $_.Exception.Message } } # Create the new file try { $null = New-Item -ItemType File -Path $file -Force -ErrorAction Stop Write-Host "The new file [$file] has been created." -ForegroundColor Yellow } catch { Write-Host $_.Exception.Message }
Auteur: diode Laatst bijgewerkt:10-04-2023 16:41
Create a file
# Create-NewFile.ps1
# Full path of the file $file = 'c:\temp\important_file.txt'
#If the file does not exist, create it. if (-not(Test-Path -Path $file -PathType Leaf)) { try { $null = New-Item -ItemType File -Path $file -Force -ErrorAction Stop Write-Host "The file [$file] has been created." -ForegroundColor Yellow } catch { throw $_.Exception.Message } } # If the file already exists, show the message and do nothing. else { Write-Host "Cannot create [$file] because a file with that name already exists." -ForegroundColor Red }
Auteur: diode Laatst bijgewerkt:10-04-2023 16:44
Add content to a file
# Update-FileContents.ps1
#Full path of the file $file = 'c:\temp\important_file.txt'
# If the file exists, append a new GUID value in the file. if ([System.IO.File]::Exists($file)) { try { $newValue = ((New-Guid).Guid) Add-Content -Path $file -Value $newValue -ErrorAction STOP Write-Host "The file [$file] has been updated with [$newValue]" -ForegroundColor Yellow } catch { throw $_.Exception.Message } }
# If the file does not exist, show a message and do nothing. else { Write-Host "The file [$file] could not be updated because it does not exist." -ForegroundColor Red }
Create a website and add a certificate with powershell
Import-Module WebAdministration
# Create the new website New-Website -Name DemoSite -PhysicalPath C:\inetpub\wwwroot\
# Notice all web bindings created Get-WebBinding
# Find the bindings only on the website we just created (Get-Website -Name 'DemoSite').bindings.Collection
# Add a new binding to the site bound to all IP address for our SSL connection New-WebBinding -Name 'DemoSite' -IPAddress * -Port 443 -Protocol https
# Notice the bindings now (Get-Website -Name 'DemoSite').bindings.Collection
# Create a self-signed certificate assigning it to a variable to use in the next step $cert = New-SelfSignedCertificate -CertStoreLocation 'Cert:\LocalMachine\My' -DnsName 'demosite.spacecowboy.local'
# Attach the certificate to the SSL binding $certPath = "Cert:\LocalMachine\My\$($cert.Thumbprint)" $providerPath = 'IIS:\SslBindings\0.0.0.0!443' ## Binding to all IP address and to port 443 Get-Item $certPath | New-Item $providerPath
Auteur: diode Laatst bijgewerkt:13-04-2023 11:41
Install IIS and dotnet core with powershell
# Install IIS and dotnet core Install-WindowsFeature "Web-Server","Web-Windows-Auth","Web-ASP","Web-Asp-Net","Web-Asp-Net45" -IncludeManagementTools
# To list all Windows Features: dism /online /Get-Features # Get-WindowsOptionalFeature -Online # LIST All IIS FEATURES: # Get-WindowsOptionalFeature -Online | where FeatureName -like 'IIS-*'
Address = IP adres op de reeks aangemaakt in de opnsense firewall DNS = interne dns en eventueel externe dns
AllowedIPs = er zijn 2 optie's
0.0.0.0/0 = al het verkeer inclusief internet gaat door de firewall 10.50.50.0/24 = Alleen dit subnet gaat er doorheen, je kunt het aanvullen met meerdere subnets (internet gaat dan over de eigen aansluiting) split tunneling
Auteur: diode Laatst bijgewerkt:27-07-2023 18:03
Spamhaus Blacklist aanmaken
Op de opnsense ga naar Firewall -> Aliases en maak een nieuwe alias aan. Neem de settings over
-------------------------------------------------------------------- Installation -------------------------------------------------------------------- 01. Log into the Linux device 02. Run the following commands in a terminal window: # update software repositories sudo apt update # install available software updates sudo apt upgrade -y # install prerequisites sudo apt install curl wget zip git -y # install Apache HTTPD and MySQL sudo apt install apache2 mariadb-server mariadb-client -y # install PHP components sudo apt install php7.4 php7.4-curl php7.4-common php7.4-gmp php7.4-mbstring php7.4-gd php7.4-xml php7.4-mysql php7.4-ldap php-pear -y # configure the MySQL database sudo su mysql_secure_installation 03. Press Enter to login as root 04. Type N and press Enter to not switch to unix socket authentication 05. Type Y and press Enter to set a root password, type the password twice to confirm 06. Type Y and press Enter to remove anonymous users 07. Type Y and press Enter to disallow root login remotely 08. Type Y and press Enter to remove the test database 09. Type Y and press Enter to reload privilege tables 10. Run the following command to login into MySQL: mysql -u root -p 11. Authenticate with the root password set earlier 12. Run the following commands to create the phpIPAM database and database user CREATE DATABASE php_ipam; GRANT ALL ON php_ipam.* to 'php_ipam_rw'@'localhost' IDENTIFIED BY 'P4P1p@m!!'; FLUSH PRIVILEGES; EXIT; exit 13. Continue with the following commands: # git clone phpipam to the webroot sudo git clone https://github.com/phpipam/phpipam.git /var/www/html/phpipam # cd into the new directory cd /var/www/html/phpipam # checkout the latest release sudo git checkout "$(git tag --sort=v:tag | tail -n1)" # set the owner of the phpipam directory sudo chown -R www-data:www-data /var/www/html/phpipam # copy sample config file sudo cp /var/www/html/phpipam/config.dist.php /var/www/html/phpipam/config.php # edit config.php sudo nano /var/www/html/phpipam/config.php 14. Update the database connection details $db['host'] = '127.0.0.1'; $db['user'] = 'php_ipam_rw'; $db['pass'] = 'P4P1p@m!!'; $db['name'] = 'php_ipam'; $db['port'] = 3306; 15. Below the database connection, add the following line to define the BASE variable define('BASE', "/phpipam/"); 16. Press CTRL+O, Enter, CTRL+X to write the changes 17. Continue with the following commands: # enable mod_rewrite sudo a2enmod rewrite # restart apache2 service sudo systemctl restart apache2
-------------------------------------------------------------------- phpIPAM Web Installer -------------------------------------------------------------------- 01. Open a web browser and navigate to http://DNSorIP/phpipam 02. The phpipam Installation web installer should be load 03. Click the New phpipam installation button 04. Click the Automatic database installation button 05. Complete the database form as follows MySQL/MariaDB username: php_ipam_rw MySQL/MariaDB password: P4P1p@m!! MySQL/MariaDB database location: 127.0.0.1 MySQL/MariaDB database name: php_ipam 06. Click the Show advanced options button 07. Uncheck Create new database and Set permissions to tables ≫ Click the Install phpipam database button 08. Once the database is initialized, click the Continue button 09. Enter and confirm an admin user password ≫ Click Save settings 10. Click the Proceed to login button 11. Login with the username admin and the admin password set earlier 12. Welcome to phpIPAM
Auteur: diode Laatst bijgewerkt:27-06-2023 19:34
Hollywood hacking terminal in Ubuntu
De tool is heel toepasselijk Hollywood genoemd. In principe draait het in Byobu, een op tekst gebaseerde Window Manager en het maakt een willekeurig aantal splitjes van willekeurige grootte windows en voert een lawaaierige tekstapp in elk van hen uit.
byobu is een interessante tool ontwikkeld door Dustin Kirkland van Ubuntu. Meer hierover in een ander artikel. Laten we ons concentreren op het installeren van deze tool.
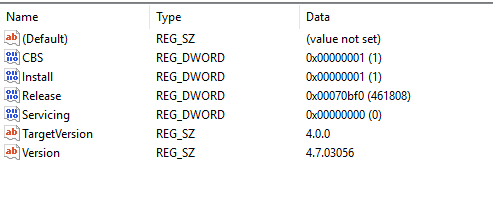
Ubuntu-gebruikers kunnen Hollywood installeren met behulp van deze eenvoudige opdracht:
sudo apt install hollywood
Als de bovenstaande opdracht niet werkt in uw Ubuntu of andere op Ubuntu gebaseerde Linux-distributies zoals Linux Mint, elementaire OS, Zorin OS, Linux Lite enz., Kunt u de onderstaande PPA gebruiken:
sftp> cd sftpuser sftp> mkdir sftp-test sftp> ls sftp-test sftp>
sudo adduser user sudo passwd user sudo usermod -aG sftp user id user cd /mnt/backup/ sudo mkdir user sudo chown -R user:sftp /mnt/backup/user sudo chmod 700 /mnt/backup/user /user
Auteur: diode Laatst bijgewerkt:25-07-2023 17:03
FOG Project - A free open-source network computer cloning and management solution
Step 2: Install MariaDB database server sudo apt install mariadb-server -y sudo systemctl status mariadb sudo systemctl enable mariadb sudo mysql_secure_installation First, create a password for the root account. To secure your database server, type ‘Y‘ for the remaining prompts to achieve the following: Remove anonymous users Disallow remote root login Remove test database Reload privilege tables
let’s create a PHP script to test out PHP integration with Apache.Run the following command echo "<?php phpinfo(); ?>" | sudo tee /var/www/html/info.php
CREATE USER 'user'@'%' IDENTIFIED BY 'password_user'; (Change password_user in password for user)
GRANT ALL PRIVILEGES ON *.* TO 'user'@'%' WITH GRANT OPTION;
FLUSH PRIVILEGES;
Auteur: diode Laatst bijgewerkt:13-09-2024 15:53
How to Install Multiple PHP Versions on Ubuntu 22.04
PHP is a programming language used for developing web applications. You must install PHP packages on a Ubuntu system to run the application written on it. Generally, it is used to create e-commerce websites, blogs, and API applications. If you’re looking for an easy way to install PHP on Ubuntu 22.04, look no further. In this blog post, we’ll show you how to do it quickly and easily.
We will use the Ondrej PPA for installing PHP on Ubuntu 22.04 LTS system. Which contains PHP 8.3, 8.2, 8.1, 8.0, 7.4, 7.3, 7.2. 7.1, 7.0 & PHP 5.6 packages. You can install any of the versions as required for your application. The new application developers are suggested to use the latest PHP version ie PHP 8.1.
In this tutorial, you will learn how to install PHP on Ubuntu 22.04 LTS system. This tutorial is also compatible with Ubuntu 20.04, and 18.04 systems.
Step 1: System Update
First, log in to Ubuntu 22.04 via console. Then update the Apt cache and upgrade the current packages of the system using the following command:
sudo apt-get update
sudo apt-get upgrade
When prompted, press y to confirm the installation.
Step 2: Installing Multiple PHP Versions on Ubuntu 22.04
The easiest way to install multiple versions of PHP is by using the PPA from Ondřej Surý, who is a Debian developer. To add this PPA, run the following commands in the terminal. The software-properties-common package is needed if you want to install software from PPA. It’s installed automatically on the Ubuntu desktop but might miss on your Ubuntu server.
The SURY repository contains PHP 8.2, 8.1, 8.0, 7.4, 7.3, 7.2, 7.1, 7.0 & PHP 5.6. As the latest stable version of PHP is 8.0, but many websites still required PHP 7. You can install any of the required PHP versions on your system.
Step #4 Change the default port if you want sudo nano /etc/default/shellinabox change port 4200 to any port you want.
Step #5 Restart Shell In A Box sudo service shellinabox restart
Done !!!
Auteur: diode Laatst bijgewerkt:09-05-2024 13:11
Add Private key to Ubuntu server
Generate key with putty key generator
Save the private key
Saving with or whitout Key passphrase
copy the public key from the screen
Make sure there is a .ssh folder in the user/home directory change to home directory user cd .ssh ls
edit the authorized_keys file and paste the public key and save the file sudo vim authorized_keys
edit the /etc/ssh/sshd_config file sudo vim /etc/ssh/sshd_config file
Remove the # from PubkeyAuthentication yes AuthorizedKeysFile .ssh/authorized_keys .ssh/authorized_keys2
#PasswordAuthentication yes and change yes to no service sshd restart
Add server to Putty
Start Putty and add the conection settings
Go to connection - SSH - Auth - Credentials and add the private ppk file with browse
Select Session and save the configuration
Click on open to start the session with out password
Auteur: diode Laatst bijgewerkt:17-05-2024 12:34
Raspberry Pi
Uptime Kuma config for Docker Containers
Step-1: 1. goto portainer 2. open uptime kuma container in docker 3. Click on "Duplicate/Edit" under "Actions" 4. goto advanced container settings - Select "Volumes" Tab 5. Click on "+map additional volume" to add new volume mapping 6. At the bottom in container field type - /var/run/docker.sock & click on "bind" 7. At the bottom in host field type - /var/run/docker.sock 8. finally click on "Deploy the Container" and wait till container is re-installed and restarted
Step-2: Open & login uptime kuma web interface and we'll setup docker host into it before monitoring: 1. Goto "settings" 2. Click on "Docker Host" - "Setup Docker Host" 3. In "Setup Docker Host" Screen - Type the Friendly name - my name click on "test" then a "Connected susseccufy" message will flash 4. now goto "Add new monitor" 5. In General - Select Monitor type as: "Docker Container" 6. Give "Friendly Name" 7. Give "Container Name / ID", i suggest to give Container ID. 8. Select "Docker Host" from drop down menu, the server created in step 3 9. Save - This will create docker container monitor and a green screen with success message will flash.
Auteur: diode Laatst bijgewerkt:02-10-2023 19:52
Privet key toevoegen op de Raspberry Pi
In the user dir create a folder
sudo mkdir ~/.ssh sudo chmod 700 ~/.ssh sudo vim ~/.ssh/authorized_keys
paste the content of the public key
sudo chmod 600 ~/.ssh/authorized_keys
In putty configuration -> Connection -> SSH -> Auth -> credentials Voeg daar je *.ppk file toe
Om via de webbrowser toegang te krijgen tot een SSH prompt installeer je shelinabox
sudo apt install shellinabox
Daarna open een webbrowser en browse naar https://server_ip:4200/
Auteur: diode Laatst bijgewerkt:03-10-2023 17:17
Magento
Backup functie Magento aanzetten
How to backup Magento 2
Enable the Magento 2 backup tool.
Set the open files’ limit value.
Backup Magento 2.
Schedule Magento 2 backups (Optional).
Verify the Magento 2 backup.
Note: Adobe deprecated the built-in backup feature of Magento 2, starting with version 2.3.0 and above. Make sure you test the Magento 2 backup functionality in a staging environment before using it on a production server.
Step 1: Enable the Magento 2 backup tool
Log in to your Magento server as the filesystem owner and navigate to the project root directory. Then, run the following CLI command to enable the Magento backup utility:
Before creating a backup, make sure you update the open files’ limit value for the Magento file system user. A low open files limit value can lead to failed backups and rollbacks using the Magento backup tool.
Adobe recommends setting the open files limit value to 65536 or more. However, you can use a larger value if your system supports it.
Run the following command as the Magento filesystem user to update the open files limit:
$ ulimit -s 65536
Verify the ulimit is updated using:
$ ulimit -n
Step 3: Backup Magento 2
You can backup Magento 2 from the terminal using the following CLI command syntax:
You can also specify one or more options to back up different parts of your Magento store. For instance, you can create a backup of the database and file system using the following command:
$ php bin/magento setup:backup --code --db
Once the command executes successfully, you should see the following output:
Alternatively, you can also backup Magento 2 via the admin panel by navigating to System > Tools > Backups and selecting one of the following three options:
System Backup.
Database and Media Backup.
Database Backup.
On the Backup options page, enter a name for your backup and tick the Maintenance mode checkbox to switch your online store to maintenance mode during the backup process. Once you’ve configured the backup options, click Ok to initiate the backup.
The backup process can take anywhere from a few seconds to several minutes, depending on the size of your store, your server configuration, and the type of backup you’ve selected. Once it completes, you’ll see a message confirming the backup is complete as follows:
Step 4: Schedule Magento 2 backups (optional)
Optionally, you can schedule daily, weekly, or monthly Magento 2 backups on a predefined schedule from the admin panel.
Log in to the Magento admin panel and navigate to Stores > Settings > Configuration > Advanced > System.
Expand the Backup Settings section and update it as follows:
Enabled Schedule Backup: Set it to Yes.
Scheduled Backup Type: Select the backup type.
Start Time: Set the time to create the backup.
Frequency: Set it as Daily, Weekly, or Monthly.
Maintenance Mode: Set it to Yes.
After that, click Save Config to update your settings.
Step 5: Verify the Magento 2 backup
Once you create a Magento 2 backup, you can verify it from the admin panel by navigating to System > Tools > Backups. The newly created backup will display inside a grid as follows:
Alternatively, you can verify it in your terminal using the following Magento CLI command:
$ php bin/magento info:backups:list
You should see the following output:
How to restore a Magento 2 backup
Warning: Restoring a Magento 2 backup erases all the data generated by your ecommerce store after the backup was created. This action is permanent, and you cannot reverse it.
You can roll back to a Magento 2 backup from the admin panel by navigating System > Tools > Backups and clicking on the Rollback hyperlink of your preferred backup.
On the next page, configure the following settings:
User Password: Enter your Magento admin password.
Maintenance mode: Click the checkbox to enable maintenance mode during the rollback.
FTP: This setting is optional. Tick the checkbox to use the FTP connection.
Finally, click Ok to proceed.
Alternatively, you can restore a Magento 2 backup via the command line. To do that, log in to your server as the Magento file system owner, navigate to the Magento project root, and execute the following command to output a list of existing backups:
$ php bin/magento info:backups:list
The command to restore a backup varies based on the backup type. For instance, you can restore a database backup using:
When you execute a command, Magento will prompt you to verify if:
You want to proceed with the backup.
You want to keep the backup file after the rollback completes.
Respond “y” or “N” to both prompts. As the rollback completes, you should see an output similar to:
Final thoughts: How to backup Magento 2 using the in-built backup tool
We’ve explained the basics of the Magento 2 backup tool and the steps to back up Magento 2 in two ways. Although Adobe has only deprecated the tool in Magento version 2.3 and later, it’s possible that it might remove the tool in a future release.
Auteur: diode Laatst bijgewerkt:11-12-2023 19:09
How to Move Magento 2 from Localhost to Server
Magento 2 store setup can be complicated. You may not want to offer a half baked setup to your potential customers only to disappoint them.
The solution is to first set up the Magento 2 store in localhost. You may have spent hours building your store. Once you finish implementing and configuring every feature, you can go LIVE!
This post shows the method to move Magento 2 from localhost to server.
Steps to Move Magento 2 from Localhost to Server:
Step 1: Export Database from Localhost
Connect to localhost software like XAMPP, WAMP etc and login to phpMyAdmin
Visit the store’s database
At the top of the menu, click Export then hit Go button.
Now, you will be able to download the database files as the .sql extension. You can also save it in .zip form.
Step 2: Make Magento Files in Zip Format
Select all the files and folders from localhost and make a zip file.
Go to htdocs folder (if you are using XAMPP) or www folder (if WAMPP)
Navigate to Magento folder and compress the files in zip format
Step 3: Uploading Magento Files to Web Server
For uploading database, you need to upload via cPanel that is your website server. But before that, you need to create a user and give database rights.
Login to cPanel.
Go to phpMyAdmin
In phpMyAdmin, create a new database by clicking on the new button. Make sure you remember database name, username and password.
Step 4: Import Database
After creating a database, you need to import the database file which you have downloaded in step 1.
You can leverage two methods for importing the database.
The first method for importing the database is by using the command line.
1
mysql -p -uusername database_name<backup_file.sql
The second method for importing the database is by using PHPMYADMIN.
Find out the Import option at the top of the menu and click on it
To import the database, hit Choose File and upload a file having .sql extension
You can also create a subfolder for a new domain. If you do not wish to do, you can continue with normal directory also.
Upload the zip file and extract that you created in step 3.
Step 6: Change env.php file for Accessing the Magento System to New Database
Once you finish uploading the zip folder with extraction, you will now need to make changes in env.php file.
Go to app/etc/env.php. In env.php file, you will have to make changes related to the information of the new database that you just created on your domain. Make changes in a username, name and password while importing the database to your new domain. Locate in the file where this information is suitable. You will find something like the below image.
Step 7: Find Out your New Domain Name for Magento System
After the completion of step 6, you need to make save the changes.
Click Save in the top right
If you wish to select and edit the file, you need to upload it again to the right directory. For that, go to the Magento database and search Table Core_Config_Data.
Replace localhost URL to domain name in “web/unsecure/base_url”
Step 8: Run Below Commands
Run all the below commands and you will manage to access your Magento store.
1
2
3
4
php bin/magento setup:upgrade
php bin/magento setup:static-content:deploy -f
php bin/magento cache:flush
php bin/magento cache:clean
That’s it.
Auteur: diode Laatst bijgewerkt:16-12-2023 08:11
Proxmox
How To Disable Proxmox VE Subscription Notification
cd /usr/share/javascript/proxmox-widget-toolkit/
cp proxmoxlib.js proxmoxlib.js.bak
vim proxmoxlib.js
on line 563 you find
if (res === null || res === undefined || !res || res .data.status.toLowerCase() !== 'active') { Ext.Msg.show({
change this to
if (false ) { Ext.Msg.show({
systemctl restart pveproxy
close your browser,connect to the server and you should find the subscription no longer appears